Homepage Guide
1. Home Page Interface Description
-
Click on the 'OPCOUNT' section on the left to access the homepage interface on the ODPM.
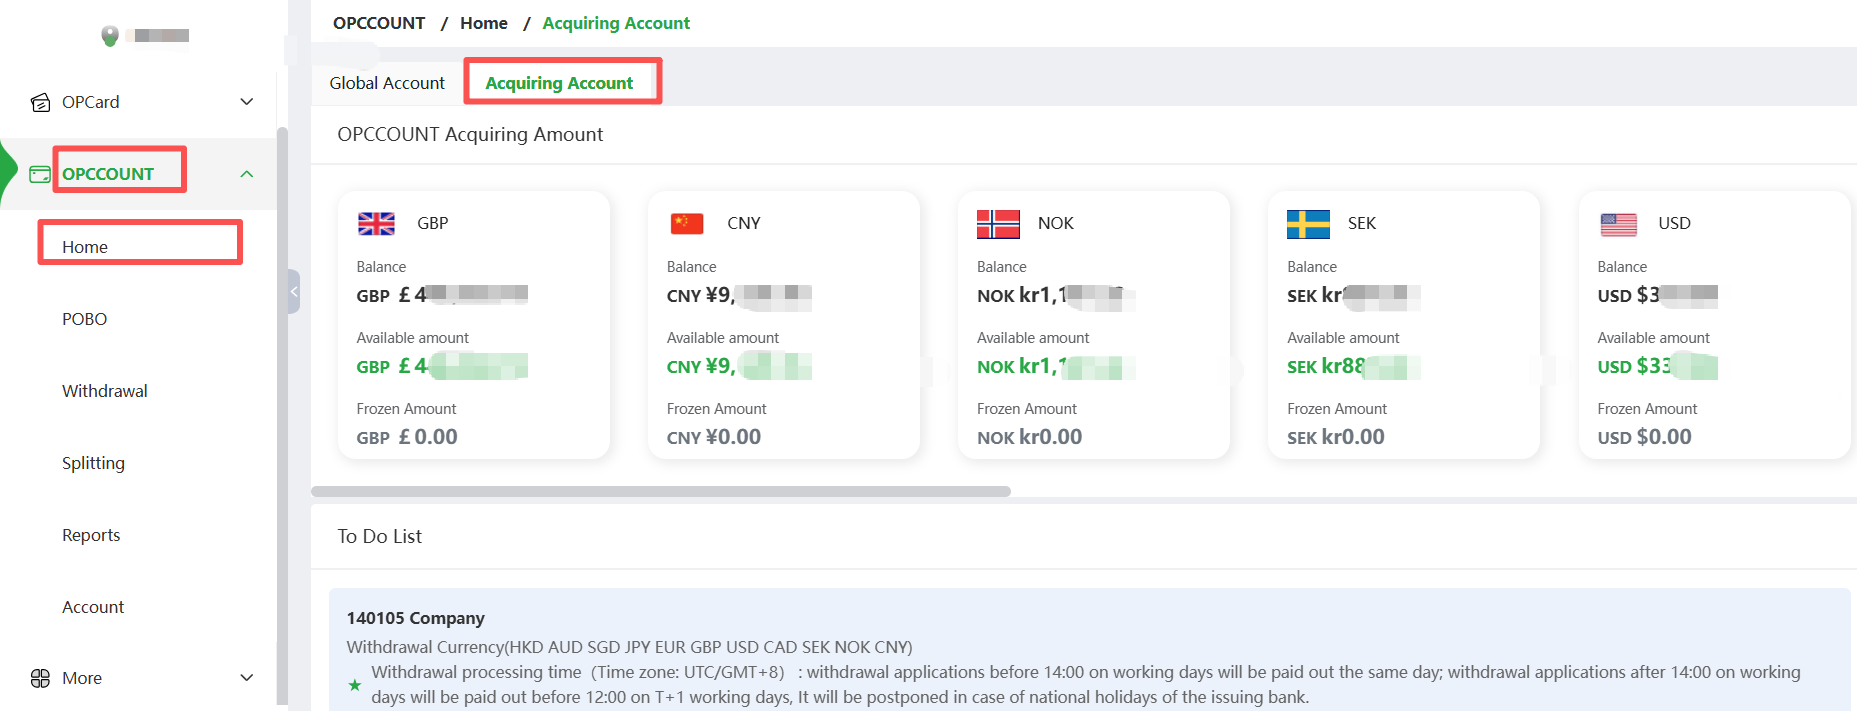
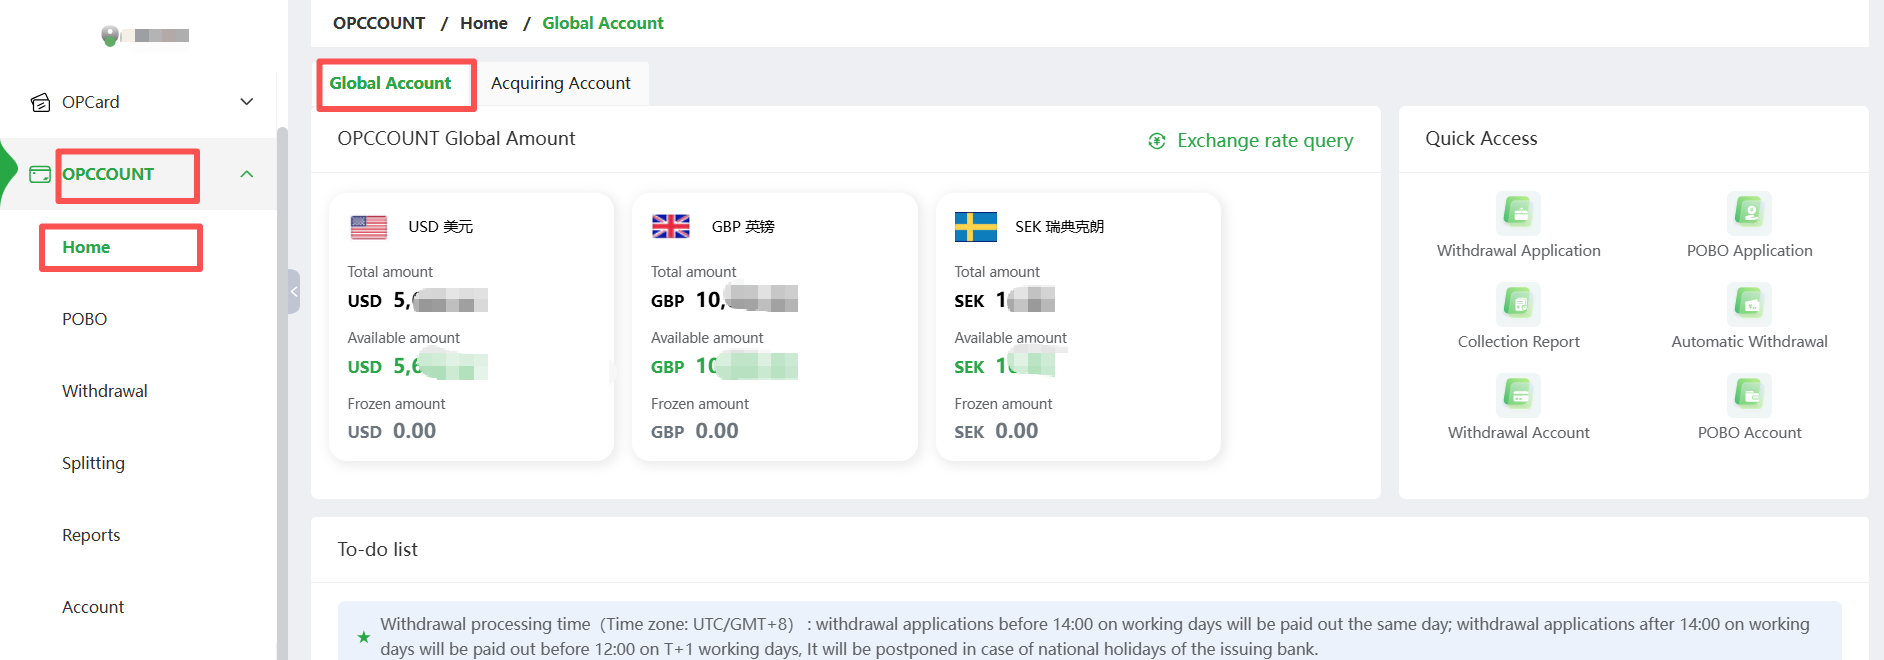
Interface Description: OPCCOUNT is divided into 【Acquiring Account】 & 【Global Accounts】. If your company has activated the corresponding accounts, the respective account sections will be displayed. For details, please contact your dedicated Account Manager or Business Manager. -
【Acquiring Account】Homepage displays the currency and amount, along with real-time transaction records for account verification, withdrawals, and POBO.
-
【Global Account】Homepage (if applicable) displays billing currency amounts and real-time operation records for account review, withdrawals, POBO. It also features currency exchange rate query and quick access.
-
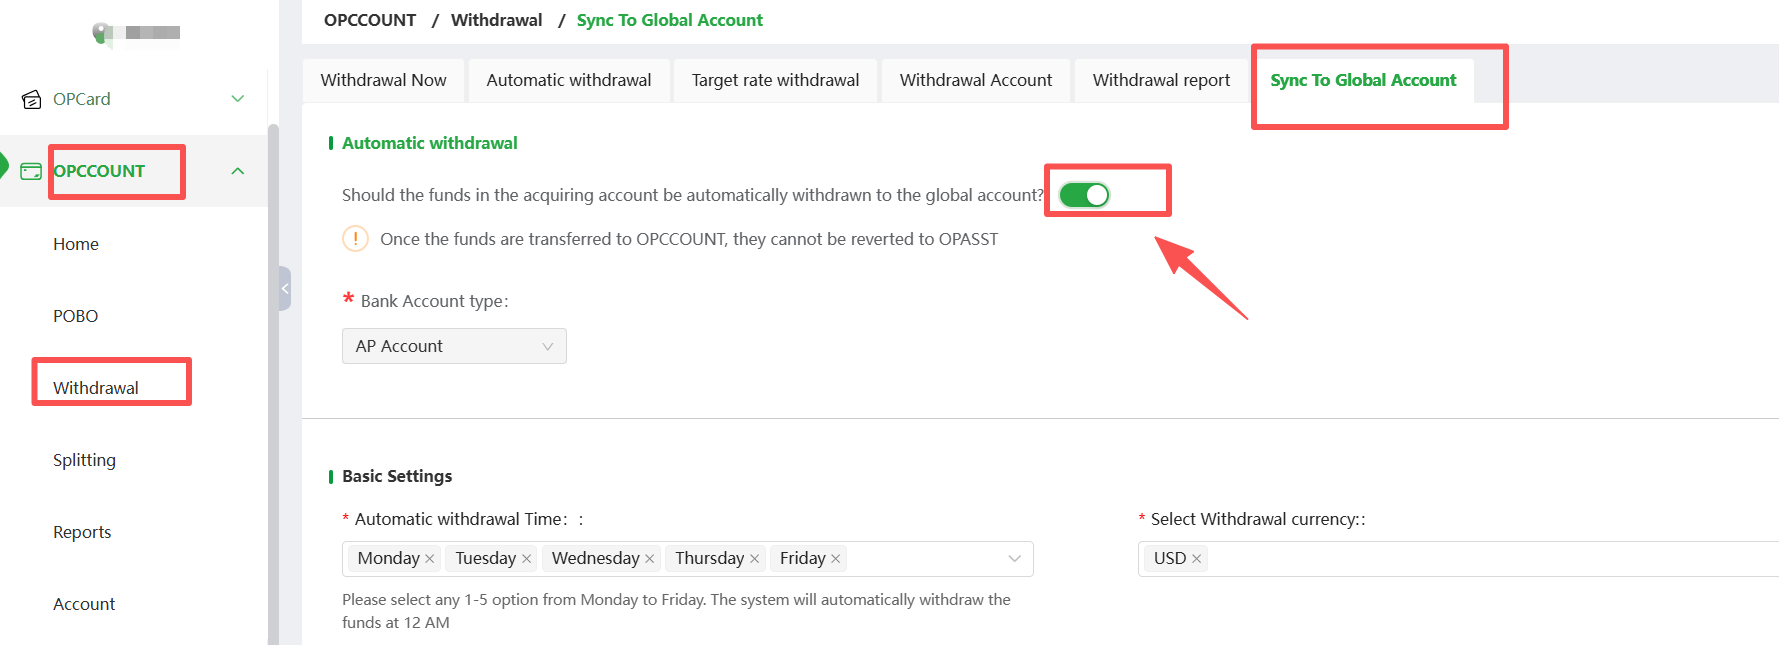
Funds will first be settled into the 【Acquiring Account】. If you require funds to be synchronized to your 【Global Account】 (if applicable), you must first enable “Sync To Global Account” in the 【Acquiring Account】. Activate the “Should the funds in the acquiring account be automatically withdrawn to the global account?” button, configure the “Automatic Withdrawal Time” and “Select Withdrawal Currency”. Note that once enabled, funds will be withdrawn to the 【Global Account】 at 12:00 PM daily. Only proceed with withdrawal after funds have been synchronized to the 【Global Account】.
-
【Global Account】(if applicable) Exchange rate query function description: View current reference exchange rates based on account currency and withdrawal currency.
-
【Global Account】(if applicable) Quick access function description:
- Withdrawal Application: Can initiate a withdraw application
- POBO Application: Can initiate a POBO application
- Collection Report: Can check the OPPCOUNT collection report
- Automatic Withdrawal: Can configure the automatic withdrawal function
- Withdrawal Account: Can manage the withdrawal account
- POBO Account: Can manage the POBO account
- Amount description: (1)Available amount: Amount that can be initiated for withdrawal
(2)Frozen amount: The amount of money that needs to be temporarily frozen in the account of OPCCOUNT platform due to compliance and other reasons, and cannot be initiated to withdraw
Withdrawal Guide
2. Withdrawal Operation
-
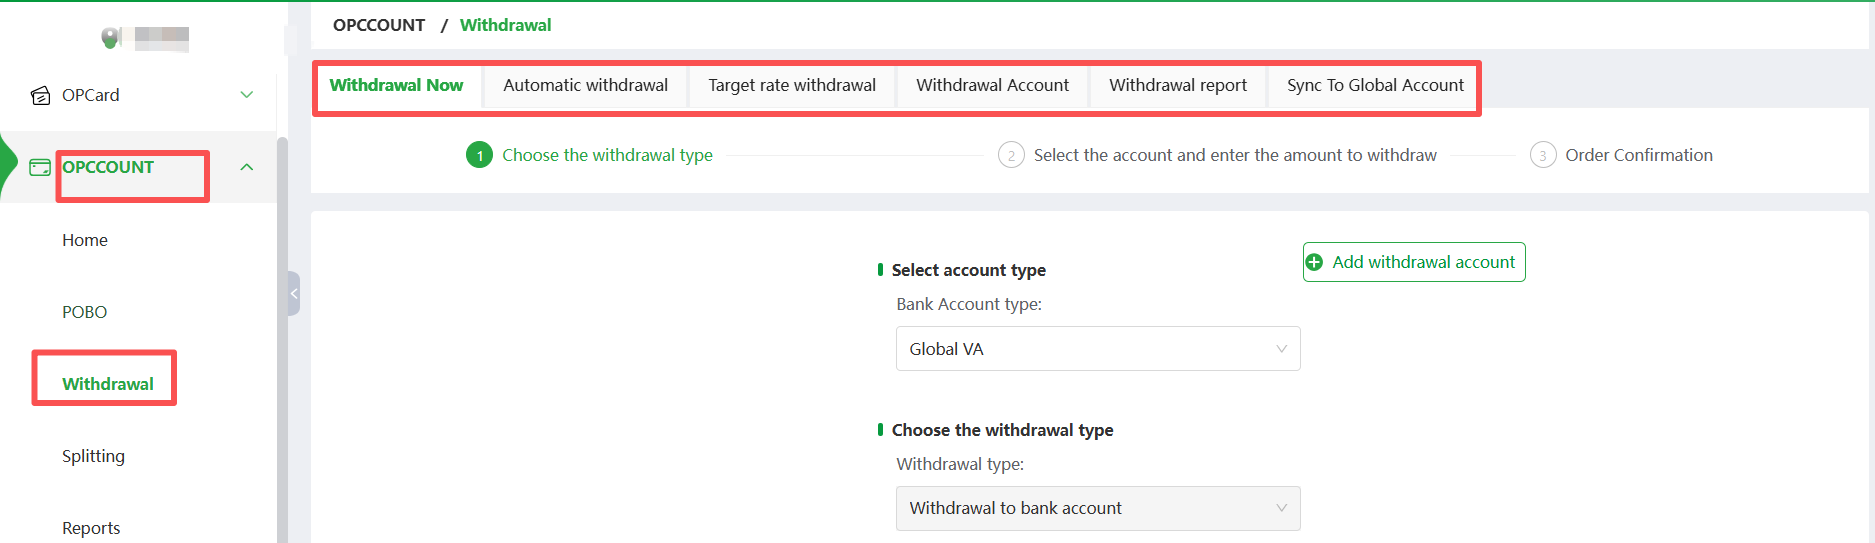
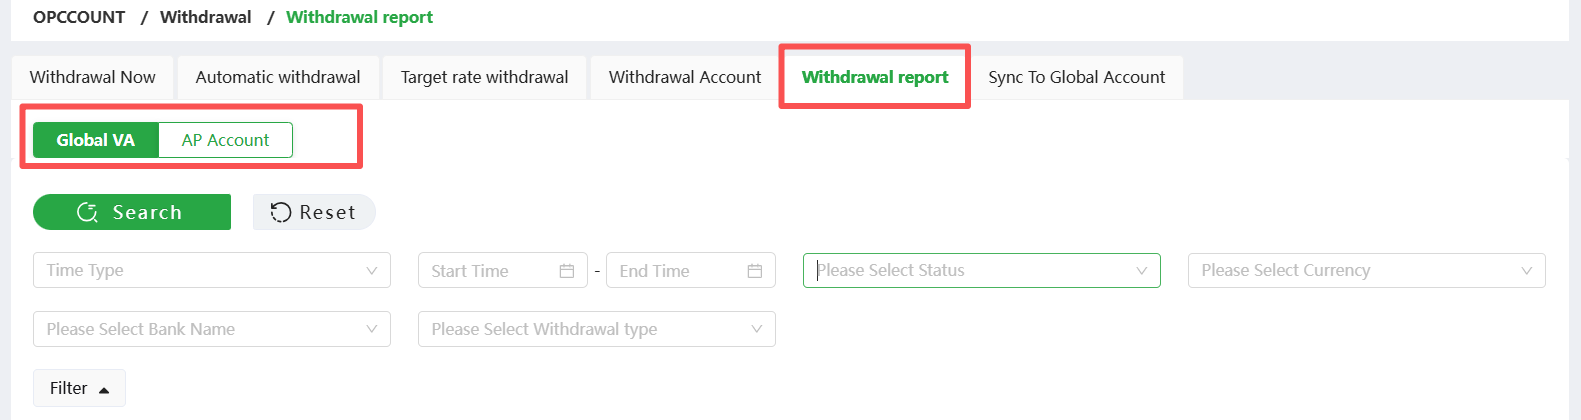
Click to enter the【Withdrawal】, which contains six subsections: 【Withdrawal Now】【Automatic withdrawal】, 【Target rate withdrawal】, 【Withdrawal Account】, 【Withdrawal report】, and 【Sync To Global Account】. The Sync to Global Accounts feature requires your company to have activated a global account.
-
When accessing the withdrawal page for the first time, a new withdrawal account must be created since no available withdrawal account exists.
3. Add A New Withdrawal Account
- Click to enter the 【Withdrawal Account】to add a new withdrawal account
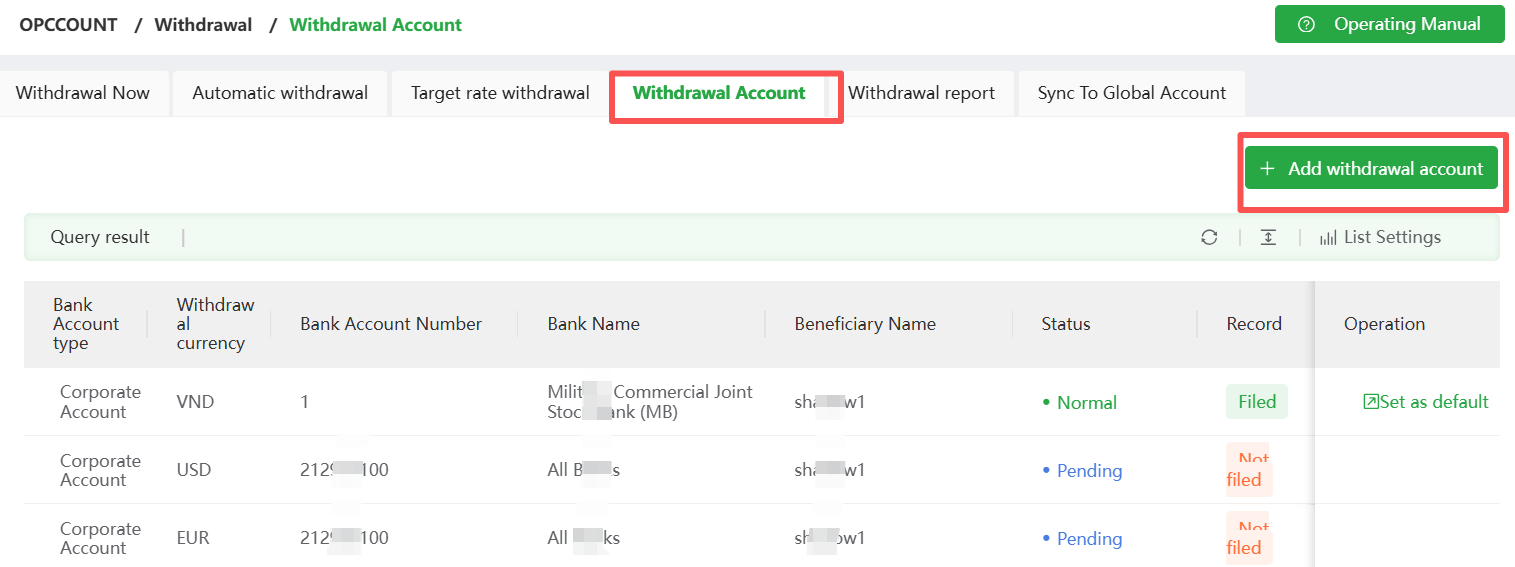
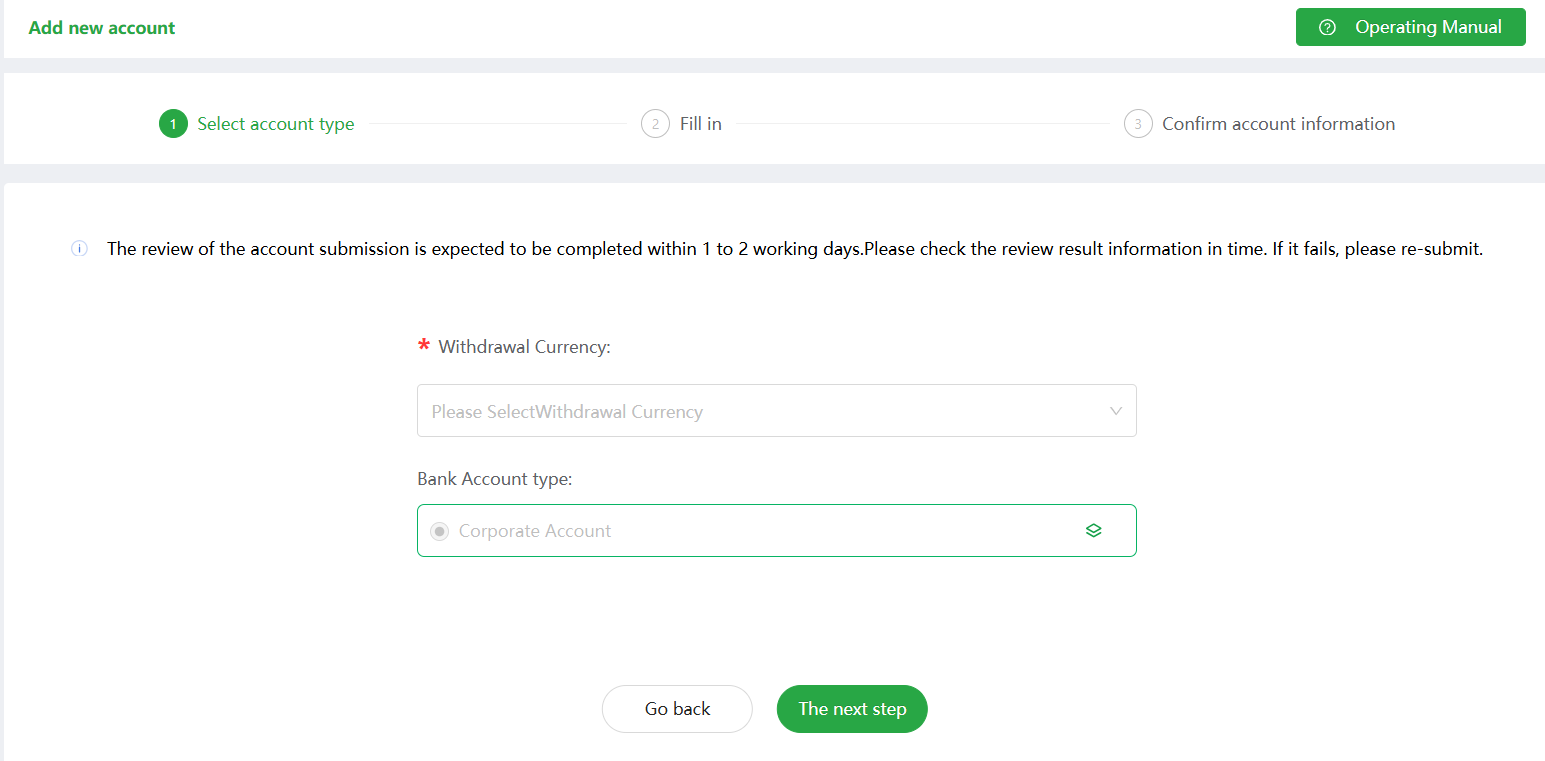
(1)Select the currency for withdrawal and the account type (RMB or foreign currency)
-
Select Account Type: Corporate Account or Personal Account, Fill in the corresponding information and submit Note: Attachment information is to upload bank account supporting documents (e.g., permit for opening bank account, e-receipt, statement, seal card, bank statement)
-
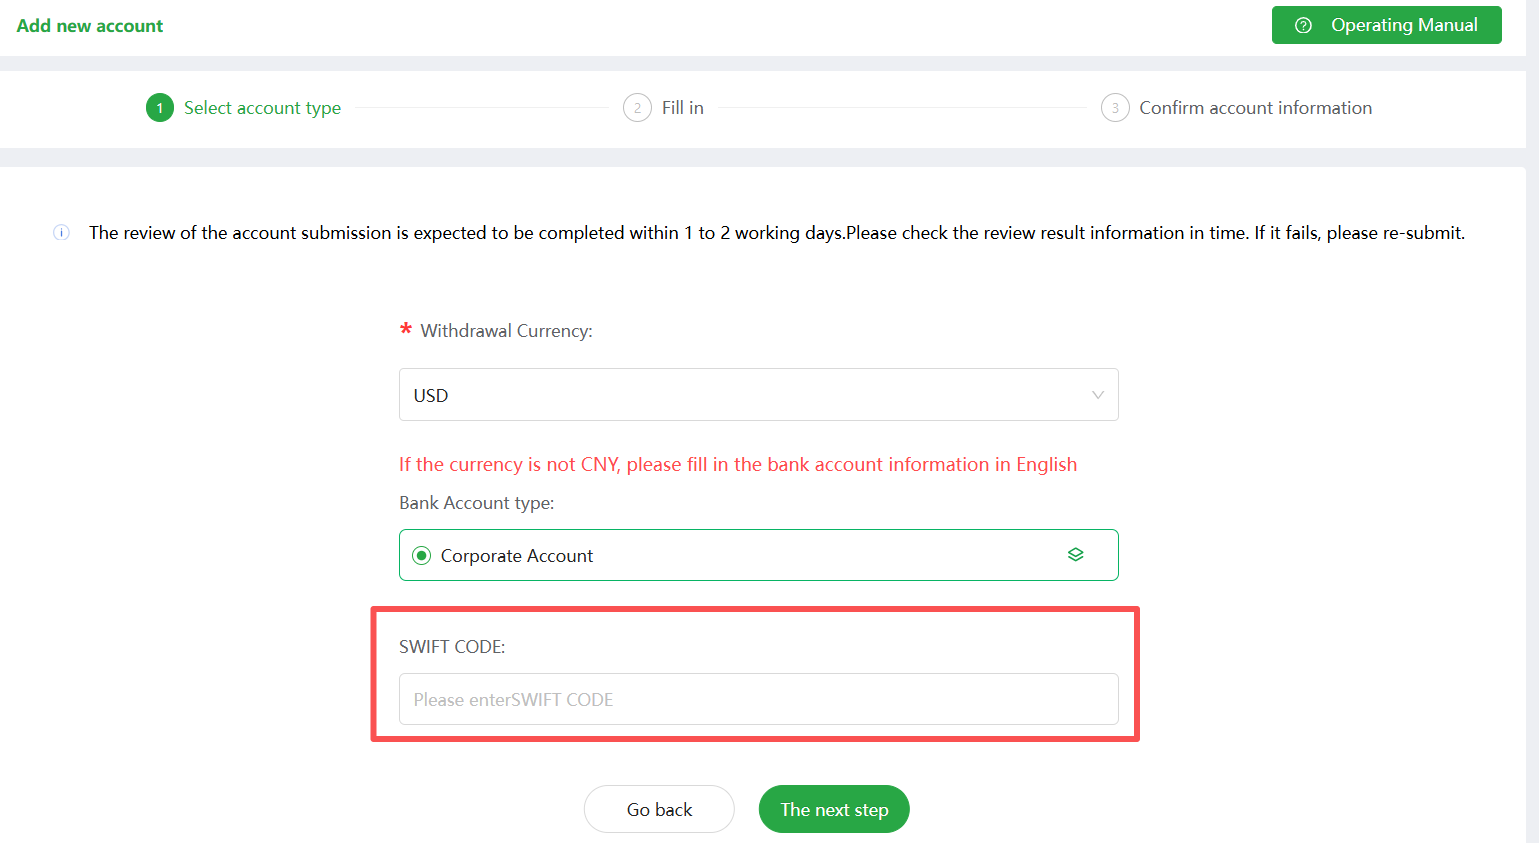
Requirements for submission of information: When withdrawing funds in currencies other than CNY, you will need to fill in the required field: Swift Code. Note: Swift Code can not have spaces before and after, and must be entered in English, click on the next step. (The system will extract the 5th-6th digit of Swift Code (Country Code) and automatically convert it to the country/region where the bank is located.
(2)Fill in bank account information
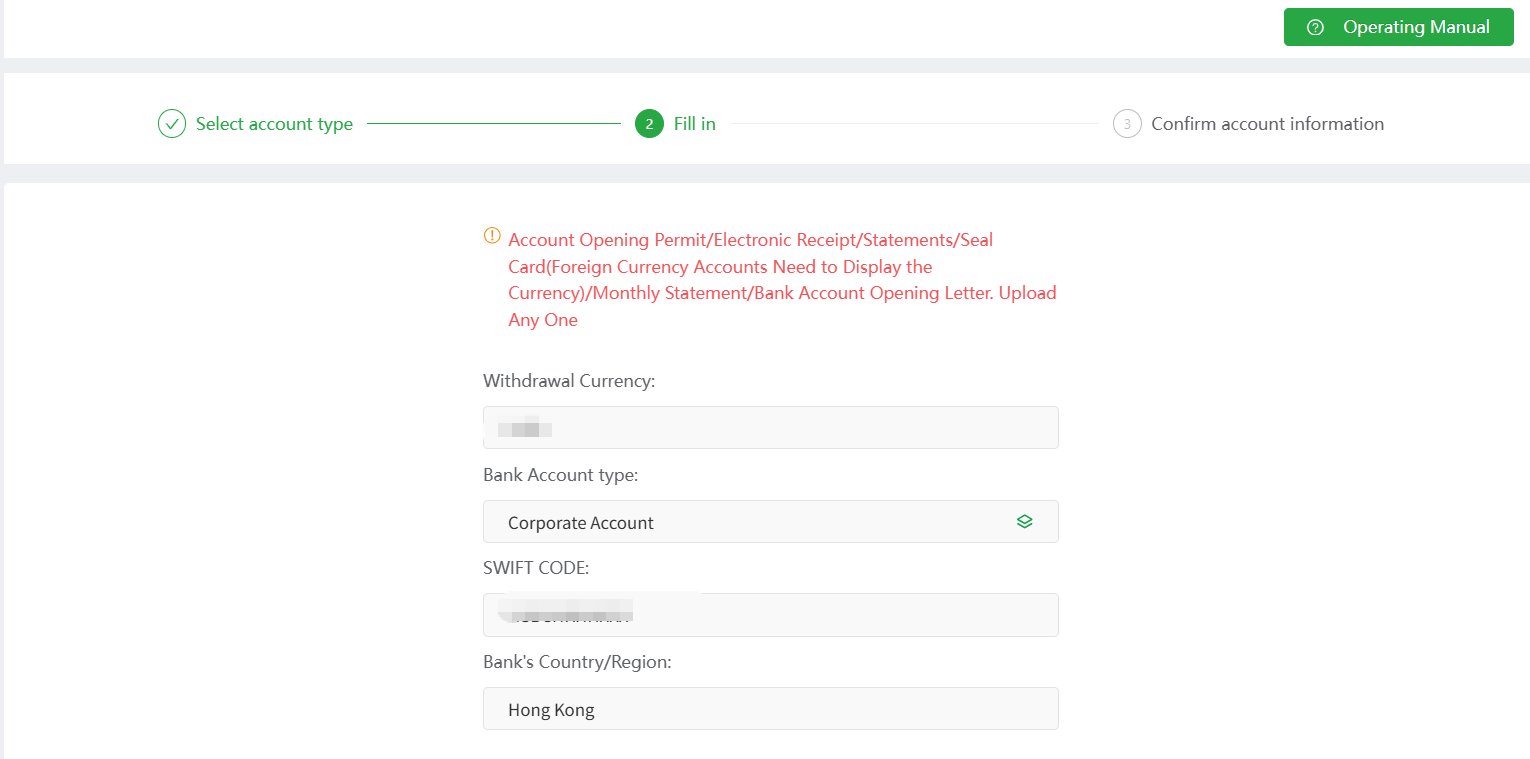
- Confirm account information.
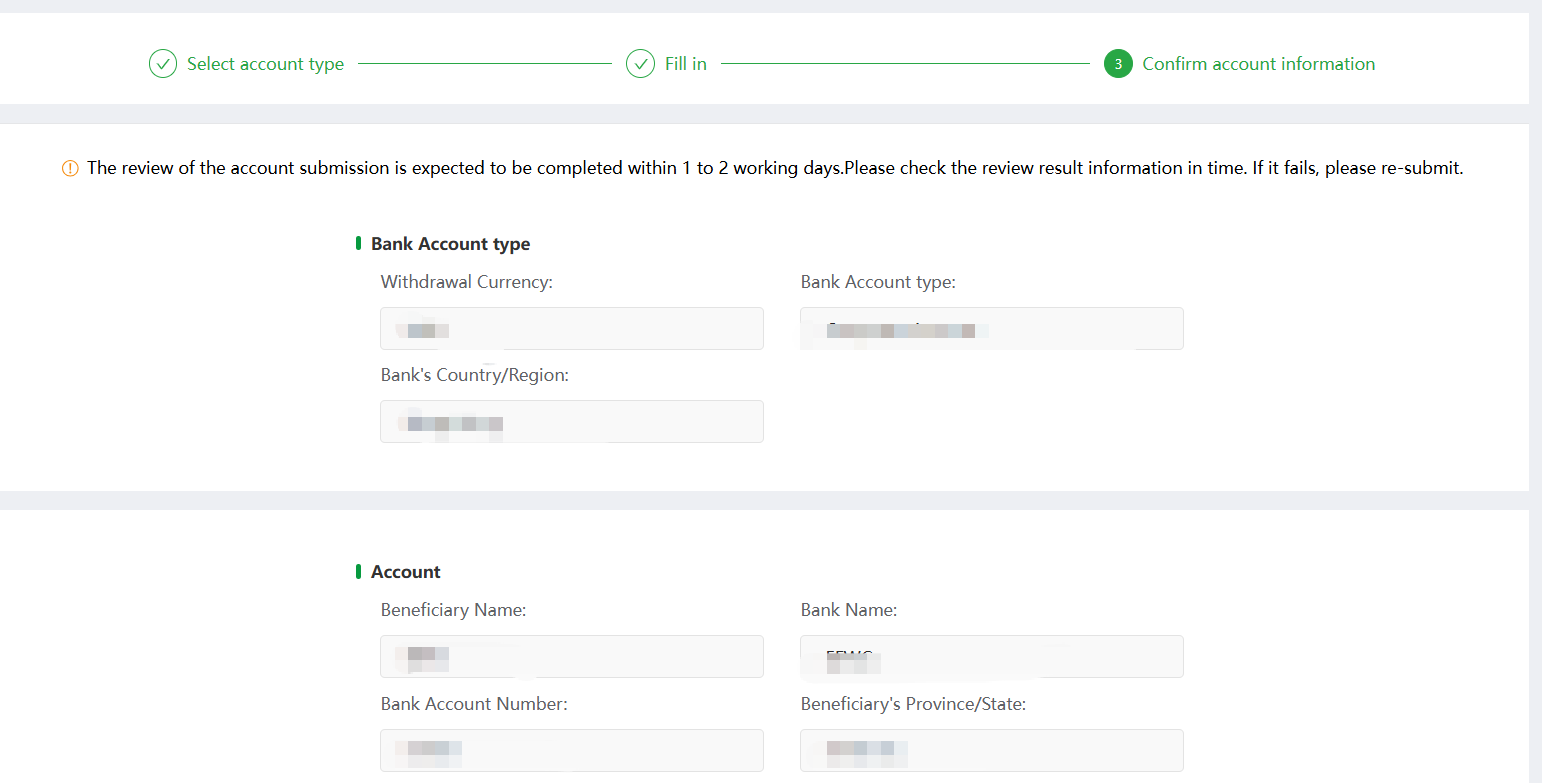
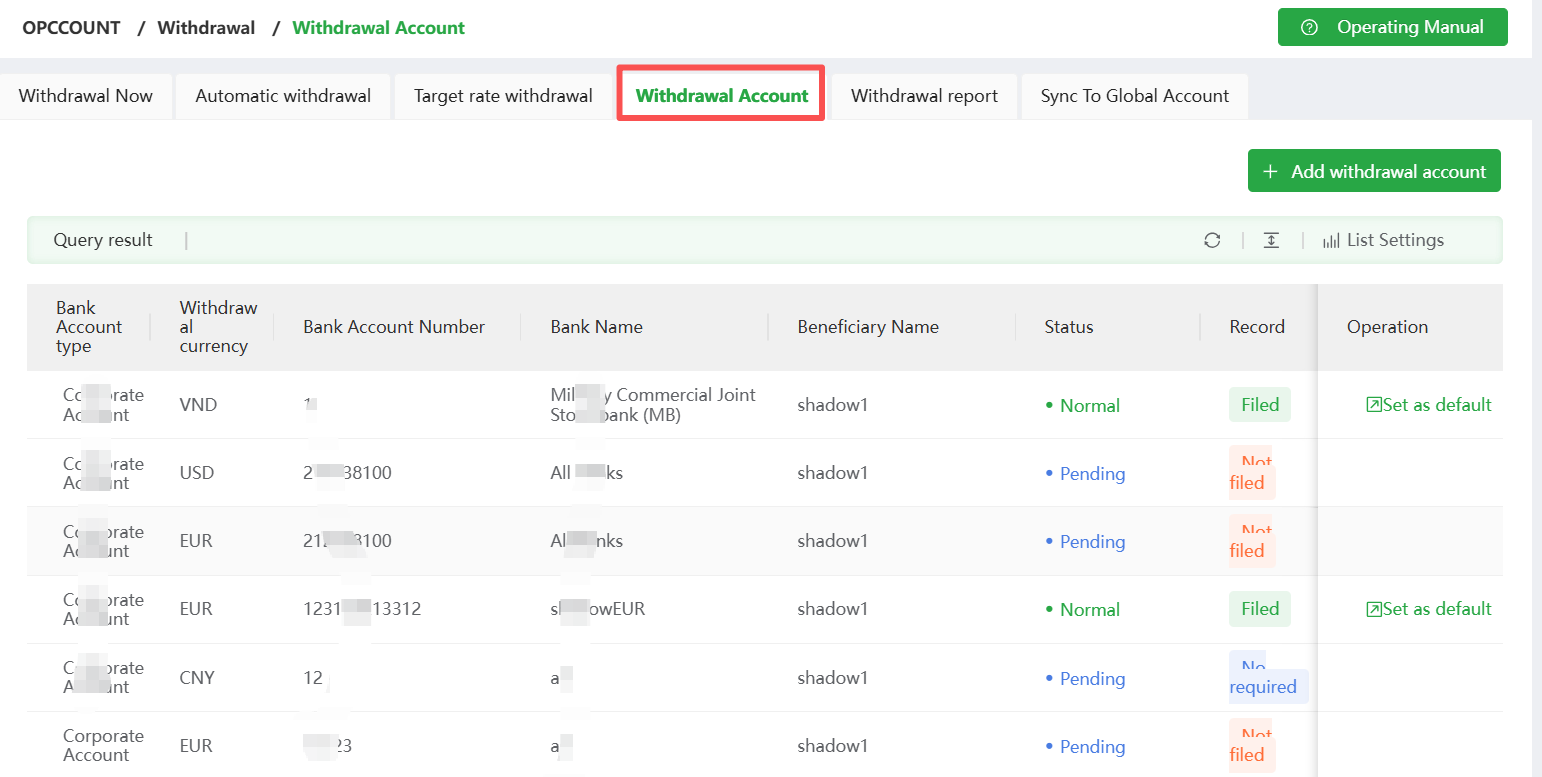
- After submission, Oceanpayment Compliance Team will conduct a bank account review, and you can check the review status in the system
- (1) CNY currency: the status of "Normal" (no need to file) means that this bank account is available.
- (2) Foreign Currency: A status of "Normal" and a filing status of "Filed" indicates that the bank account is available.
- (3) Available accounts can be modified, deleted or set as default accounts.
4. Manual Withdrawal Operation
- Select the account type for withdrawal and the withdrawal bank account. Enter the requested withdrawal amount. You may initiate withdrawal requests for one or multiple billing currencies simultaneously. Switch between withdrawal accounts to change the bank account or corresponding withdrawal currency. Supports adding new withdrawal accounts directly from this page. The 【Acquiring Account】 supports withdrawals to 【Global Account】(if applicable)
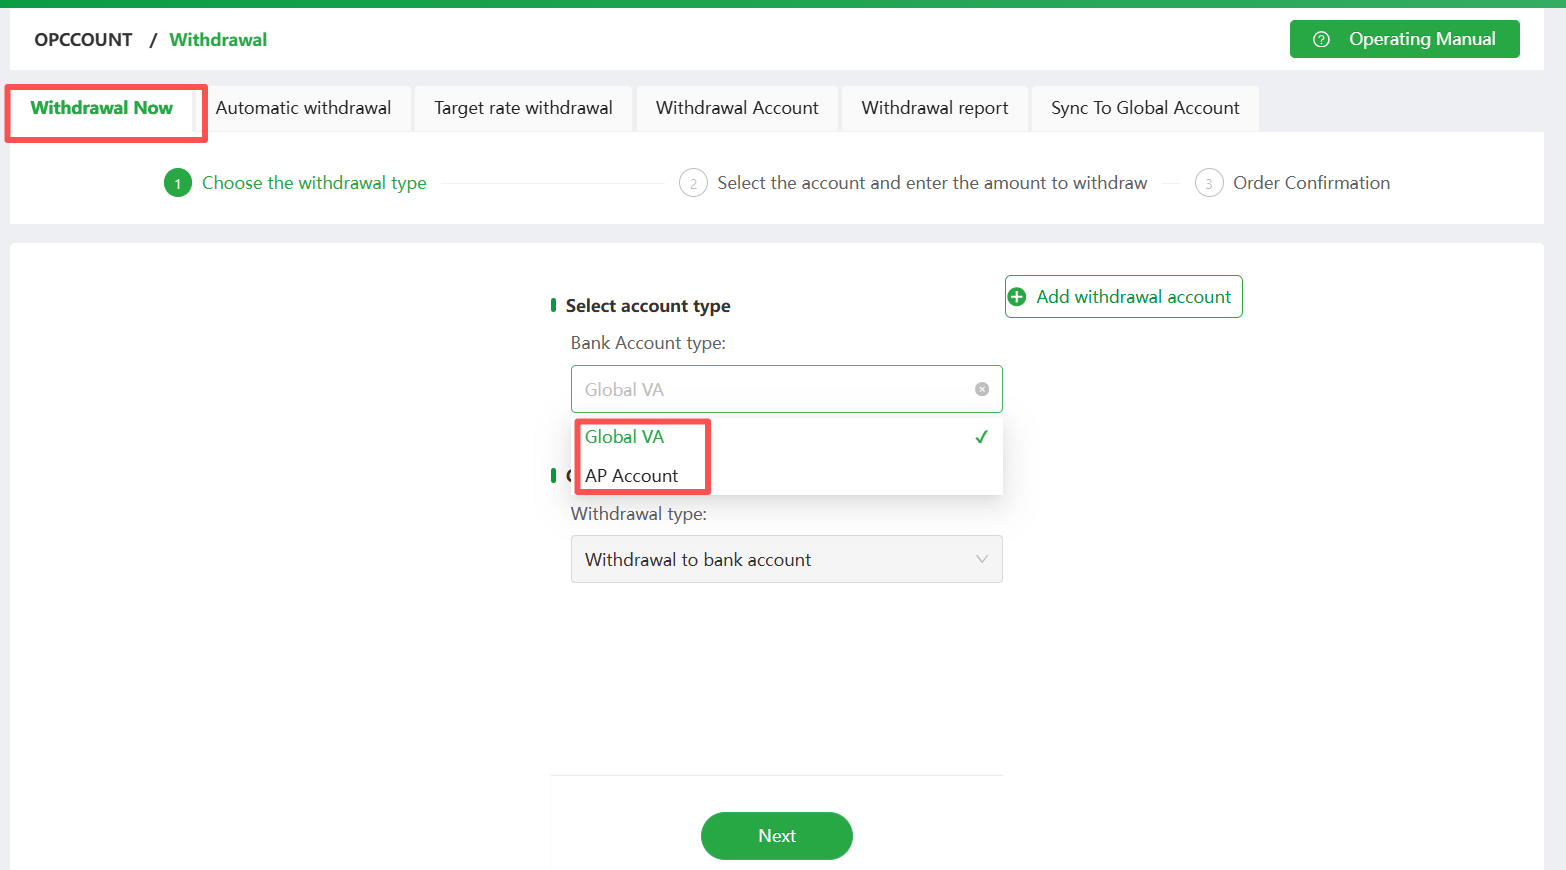
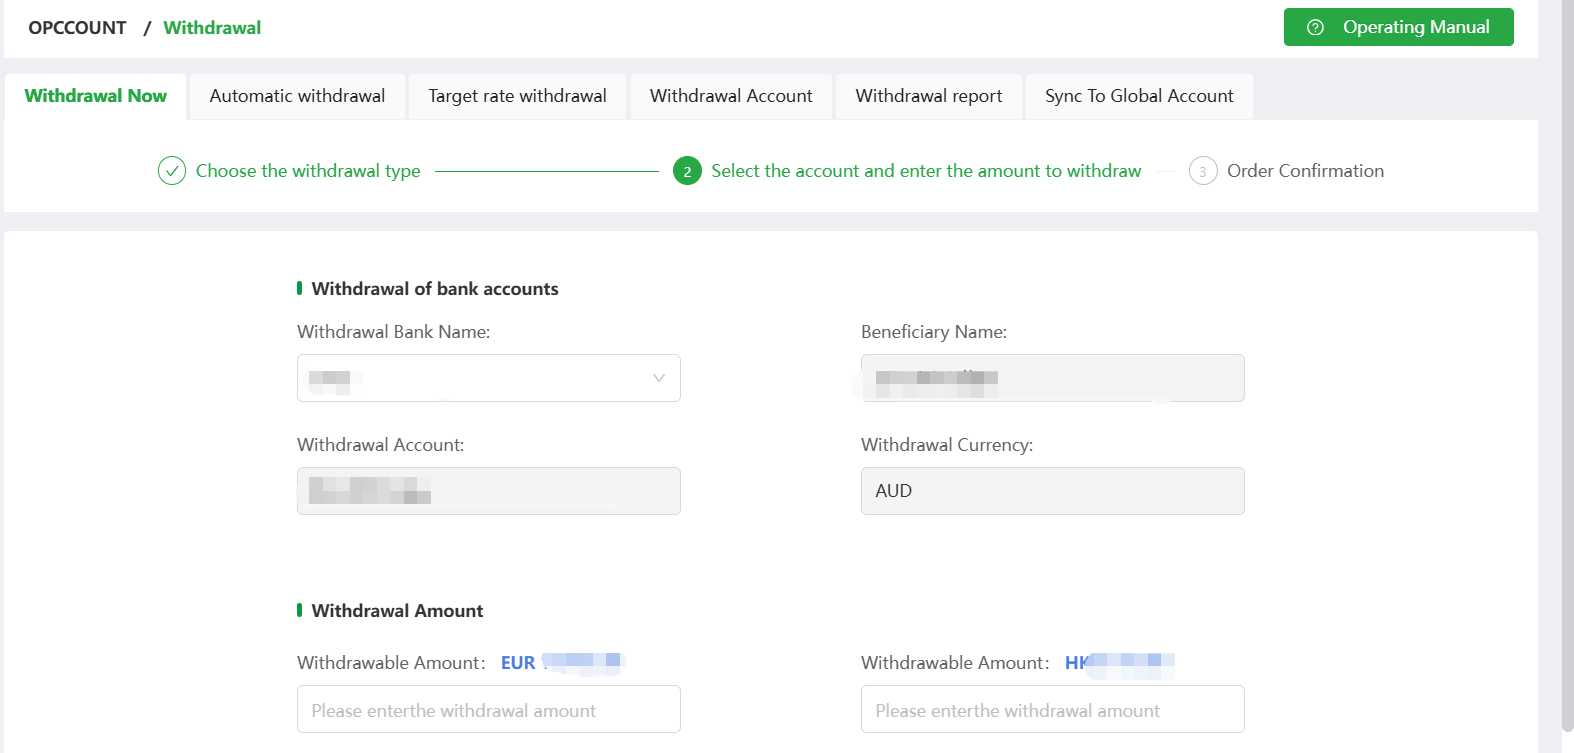
- After you have filled in the form, click next step to the ‘Order Confirmation’ page, you can check the reference real-time exchange rate and handling fee (support 7*24 hours exchange): (1)Tick the box on the left of the data to be withdrawn and click ‘OK’, then the application for withdrawal of the ticked amount will be initiated successfully.
(2)If you don't want to continue the withdrawal process, you can click ‘Cancel’ and re-initiate the withdrawal application later.
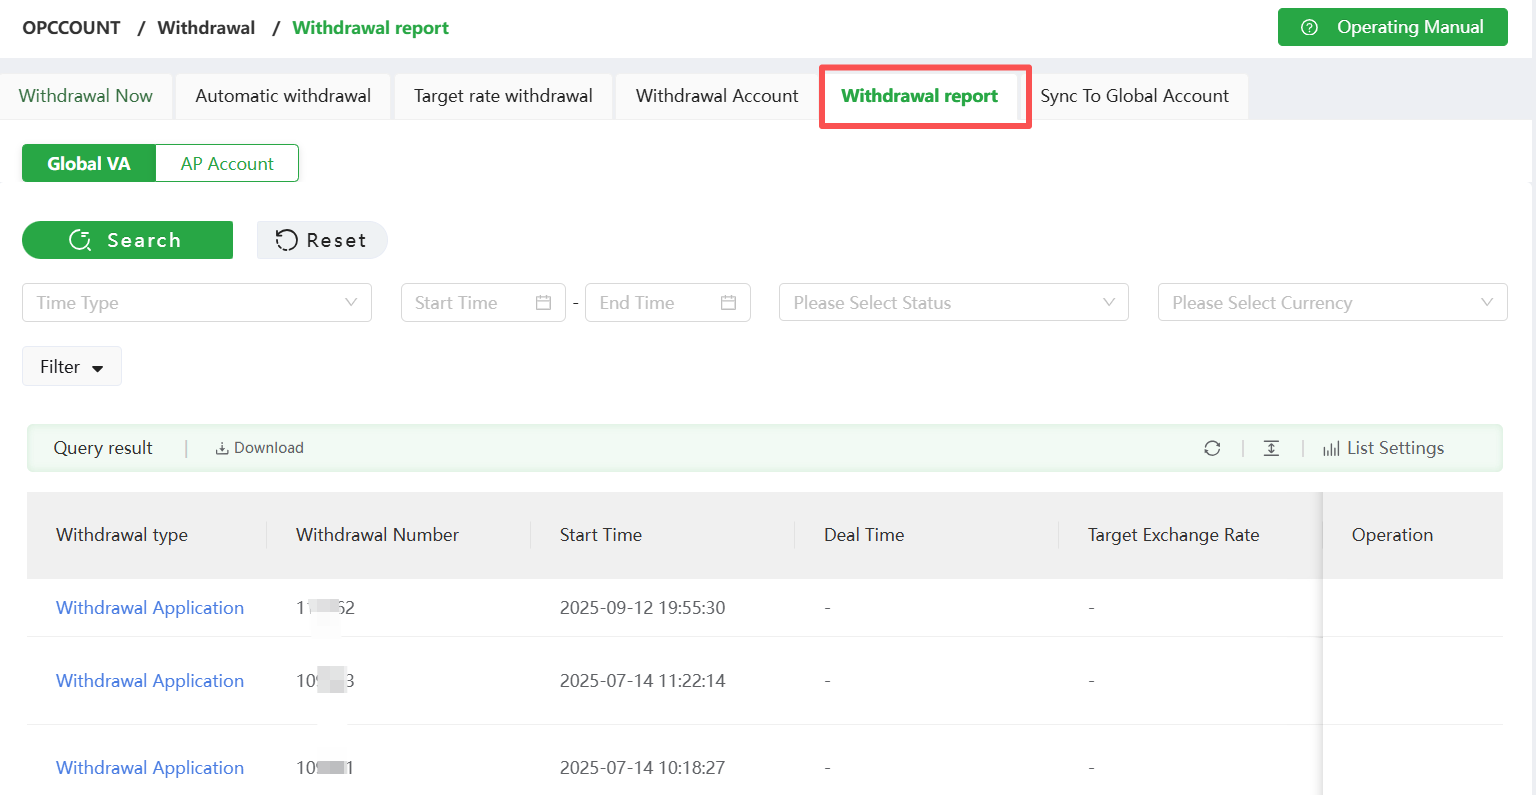
- After successfully submitting a withdrawal request, you can view the withdrawal history in the【Withdrawal Report】.
5. Auto Withdrawal Operation
(1)Enable Automatic withdrawal
-
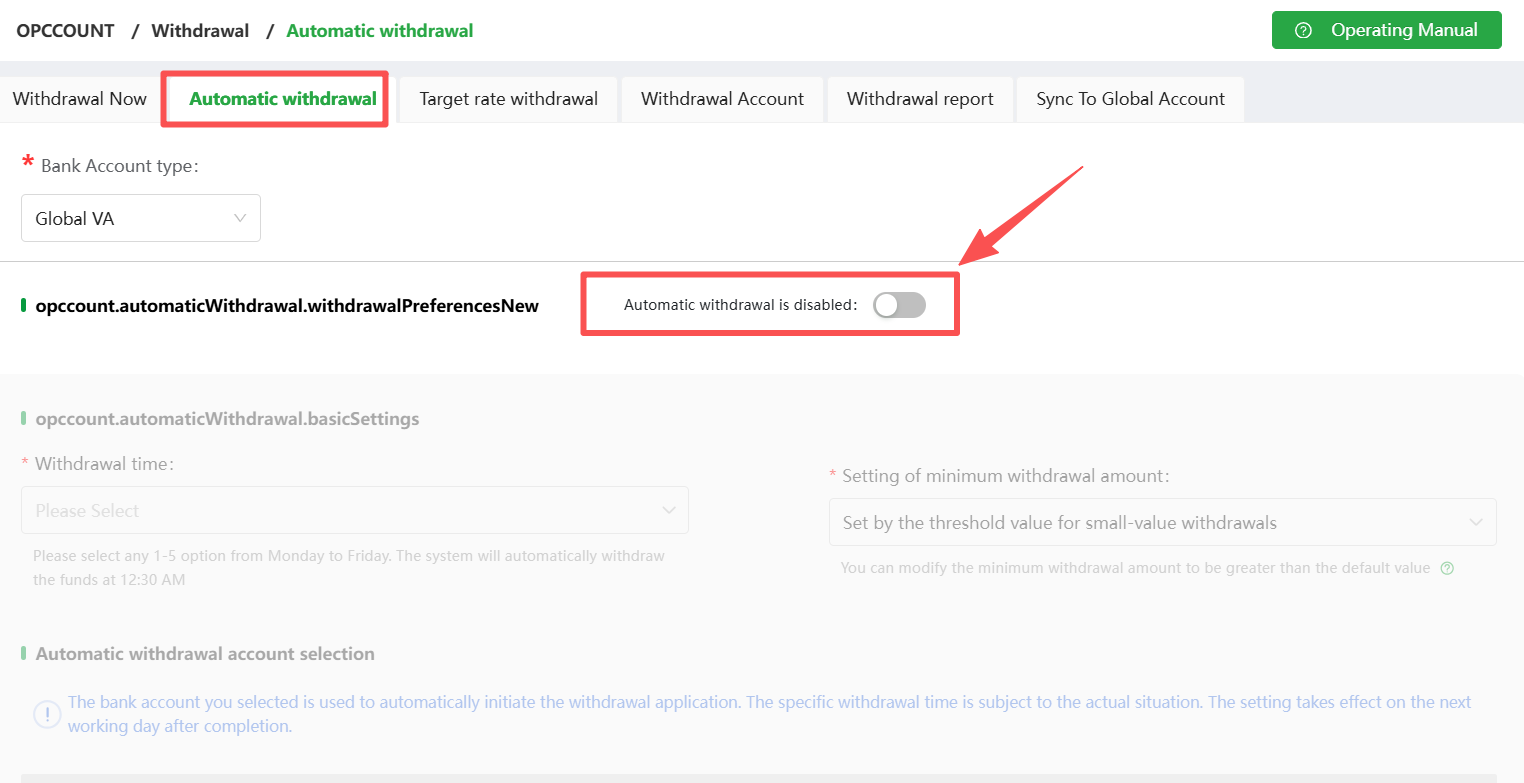
Click Automatic withdrawal to access the setting page
-
Automatic withdrawal is disabled by default
-
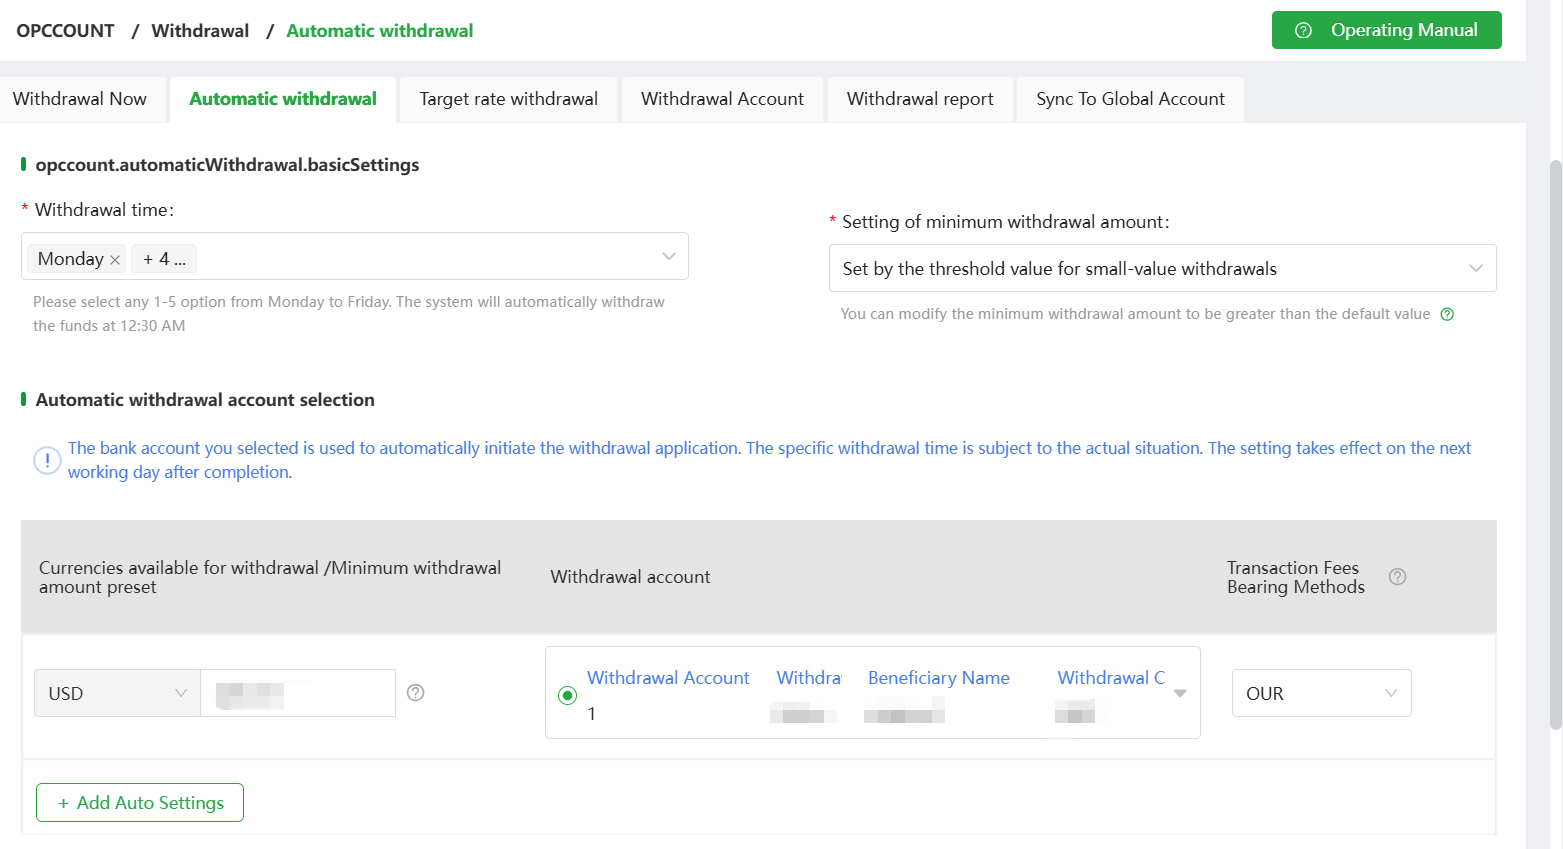
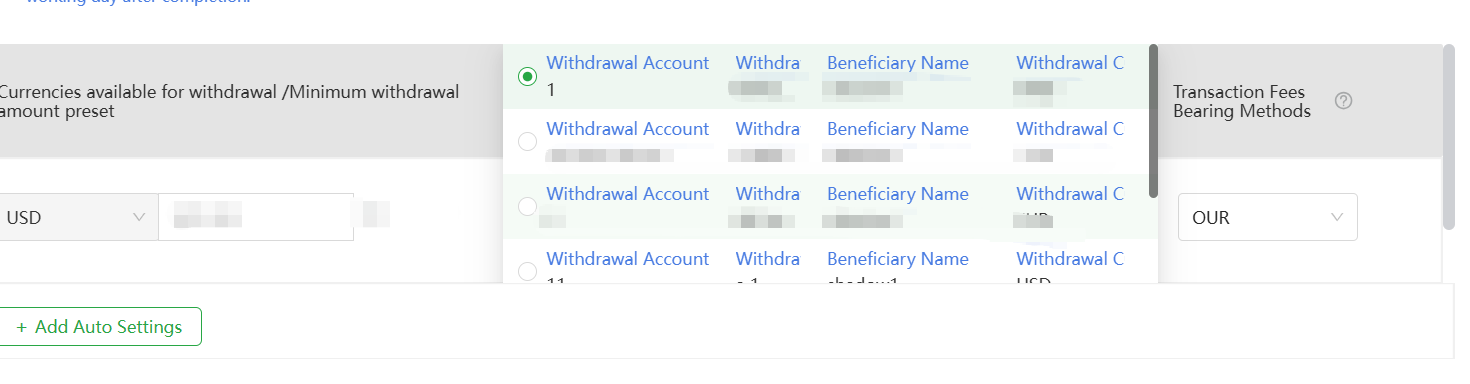
Click the button to enable automatic withdrawal, the currency to be withdrawn must select the corresponding withdrawal account to select the configuration information, click the OK button to save the current configuration information
-
To disable auto-withdrawal, click the button. (2)Automatic withdrawal configuration
-
Withdrawal time: You can choose Monday to Friday and it is a multiple choice, mandatory option. (It is not possible to distinguish between holidays for the time being, and we will notify you in advance if we are unable to complete the payment in case of a holiday.) Based on the small-value withdrawal threshold that was set. When your withdrawable balance exceeds the small withdrawal threshold, the withdrawal is initiated, saving you the relatively small handling fee. When your available balance exceeds the minimum withdrawal amount, a withdrawal is initiated which may result in small-amount transaction fees. Then exact amount will be determined by your available balance at the time you initiate the withdrawal
-
Auto Withdrawal Account Selection: Select the account that you need to complete the automatic withdrawal of funds into the account, click on the final confirmation, the second working day after the completion of the settings to take effect. Please make arrangements in advance.
6. Target Exchange Rate Withdrawal Setting
7. This feature primarily allows you to set your target exchange rate for withdrawals within the valid timeframe. The system will automatically monitor exchange rates in real time. If the real-time rate matches your target rate, the system will automatically withdraw funds to your bank account at the target rate.
8. Set Target Exchange Rate Withdrawal: Click【Target Exchange Rate Withdrawal】and select the corresponding account type.
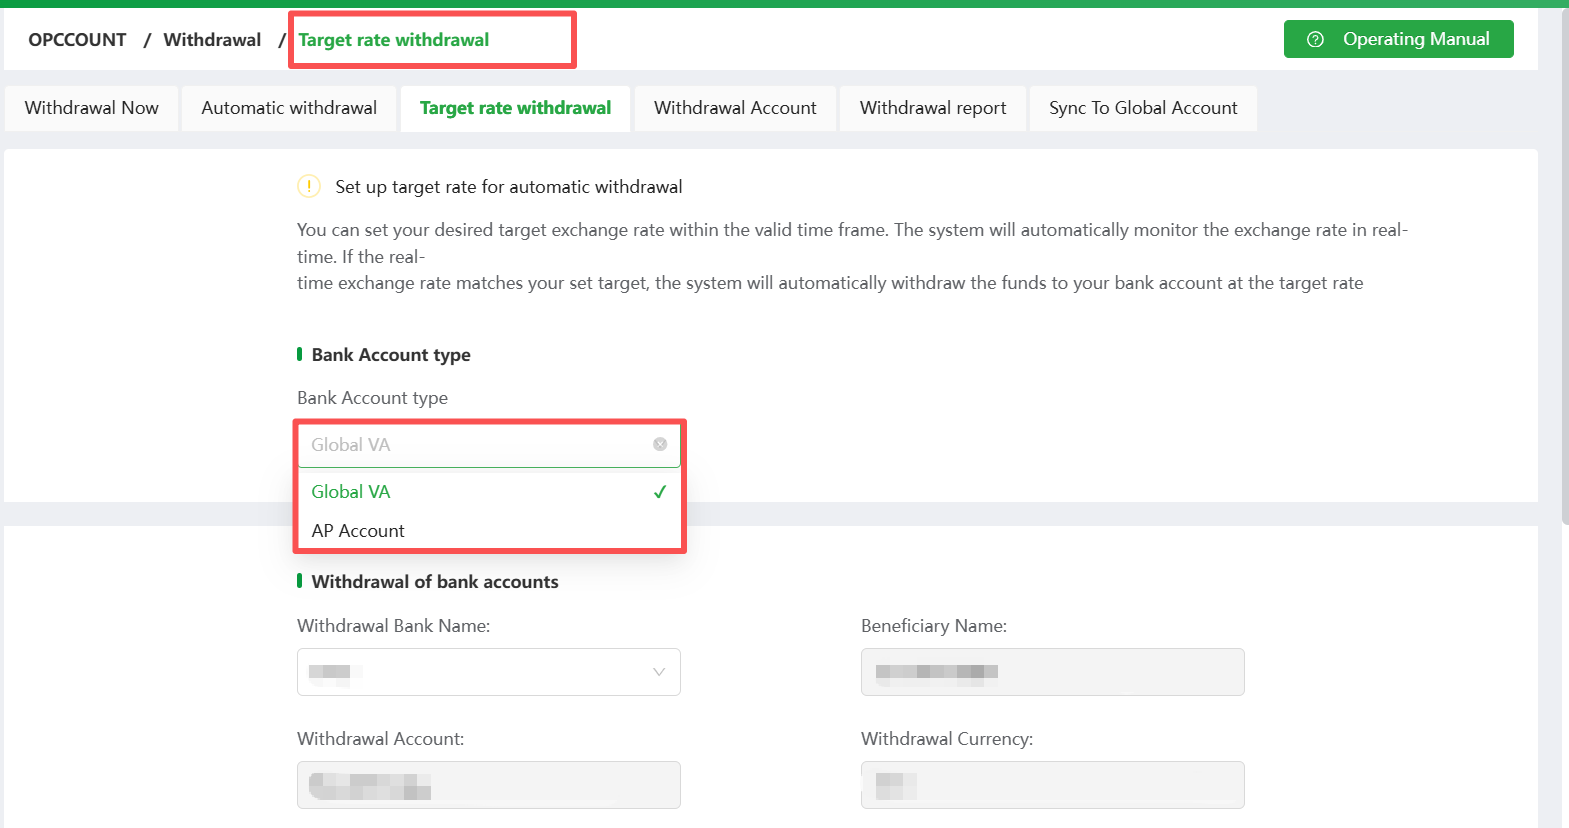
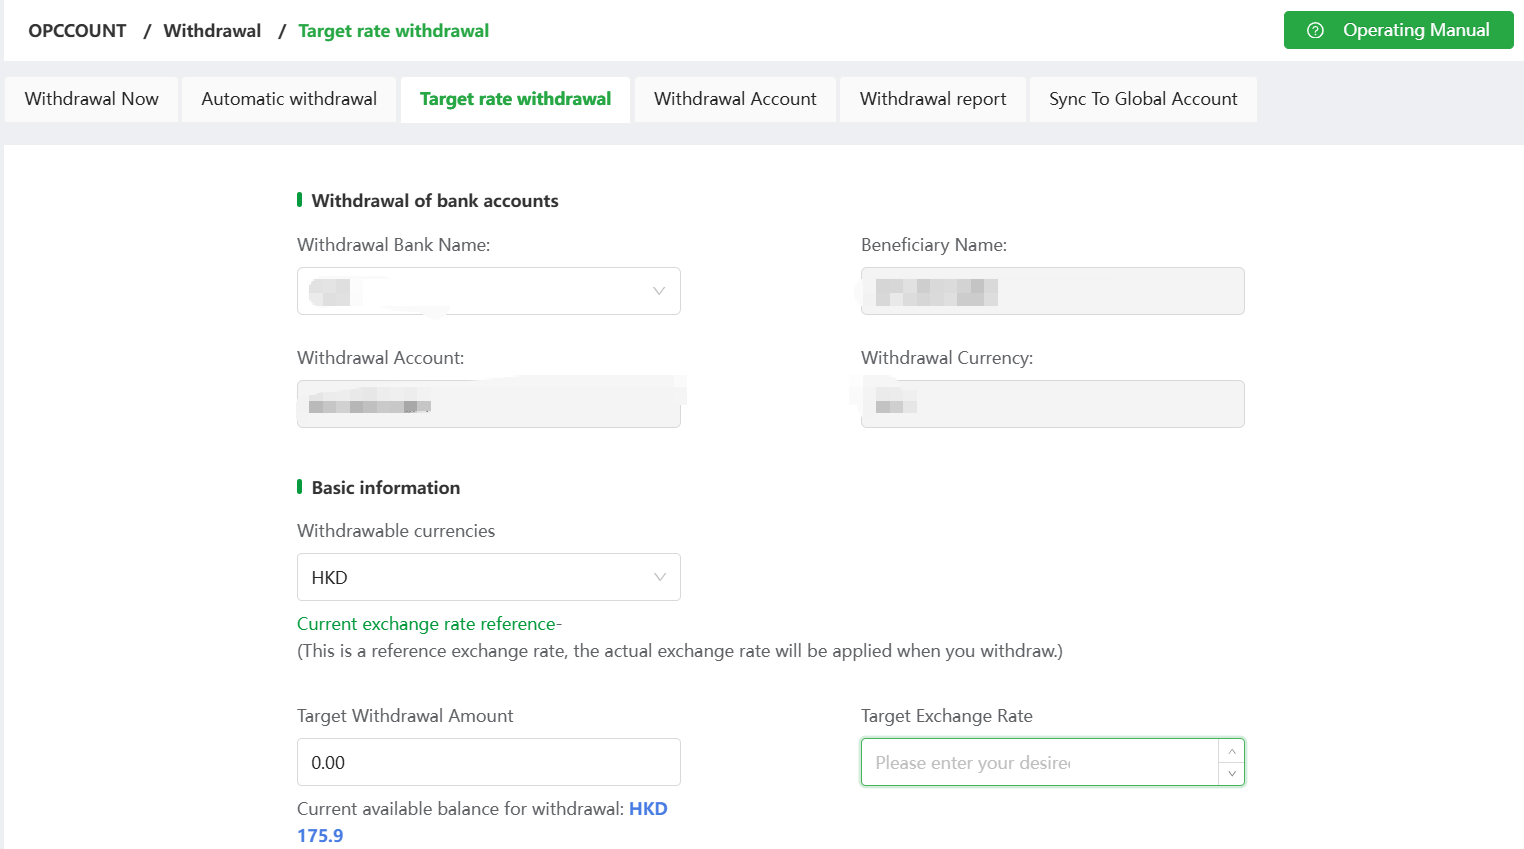
- The bank account information displayed by default includes the receiving bank, account holder name, account number, and withdrawal currency upon successful withdrawal. The available withdrawal currencies are those currently supported for withdrawal from the merchant account (i.e., the original currency before conversion).
Exchange relationship: The withdrawal currency is converted from the available withdrawal currency to the withdrawal account's designated currency.
-
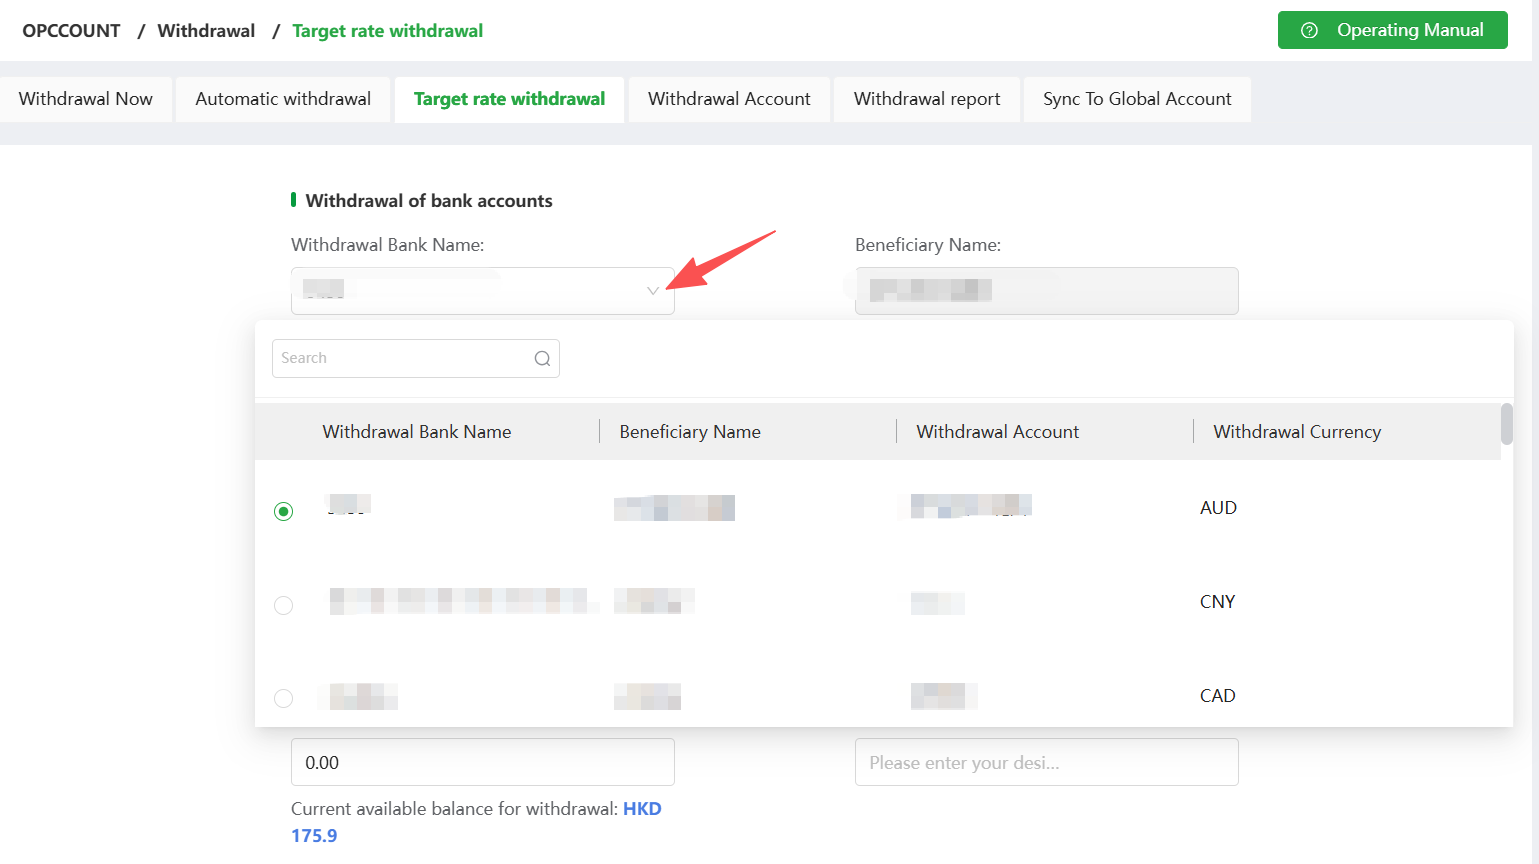
You may select other bank accounts on this page.
-
On this interface, enter the cryptocurrency to withdraw, target exchange rate, target withdrawal amount, and effective deadline, then click Submit.
-
A confirmation prompt will appear upon successful submission.
-
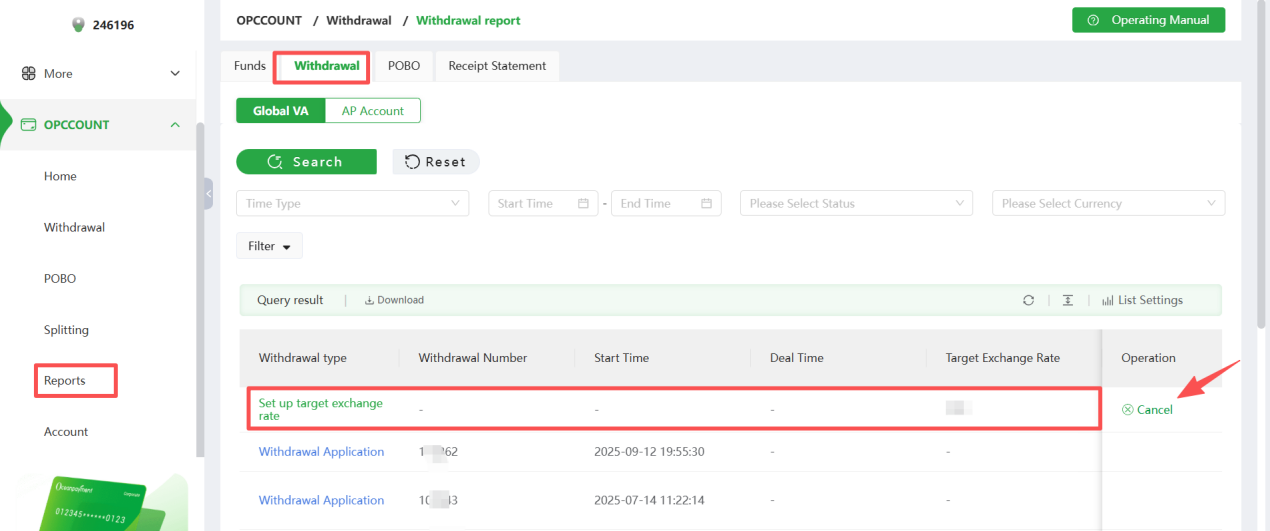
Simultaneously, the OPCCOUNT withdrawal report will add a new record for this withdrawal with the type “Target Withdrawal” and status “Pending.” If the target exchange rate is not reached within a reasonable timeframe or you wish to modify the rate, click “Cancel Task” to terminate this withdrawal and set a new exchange rate.
-
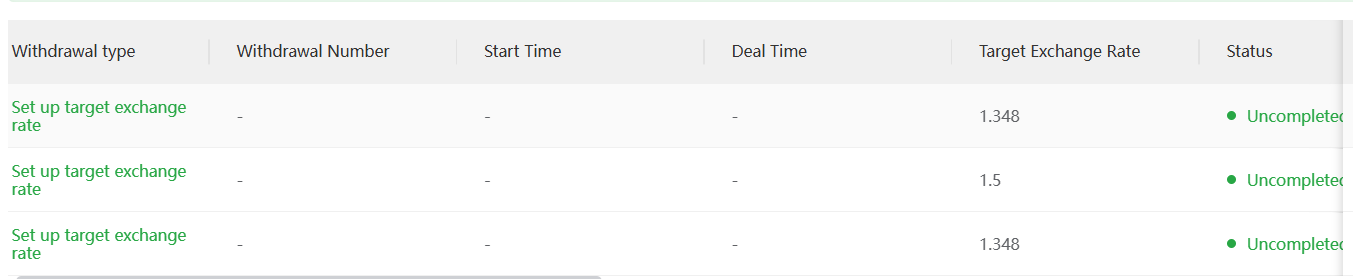
Important Notes: When the target exchange rate is not achieved, the following fields will display null values: batch number, withdrawal time, exchange rate, handling fee, and paying bank. Only one exchange rate task per currency is supported for the same withdrawal account at any given time.
-
Example: If an account's withdrawal currency is USD and HKD is available for withdrawal, only one HKD-to-USD withdrawal task may be submitted for that account.
-
When the system detects that the exchange rate has fluctuated to the target rate, the record will be updated to the status: Pending. Simultaneously, it will generate the withdrawal batch number, withdrawal time, exchange rate (actual withdrawal rate), handling fee, and other relevant information.
9. Withdrawal Report
- View all initiated manual or automatic withdrawal records, categorized by acquiring accounts and global accounts.
POBO Guide
10. POBO Operation
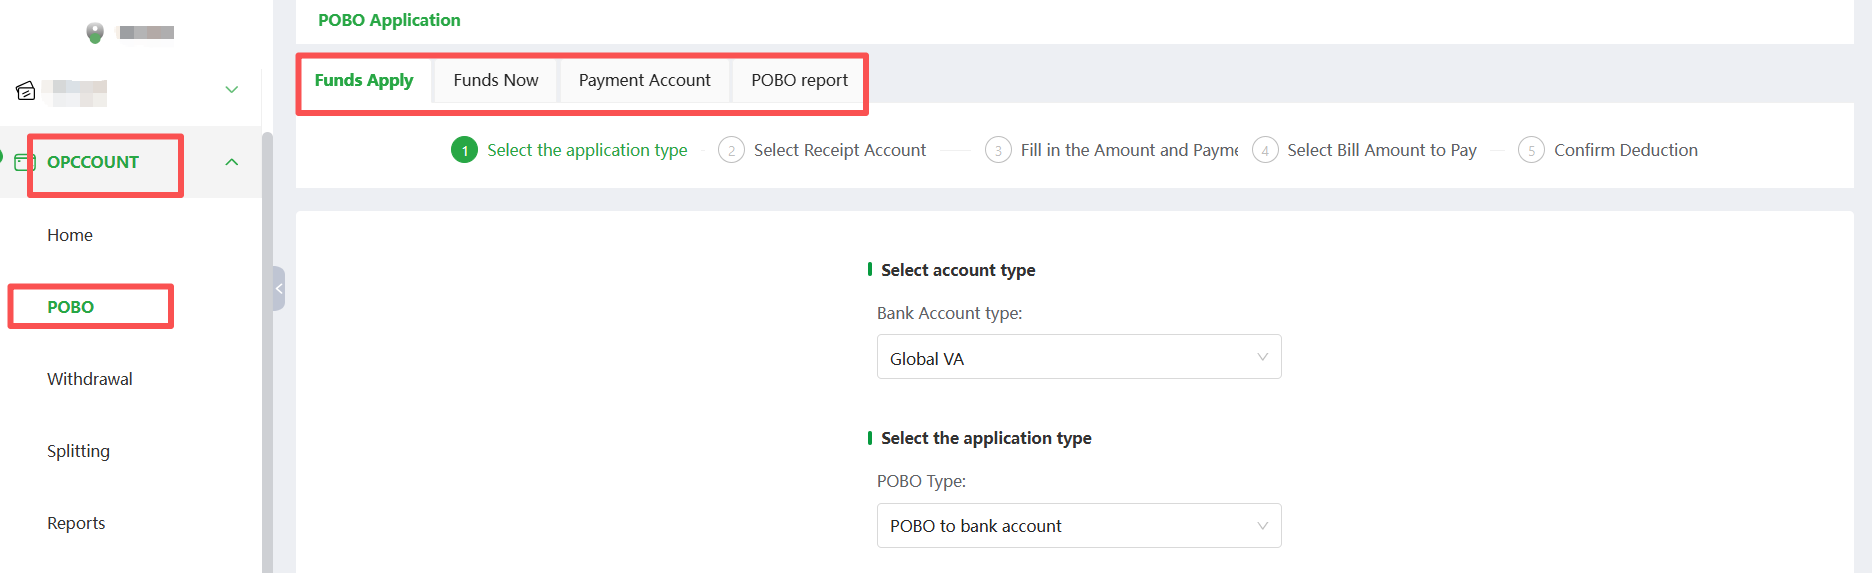
- Click to enter【Acquiring Account】, which consists of four sections: 【Funds Apply】, 【Funds Now】, 【Payment Account】, and 【POBO report】.
11. Foreign Currency POBO
12. POBO Account Management
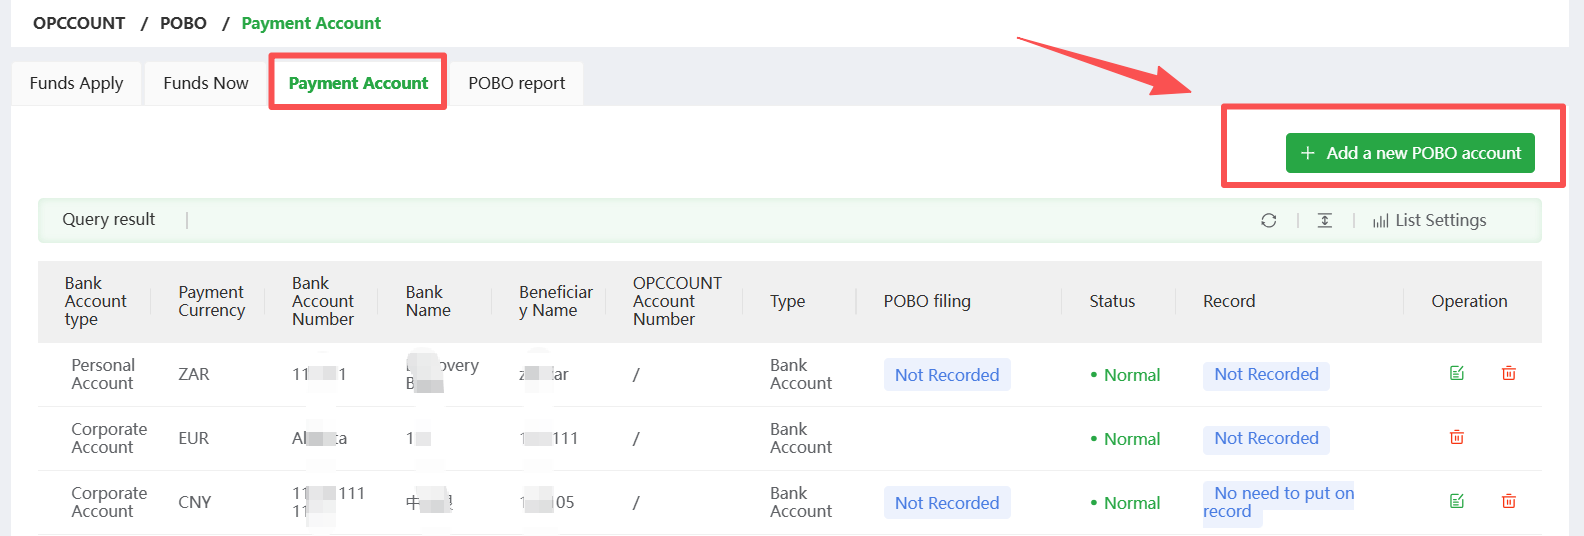
-
You will need to add a new POBO account for the first POBO
-
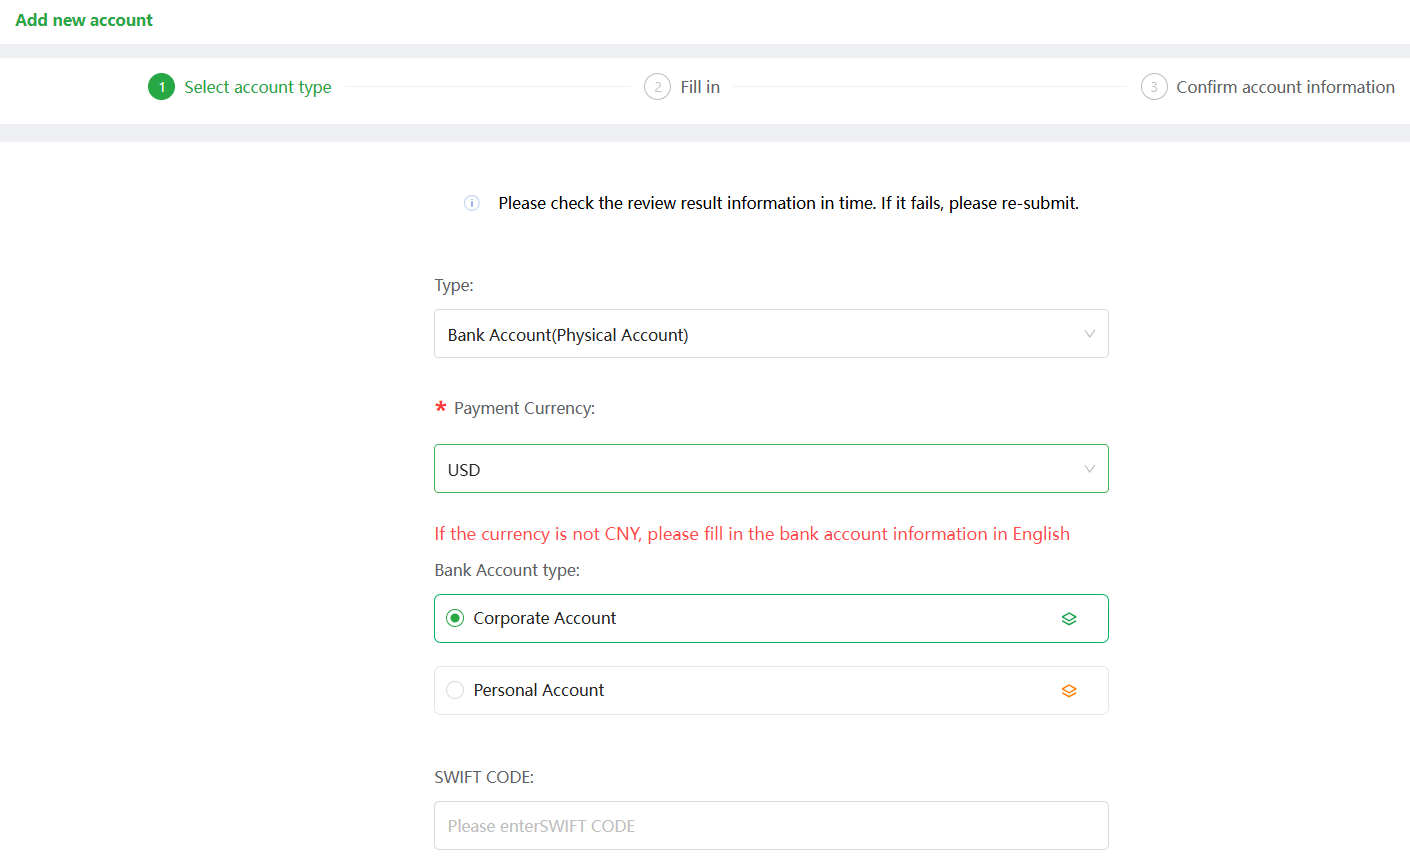
Select account type and the POBO currency
-
When the currency is not CNY, the swift code is required, note that no space is allowed before or after the swift code, and it must be in English
-
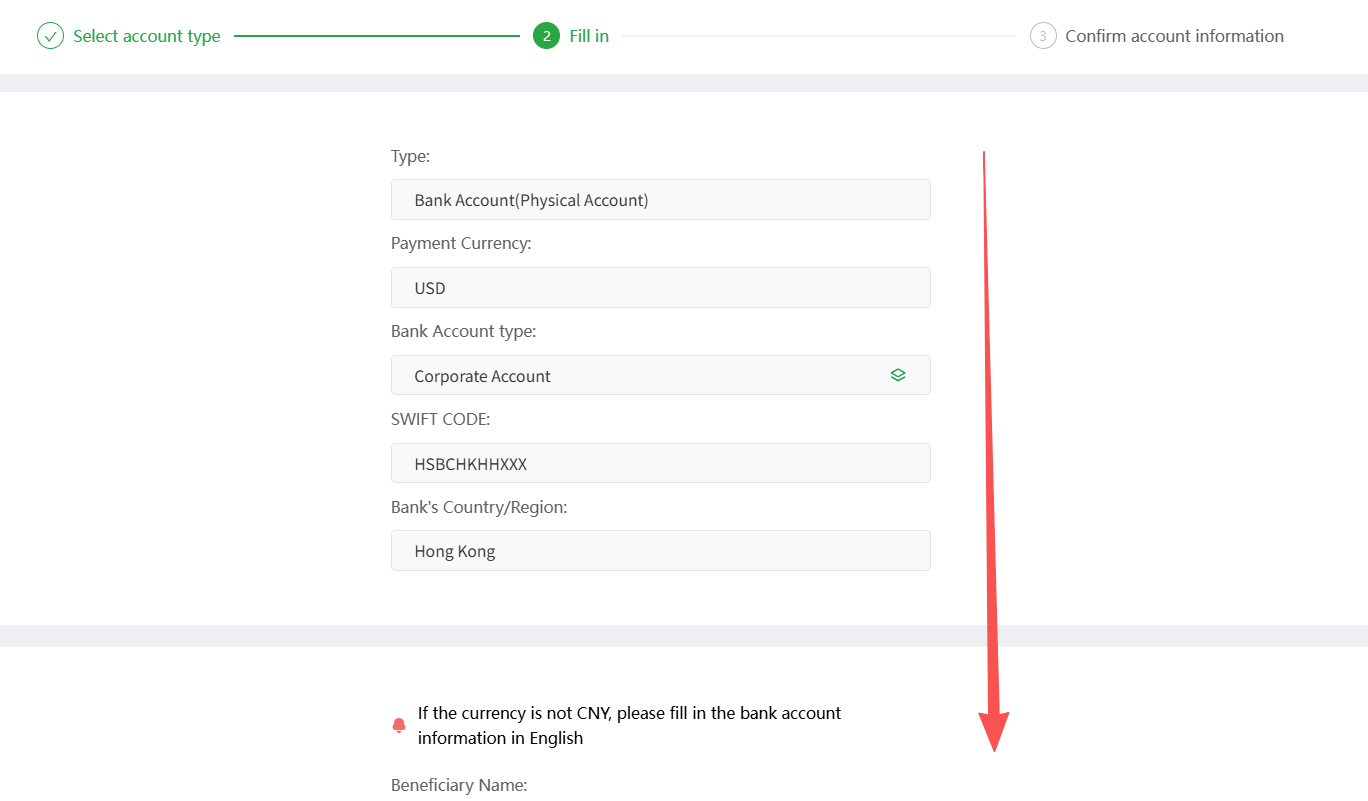
Fill in bank account information
-
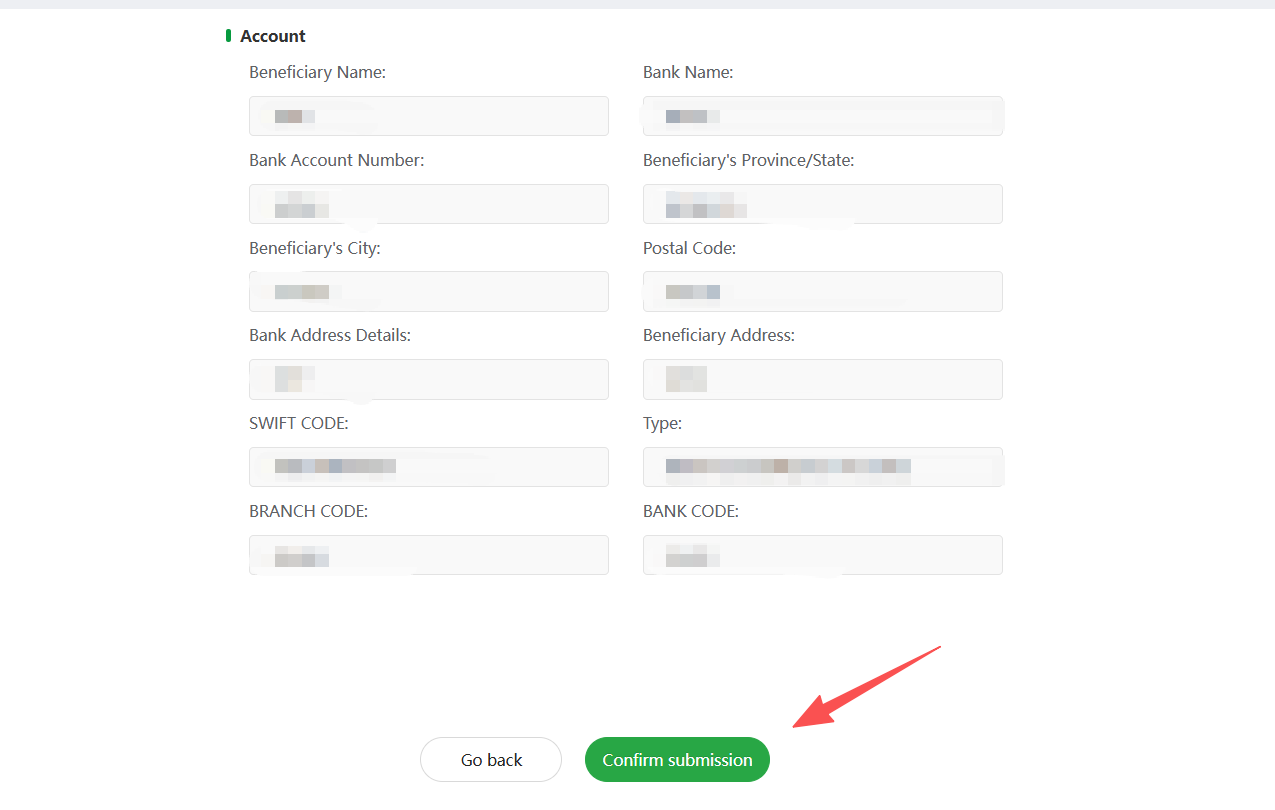
Confirm the bank account information
- Proceed if the information filled in is correct
- When a POBO request is initiated, Oceanpayment will review the entire POBO application and the submitted bank account information.
13. Add OPCCOUNT Global Account
- Enter the 【Payment Account】and click the Add a new POBO account.
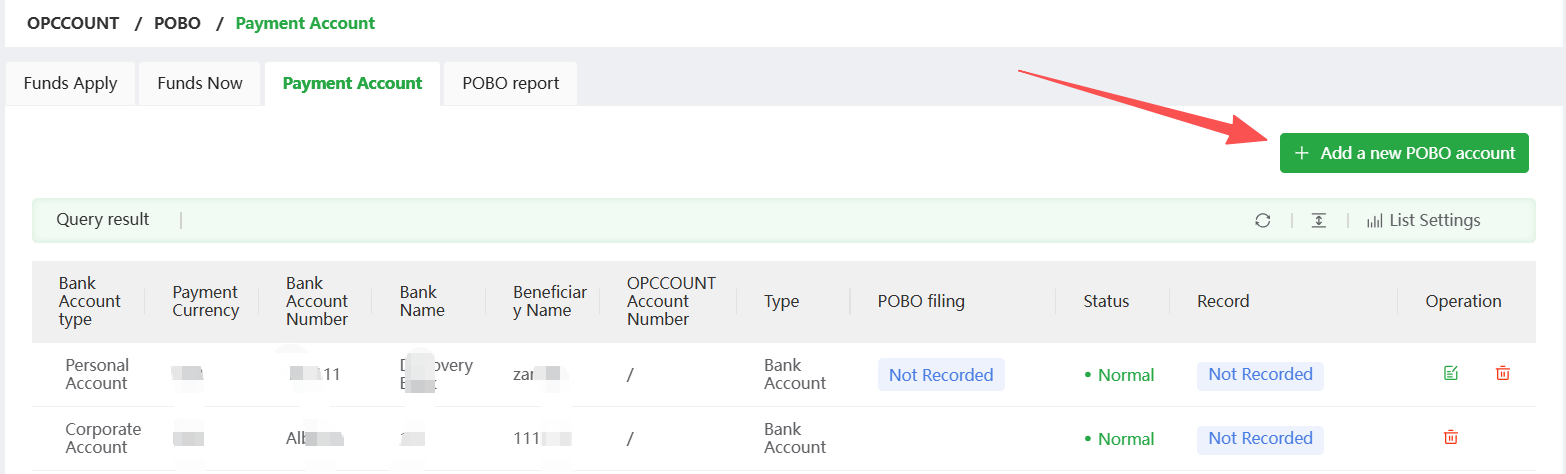
If you have activated your global account, you may select to add an OPCCOUNT account on this page. Please note:POBO currently supports only business accounts for foreign currencies, and only company accounts can be selected by default.
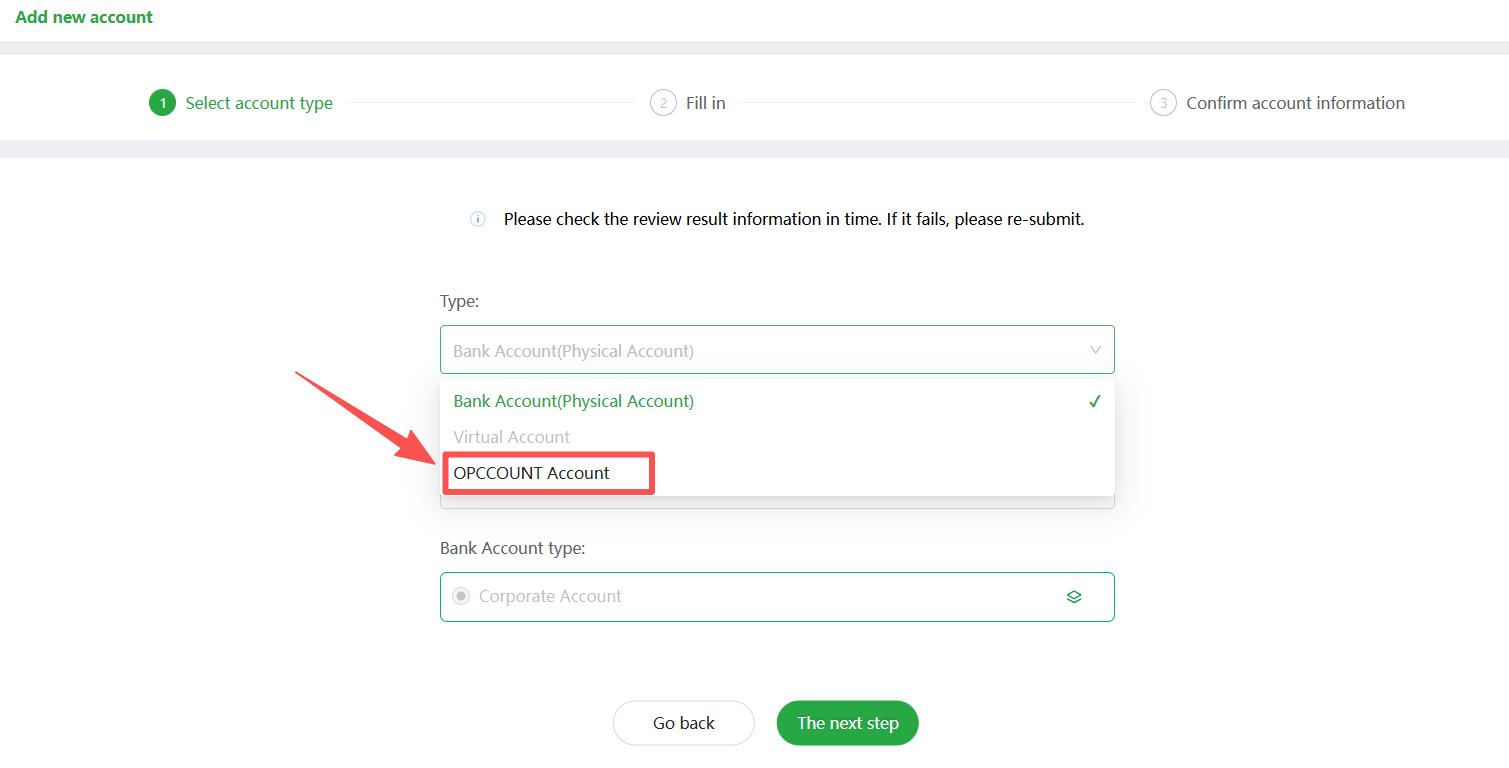
-
Confirm the account information
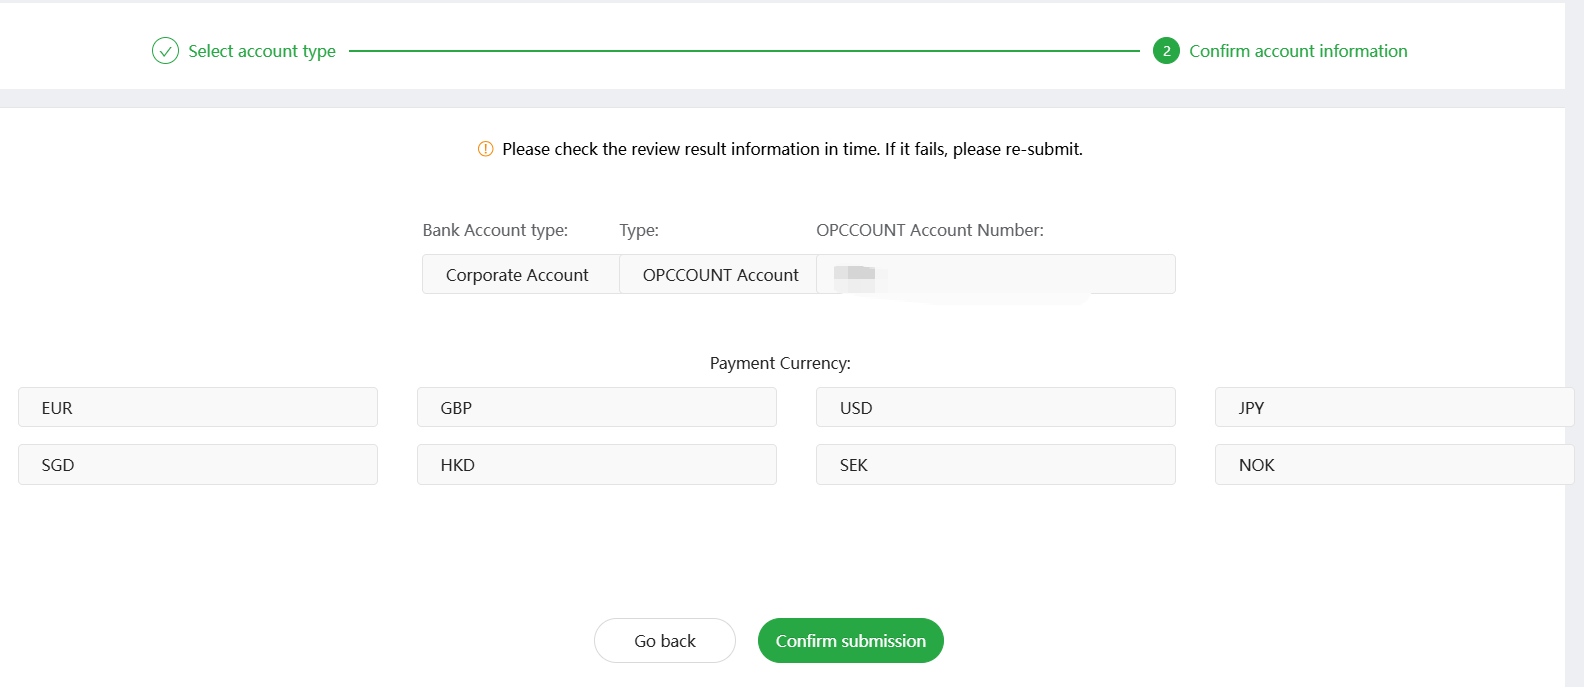
-
After confirming the submission, you can use this POBO account to initiate a POBO application
14. Initiate Foreign Currency POBO
-
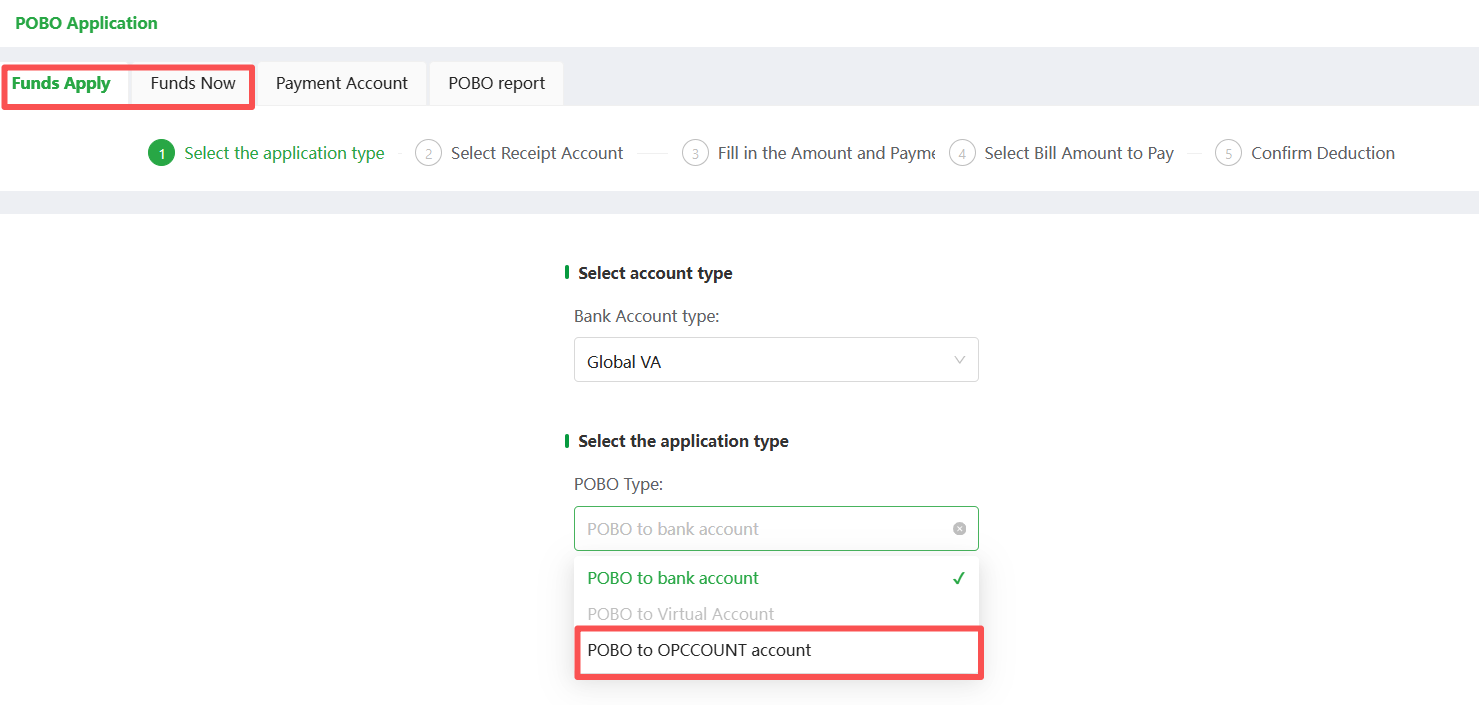
POBO supports transfers to individual, company bank account and OPCCOUNT Account.
-
Click the【POBO】-【Funds Apply】, select the account type (Global VA or Acquiring Account) and application type is Bank Account or OPCCOUNT Account. POBO to OPCCOUNT Global Account (if applicable): Transfer funds from your OPCCOUNT account to another person's or your own OPCCOUNT Global Account.
Payment to Company Bank Account:
(1)Direct POBO: Your OPCCOUNT account to another person's bank account
(2)Proxy POBO: Own/other person's OPCCOUNT account to own/other person's OPCCOUNT
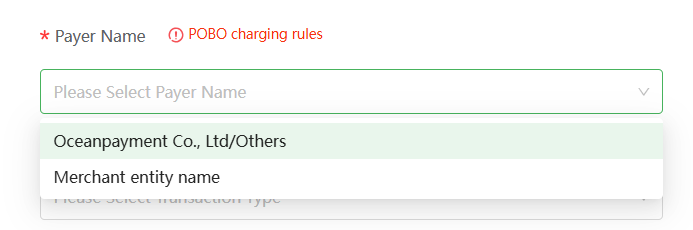
-
Click next to select the account or add New POBO Account
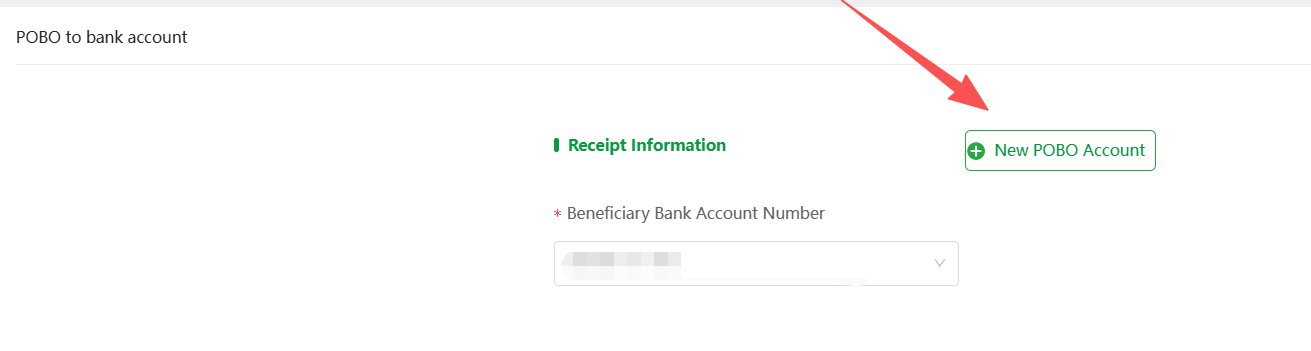
-
Fill in the amount and payment information and upload the audit material
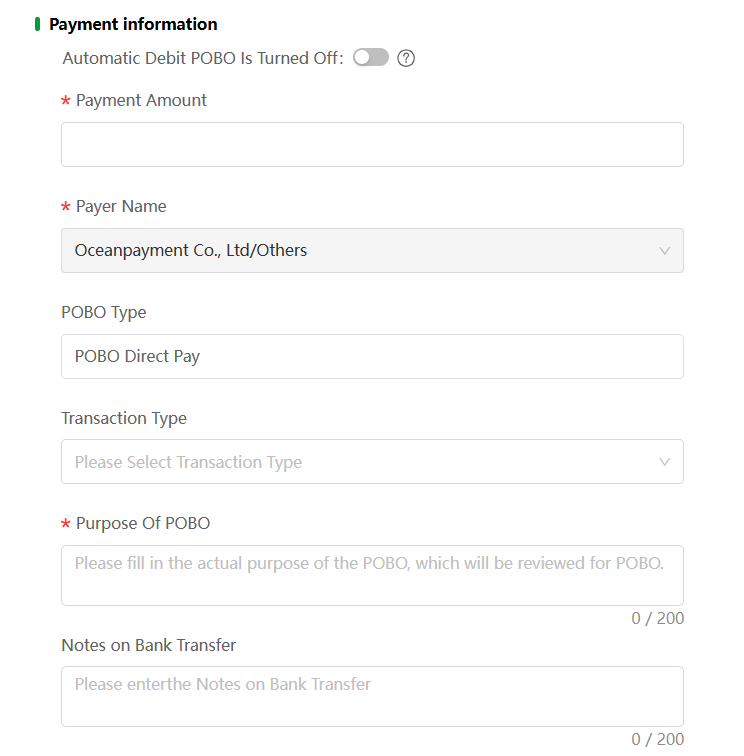
-
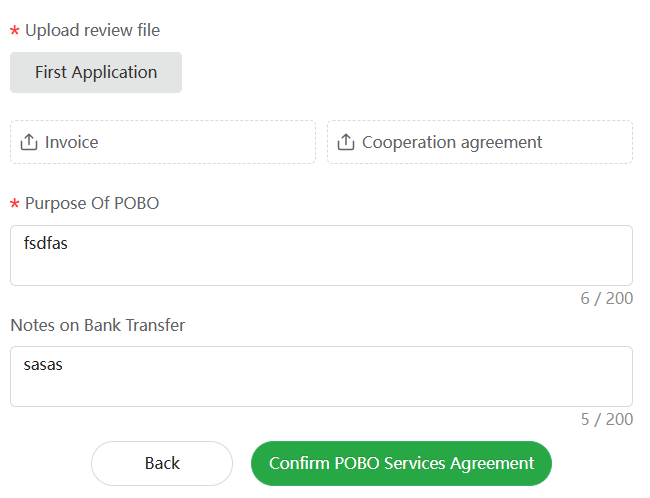
Enter Purpose of POBO and Notes on Bank Transfer
-
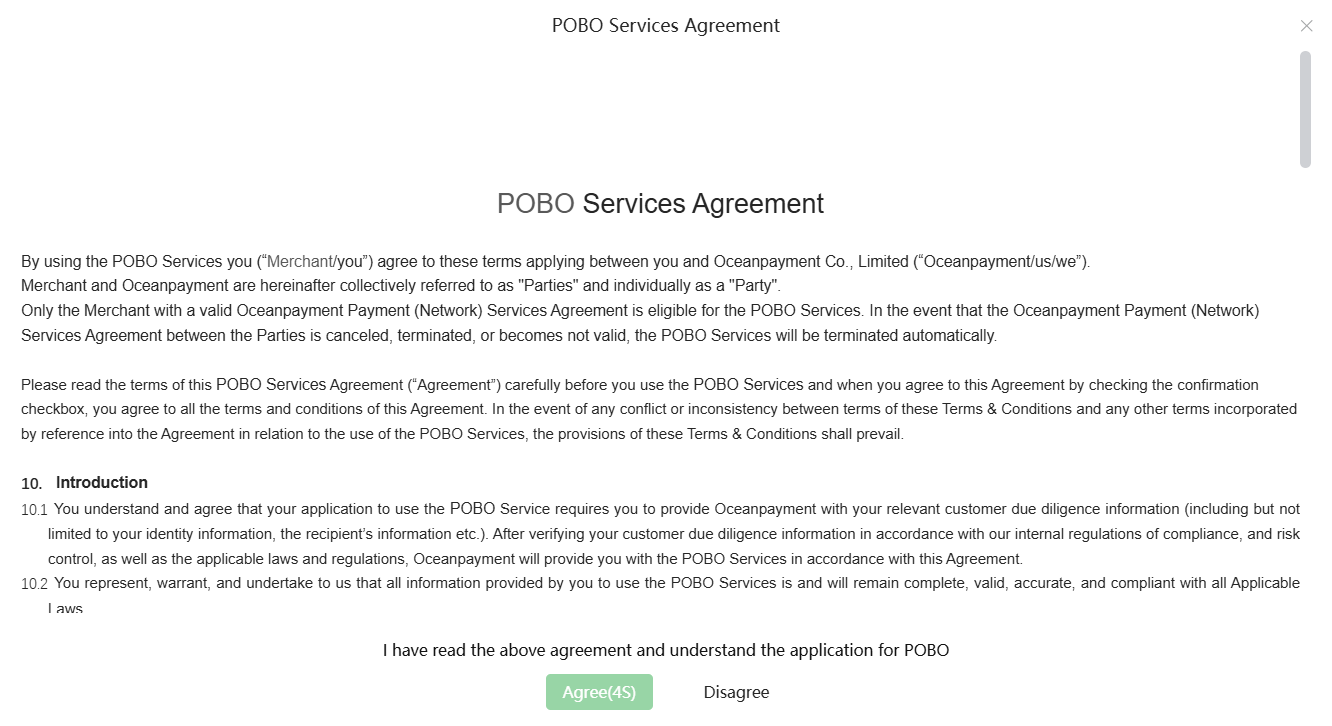
Confirm POBO Services Agreement
Click Agree within the 5-second countdown.
Clicking Disagree will close the window and the POBO cannot be submitted.
Clicking Agree, submit the application.
-
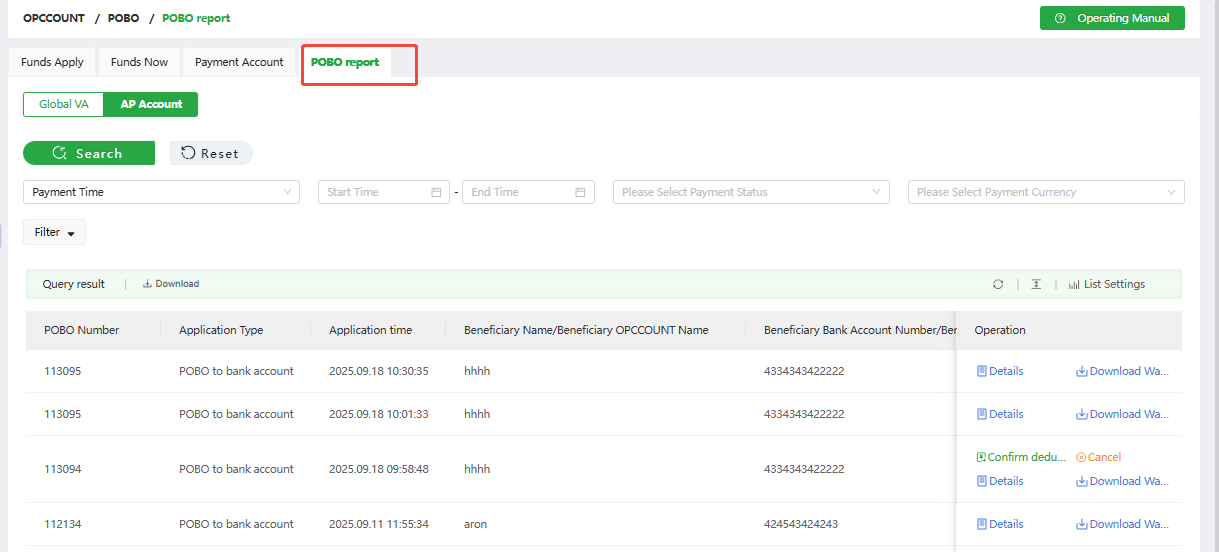
After successful submission, it will show POBO application submitted for review. Then you can view the POBO details in【POBO Report】.
-
Click Confirm Deduction,then select bill balance & currency. You can also select the Fee Bearing Methods: BEN (borne by the recipient), OUR (borne by the payer), or SHA (shared).

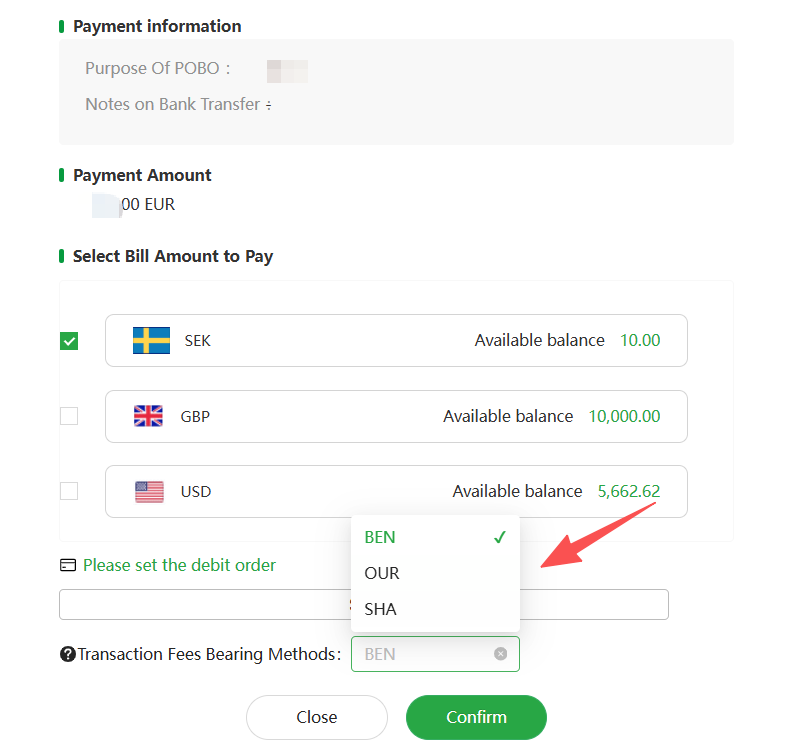
Note: JPY payments only support whole amounts.
Note: Step 4 deduction confirmation can only be done after completing the contract and document review process.
-
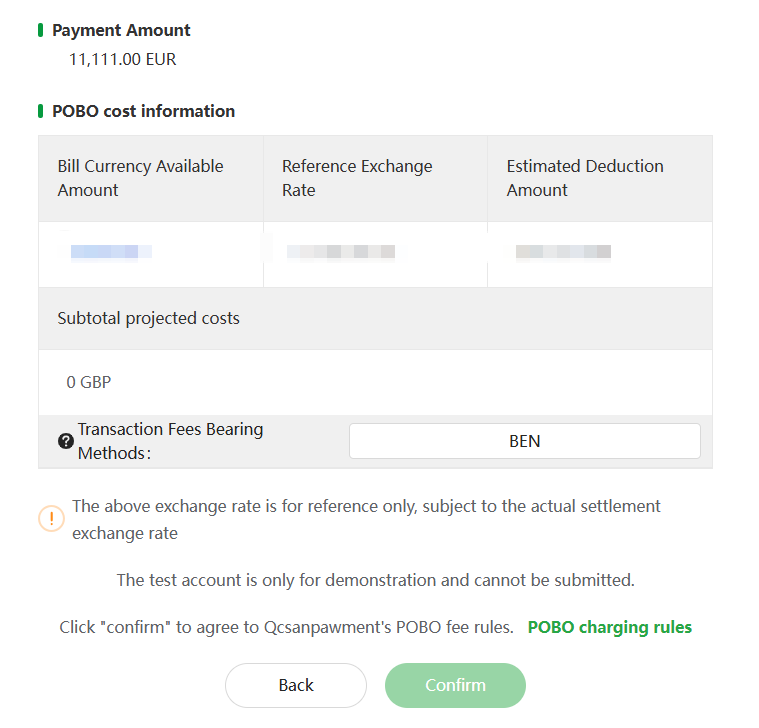
After clicking Confirm, review the fee information, then click Confirm again to submit.
-
Click【POBO】-【Funds Now】, then select the account type and the opccount aready Account
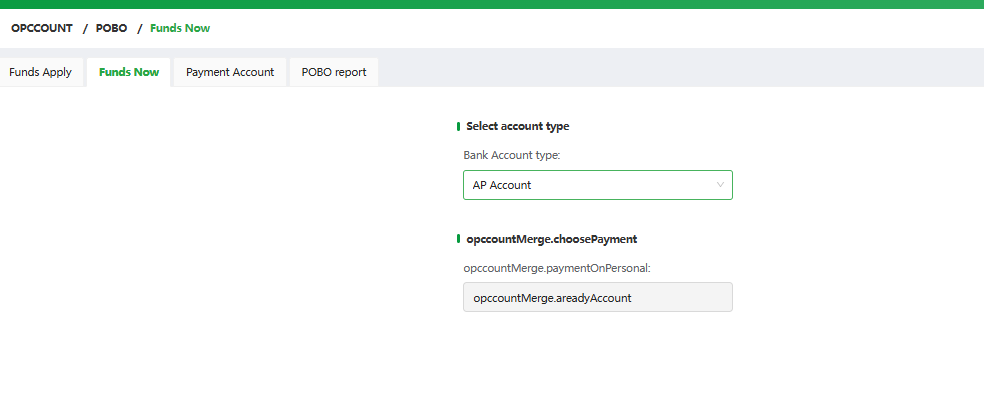
-
Select an existing added bank account, or add a new POBO account.
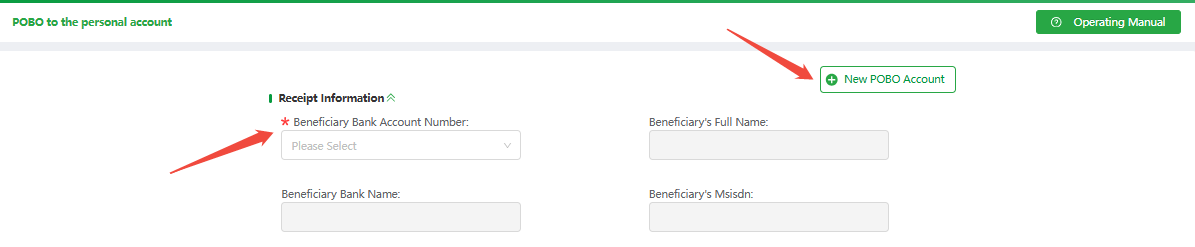
-
After being redirected to the information page, fill in payment details.
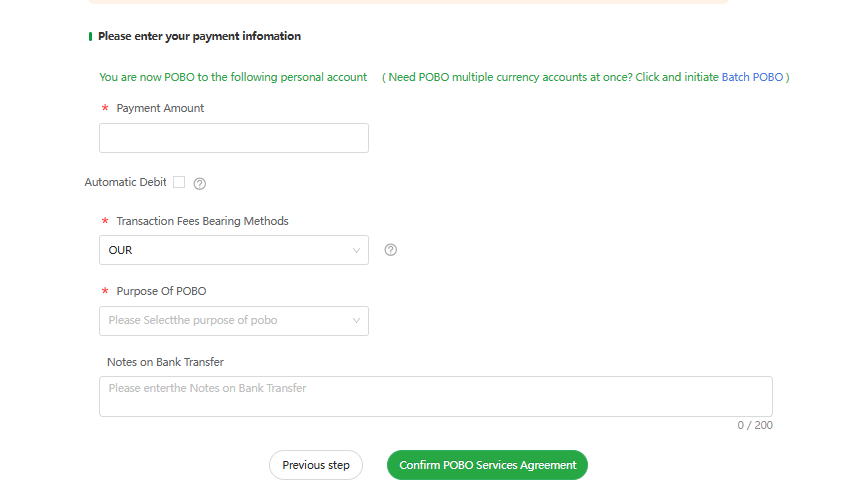
-
Confirm POBO Services Agreement

Click Agree within the 5-second countdown.
Clicking Disagree will close the window and the POBO cannot be submitted.
Clicking Agree submit the application.
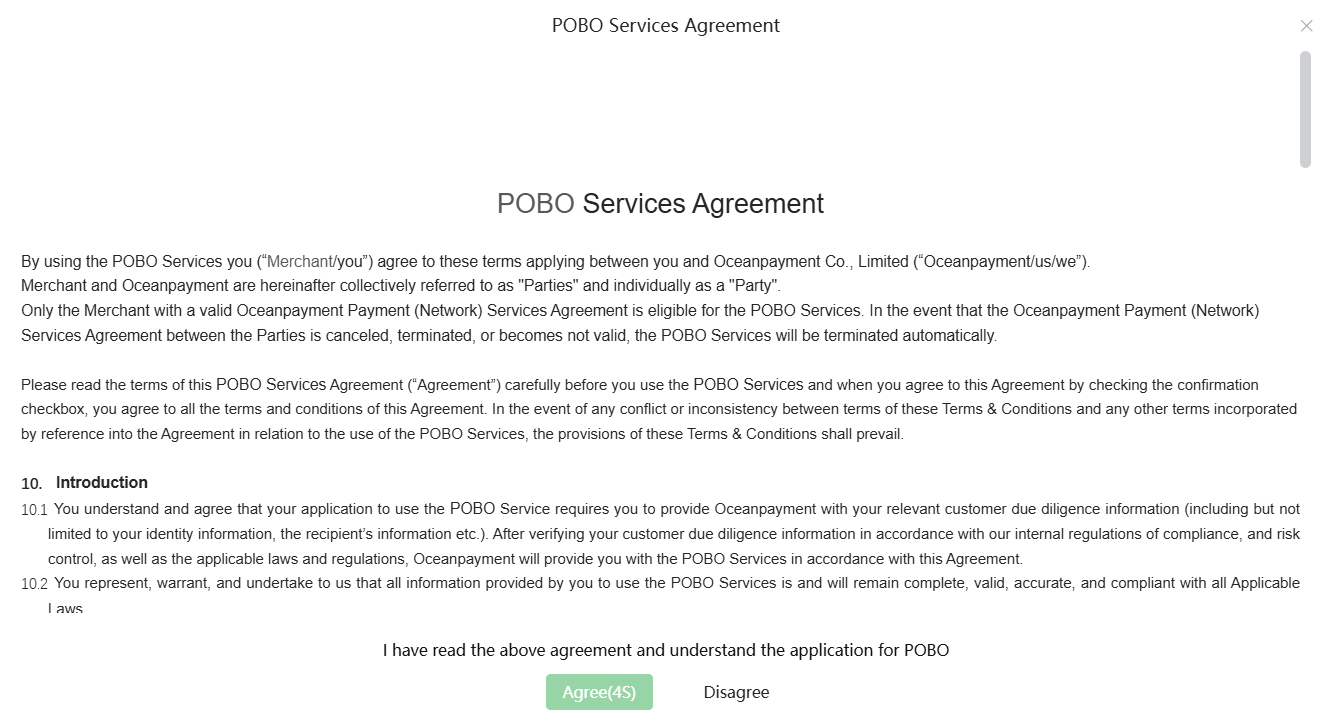
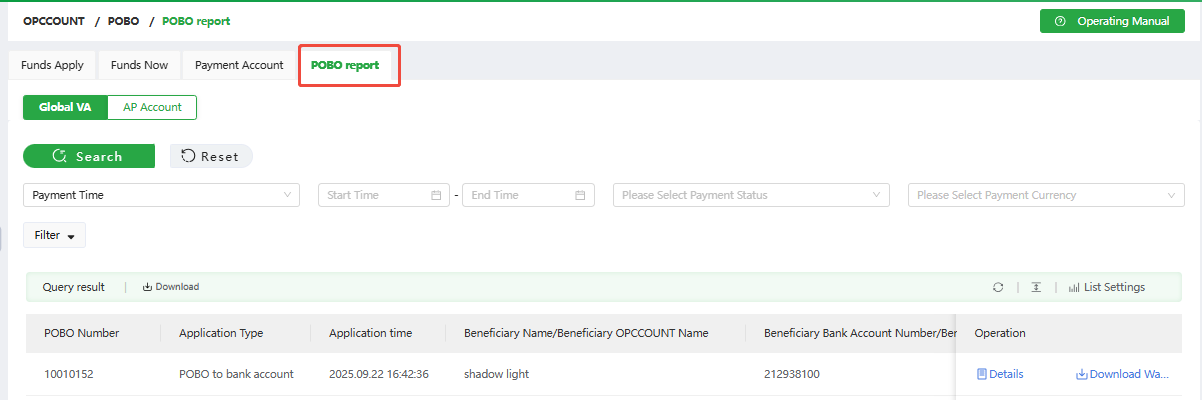
- After successful submission, it will show “POBO application submitted for review”. Then you can view the POBO details in【POBO Report】.
15. CNY POBO
- This feature requires activation upon request. Approval is necessary before initiating CNY POBO,please contact your dedicated account manager or business manager.
16. Initiate CNY POBO
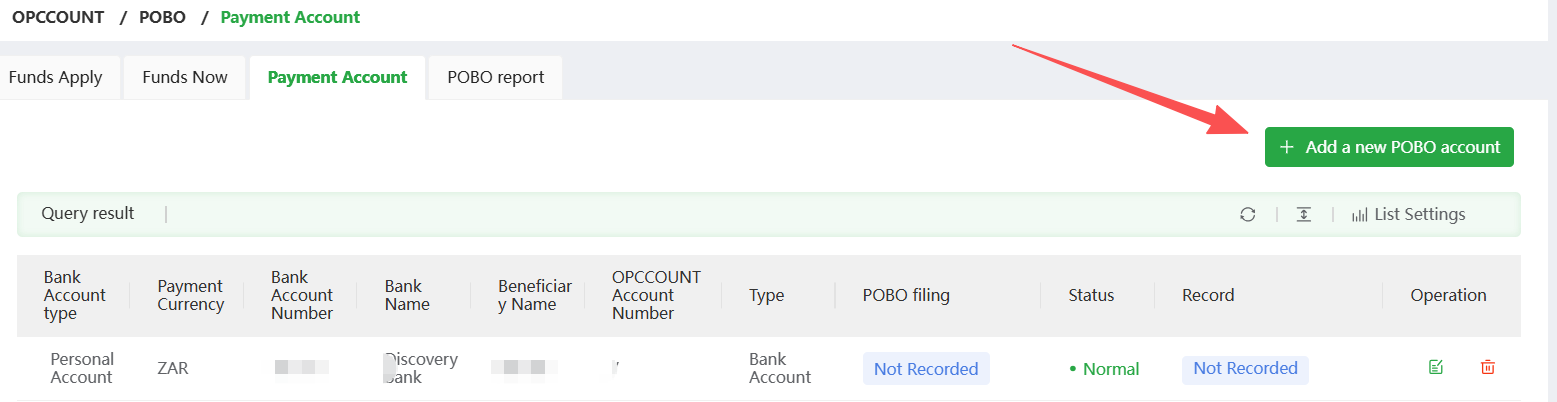
- Click the【Payment Account】to add a CNY POBO account.
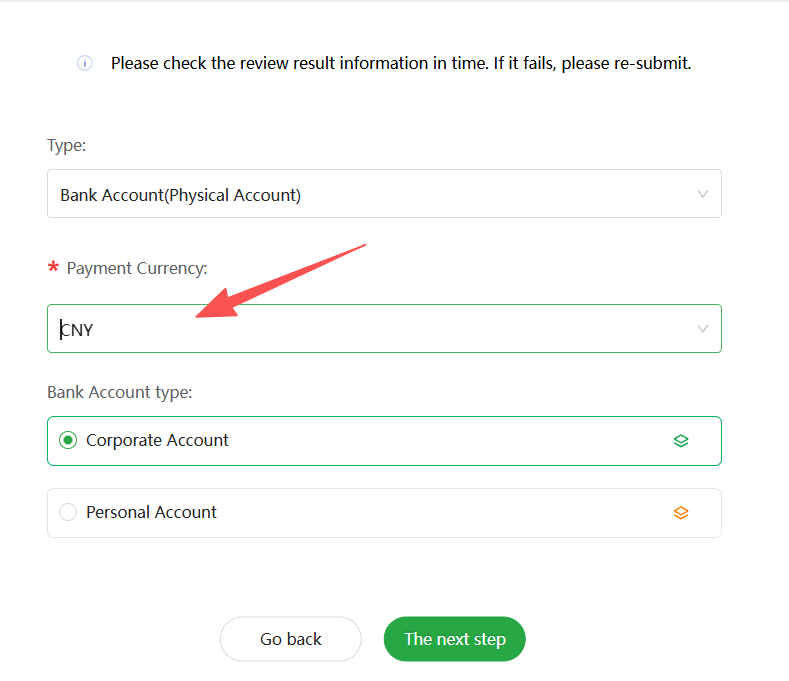
-
Fill in the corresponding information.
-
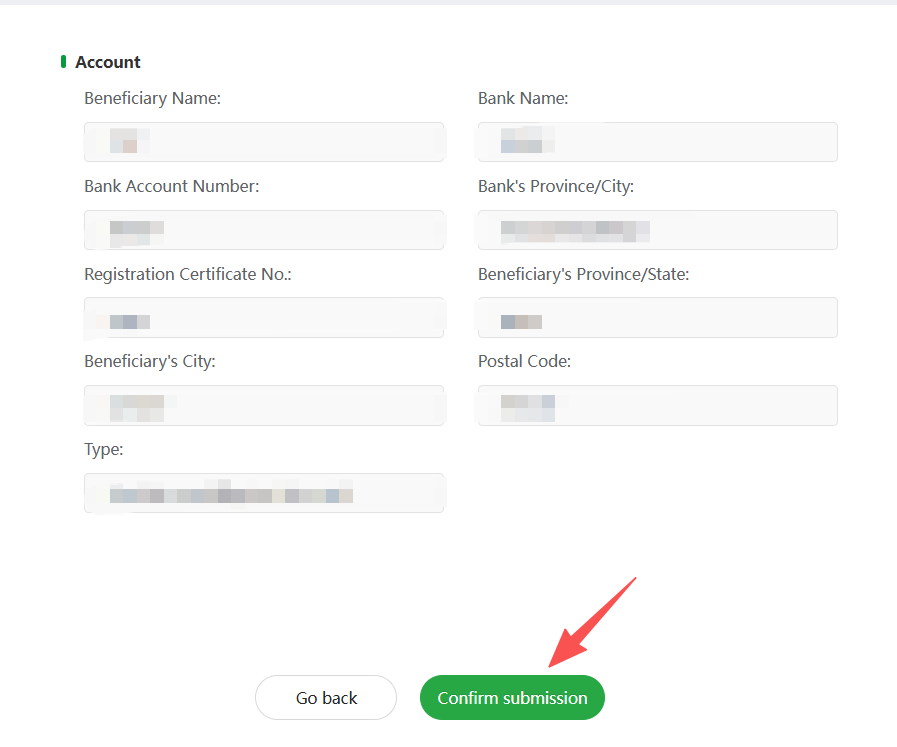
Confirm account information and submit the POBO account.
-
Initiate CNY POBO
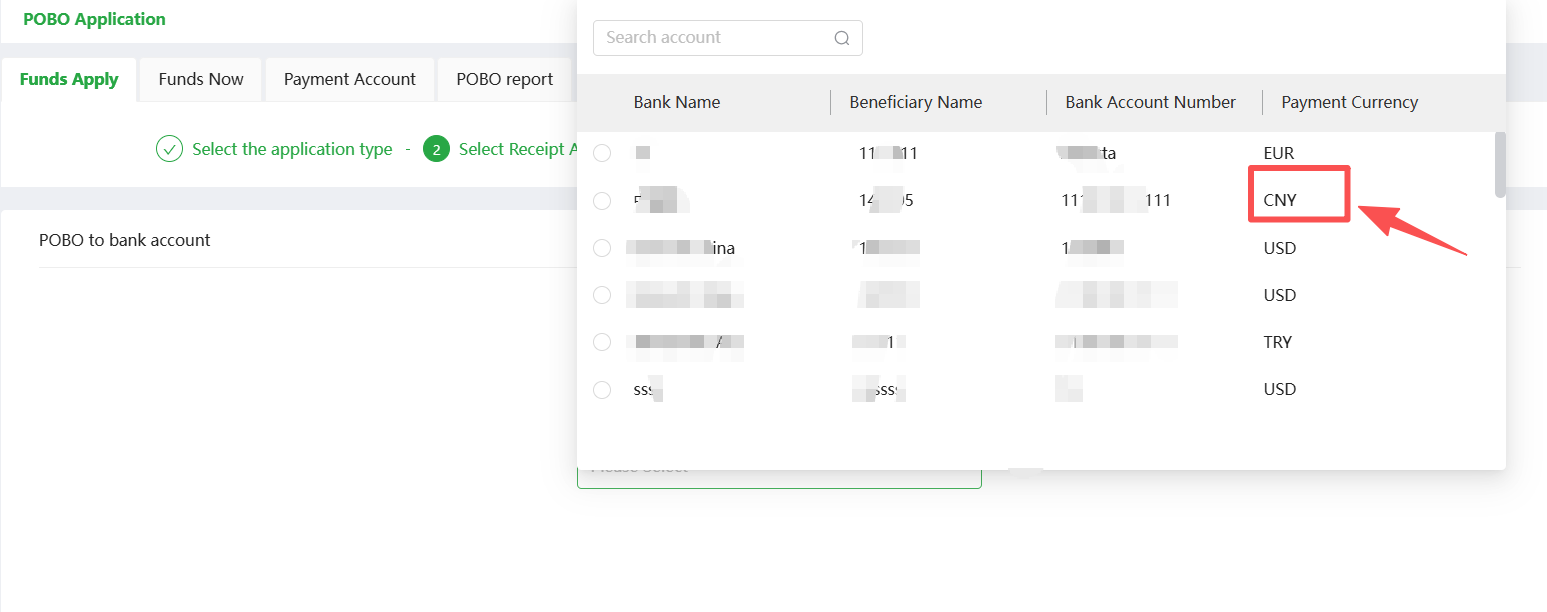
-
Fill in the POBO information
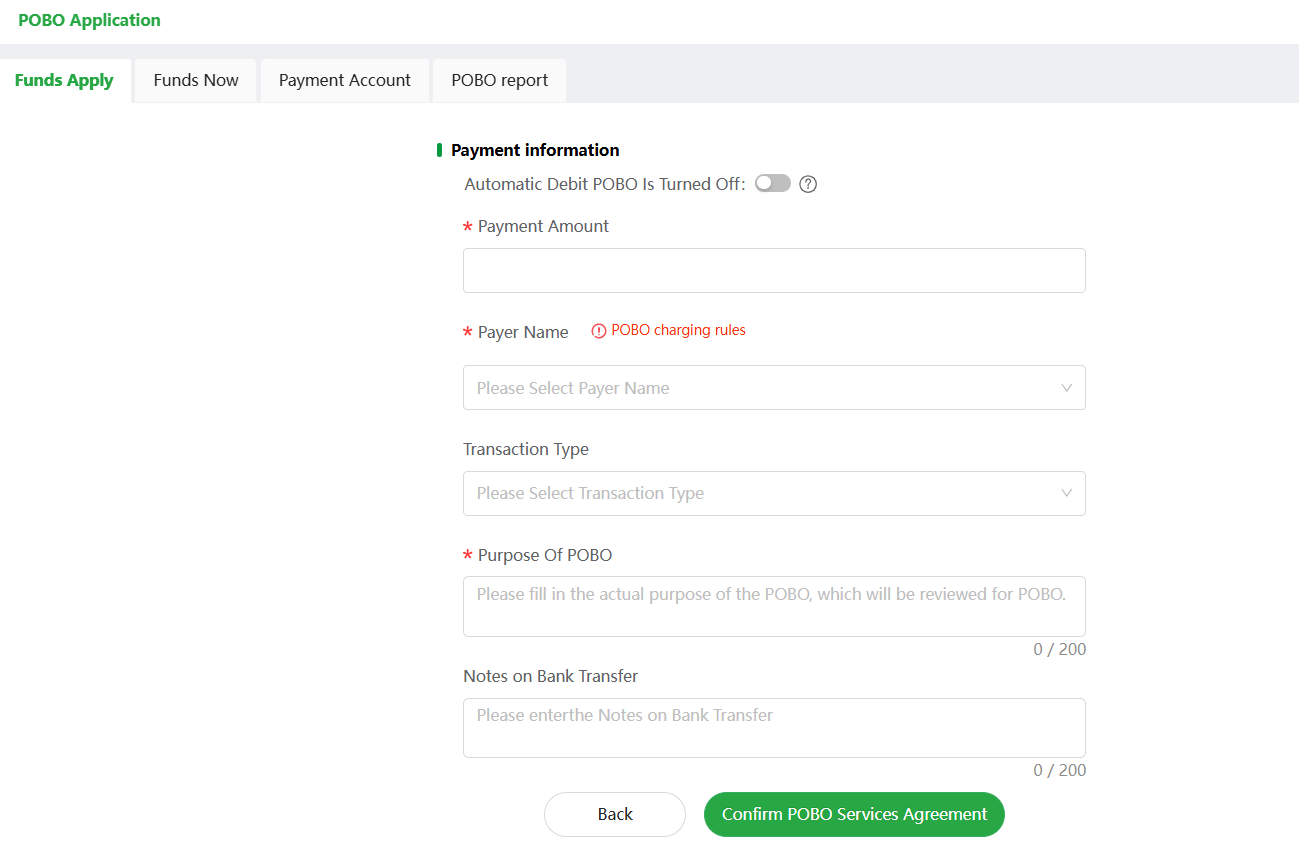
-
After submitting the POBO request, you can view the corresponding POBO records in the POBO Report.
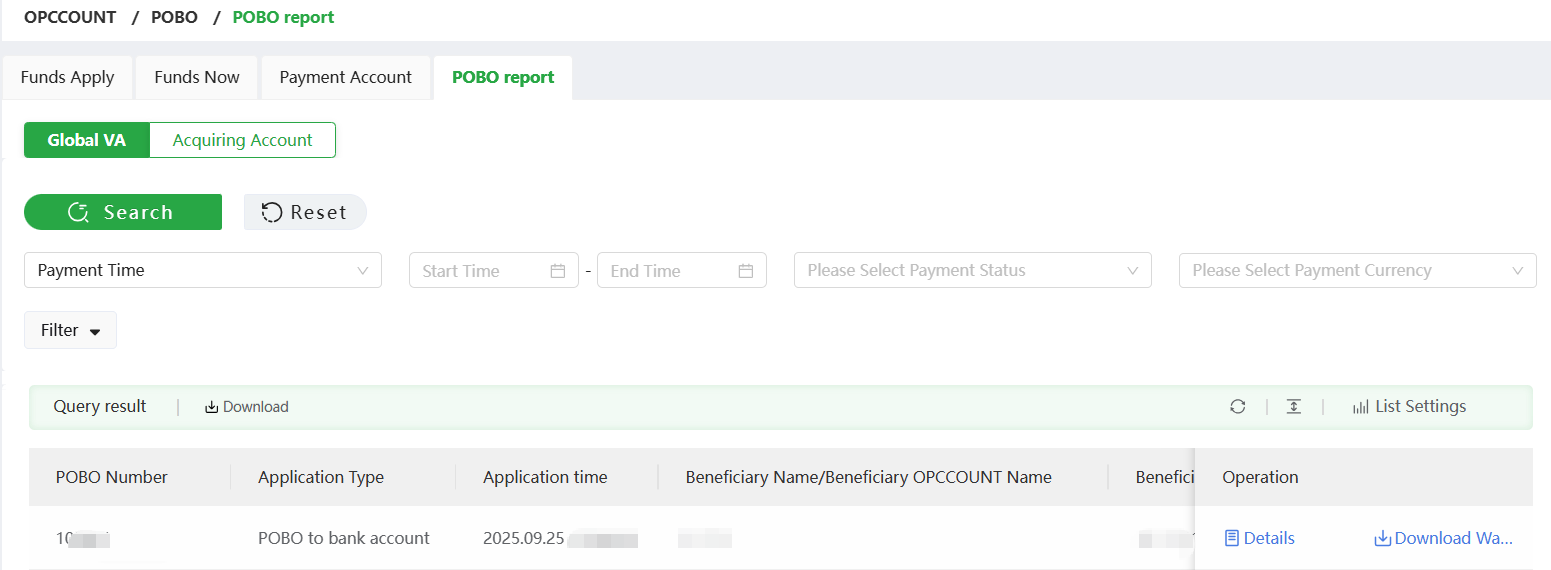
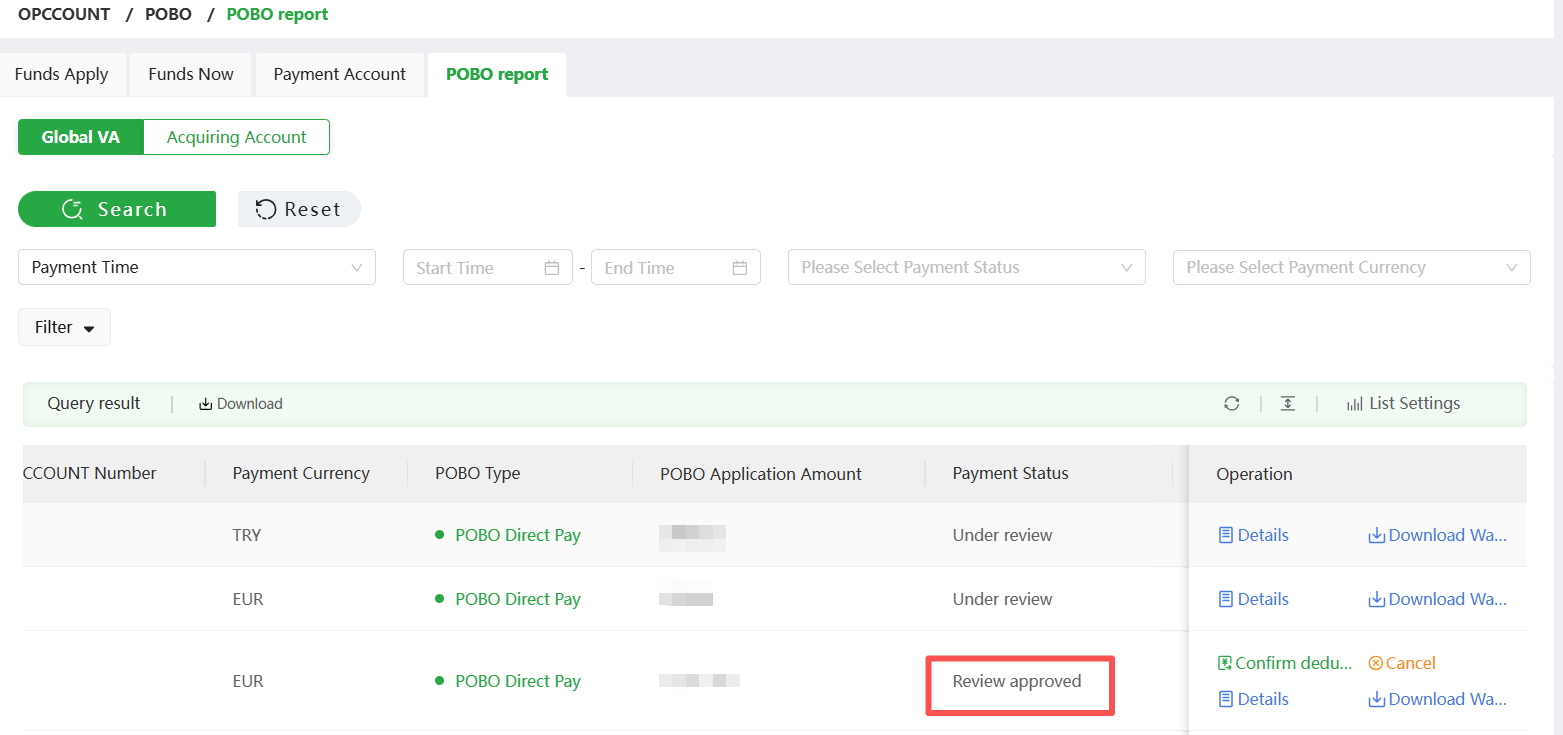
17. POBO Request Status
- You can view the final POBO status in the【POBO Report】module. Here, you can also click to confirm deductions, cancel, details, and download water bills uploaded by the backend system for records where the POBO status shows as successful.
Splitting Guide
18. Introduction
- Splitting is mainly used to handle fund allocation through terminal numbers.
19. Function Description
- Click 【Splitting】 - 【Bill Splitting】 to access the Splitting function
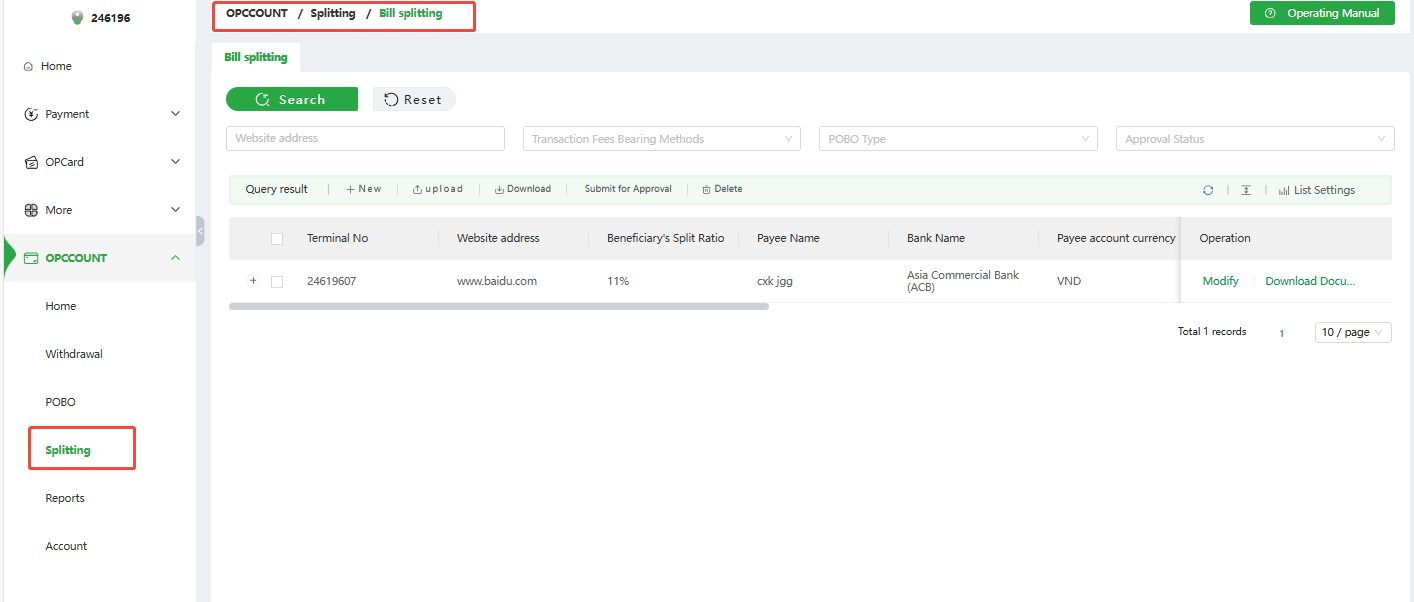
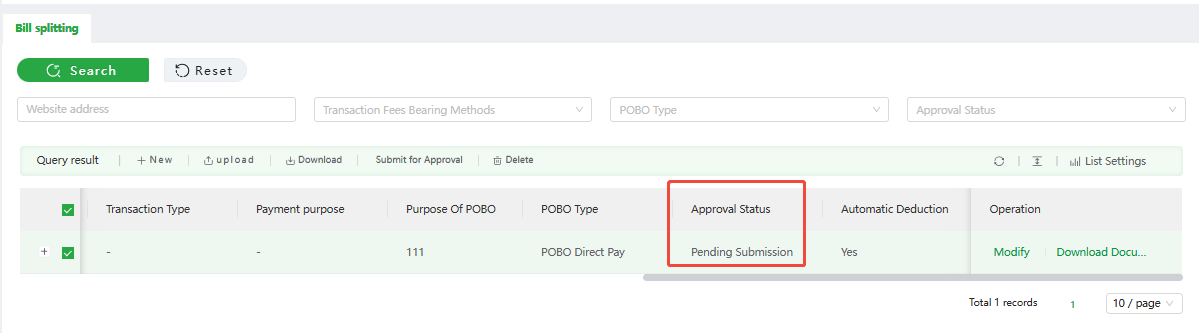
- Page allows filtering and includes buttons for【New】,【Upload】,【Download】,【Submit for Approval】, and【Delete】. You can also modify or download documents for existing Splitting records.
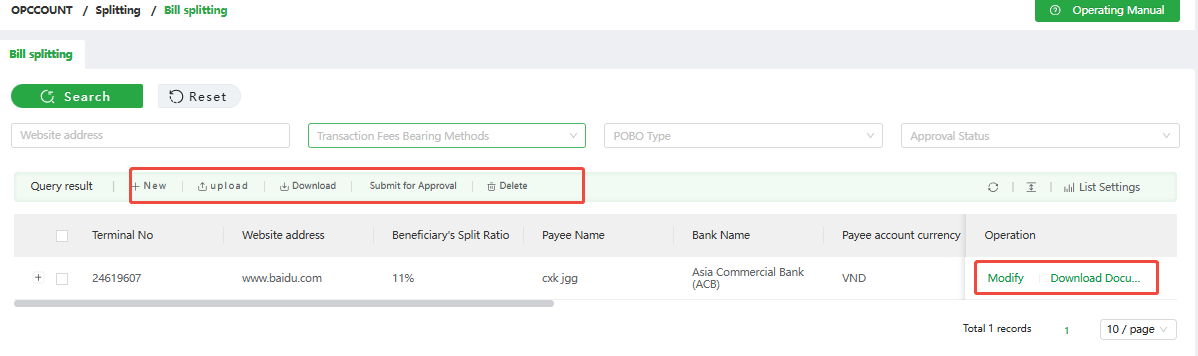
Button Description:
New: Click New to initiate a Splitting application.
Upload: Click Upload to download the corresponding template for batch uploading Splitting applications.
Download: Select Splitting application records on the current page to download Splitting details in bulk.
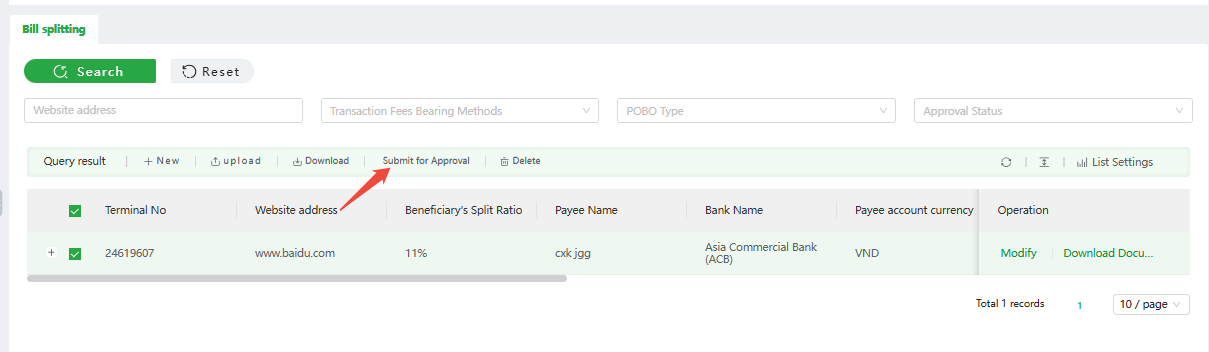
Submit for Approval: Select newly added Splitting applications on the current page to submit to Oceanpayment for approval.
Delete: Delete the selected Splitting application.
Download Document: Download the corresponding Splitting document.
20. Splitting Process
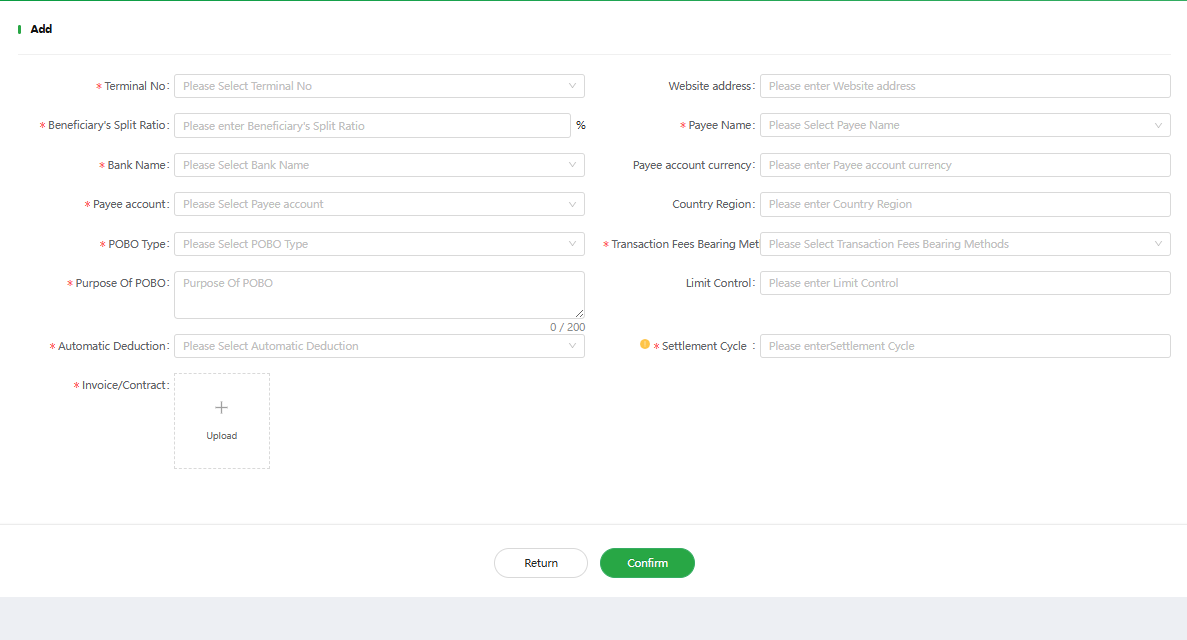
- Click【New】to go to the information entry page. Fill in the corresponding Terminal No, beneficiary account, and upload the related invoice/contract, then click Submit.
Notes:
Terminal No: The Terminal No. currently integrated with your website.
Beneficiary's Split Ratio: The allocation percentage of settlement for the beneficiary under this terminal.
Transaction Fees Bearing Method: BEN (borne by the recipient), OUR (borne by the payer), SHA (shared).
Limit Control: The maximum amount that can be allocated to the beneficiary per transaction.
Settlement Cycle: The time period for processing the split. For example, if the cycle is 3 days, a payout with splitting will be processed after 3 days with the corresponding fees deducted.
Beneficiary’s bank account must be whitelisted in Oceanpayment. To initiate a split, please contact your account manager.

-
You can see the corresponding application records on the page after add new splitting. Select the record and click Submit for Approval.
-
You can check Approval Status
-
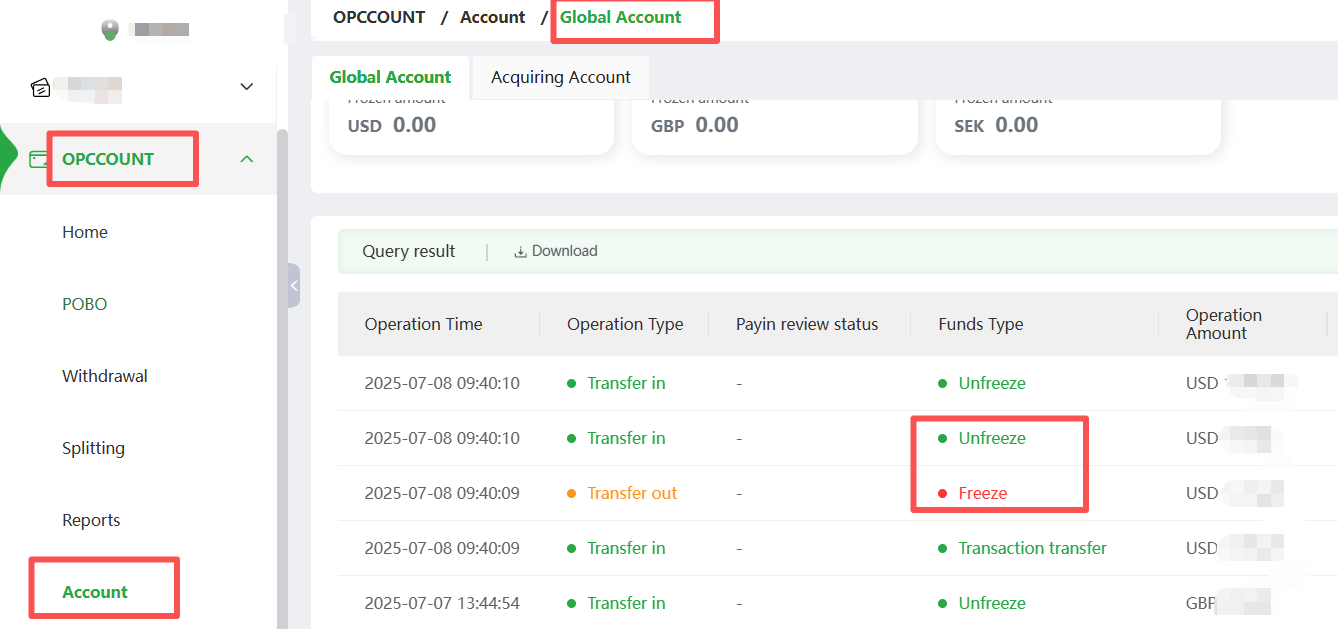
After Splitting application is approved, when a new settlement is transferred to OPCCOUNT, the funds for the configured terminal will be allocated separately and frozen. At the same time, funds matching the beneficiary‘s split ratio will be unfrozen as follows:
-
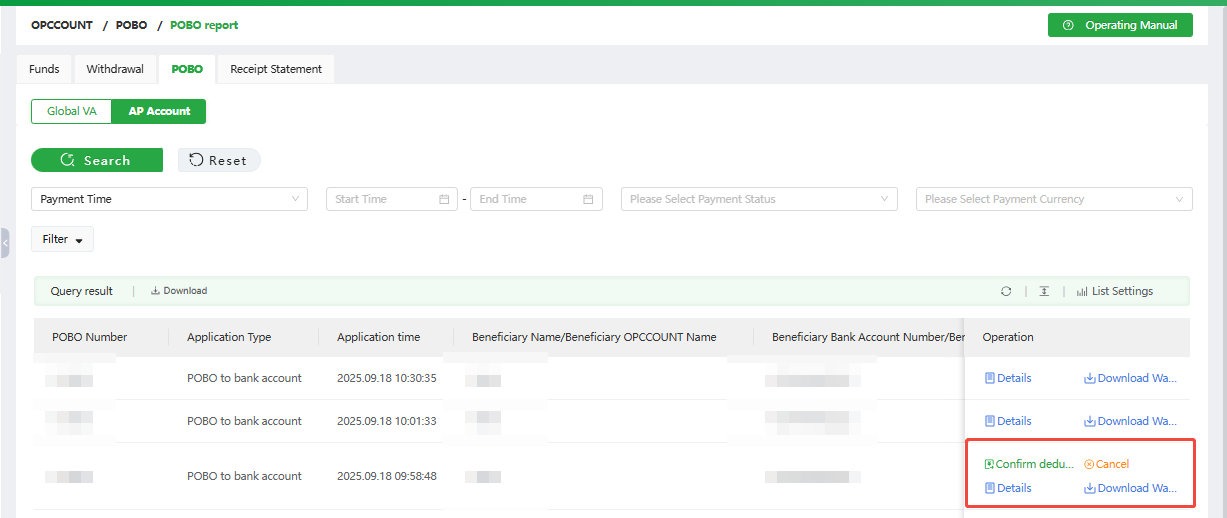
When split cycle is met, POBO will be generated. If no issues and auto-deduction is not set, you can click Confirm Deduction. After the deduction is completed, you can download water bill. If there are any issues, you can still click Cancel for this POBO.
OPCCOUNT Reports
21. Funds
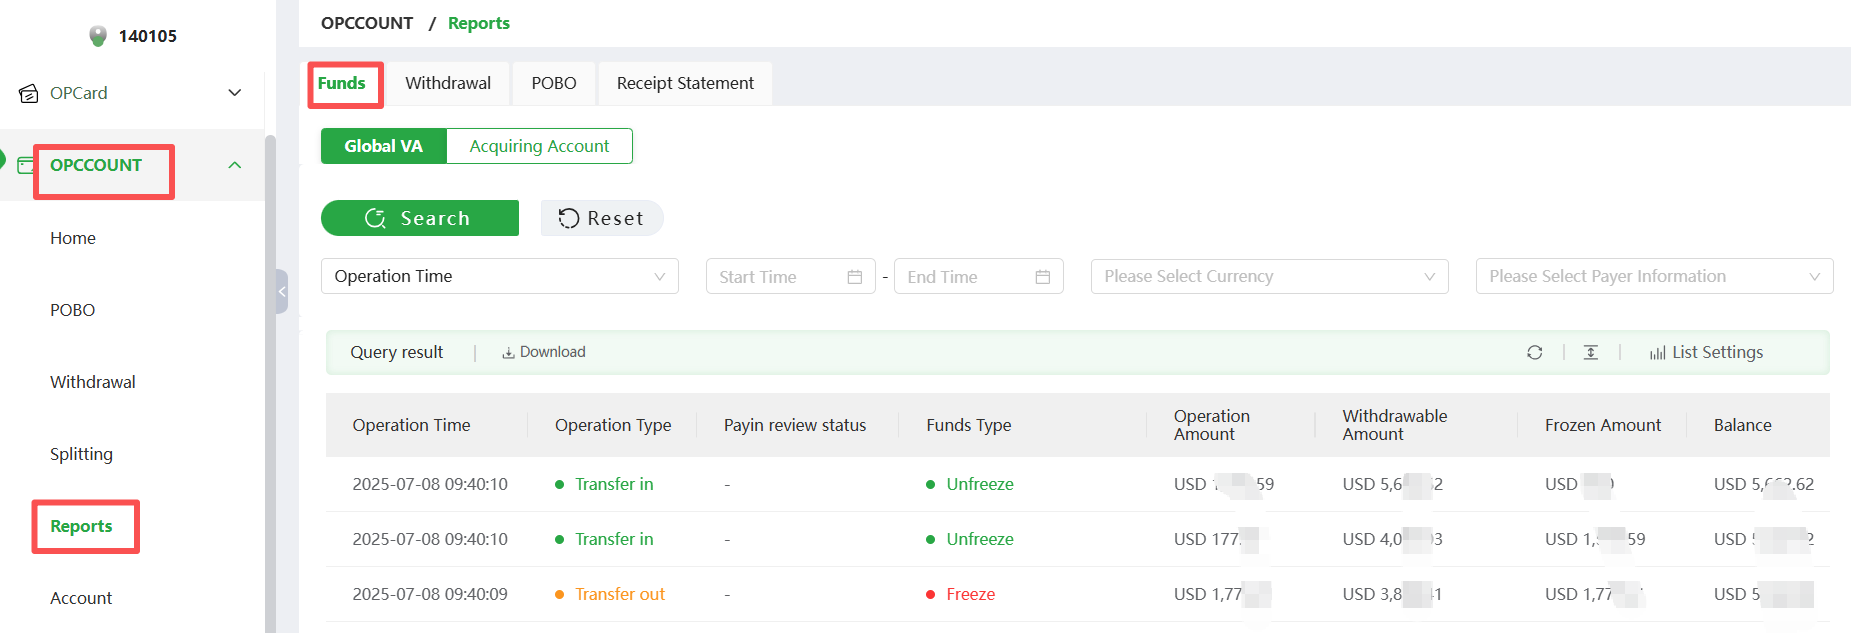
- You can view the Funds in the OPCCOUNT- Reports. The fund statement contains all your own fund transaction records on the OPCCOUNT platform.
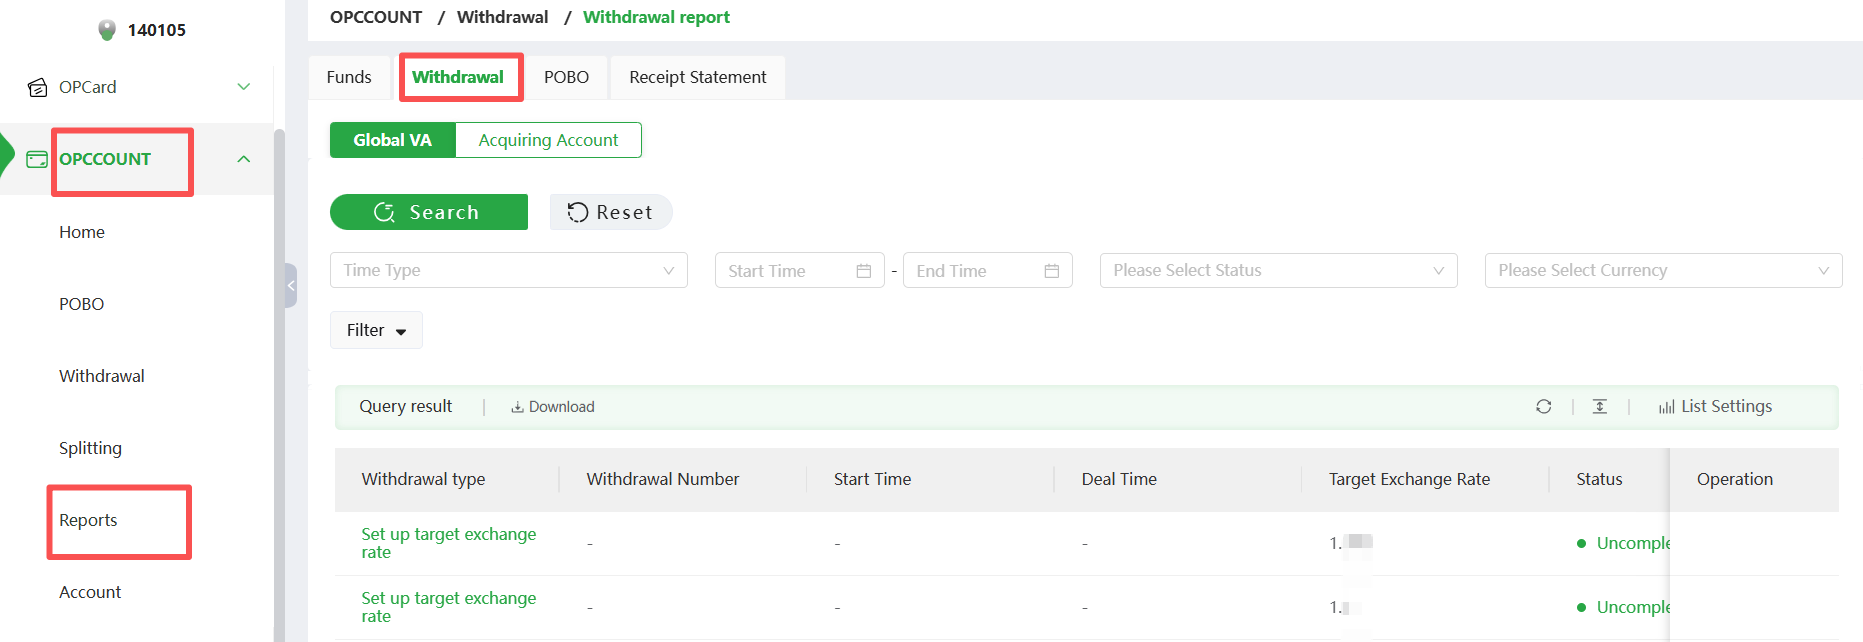
22. Withdrawal
- View all initiated manual or automatic withdrawal records
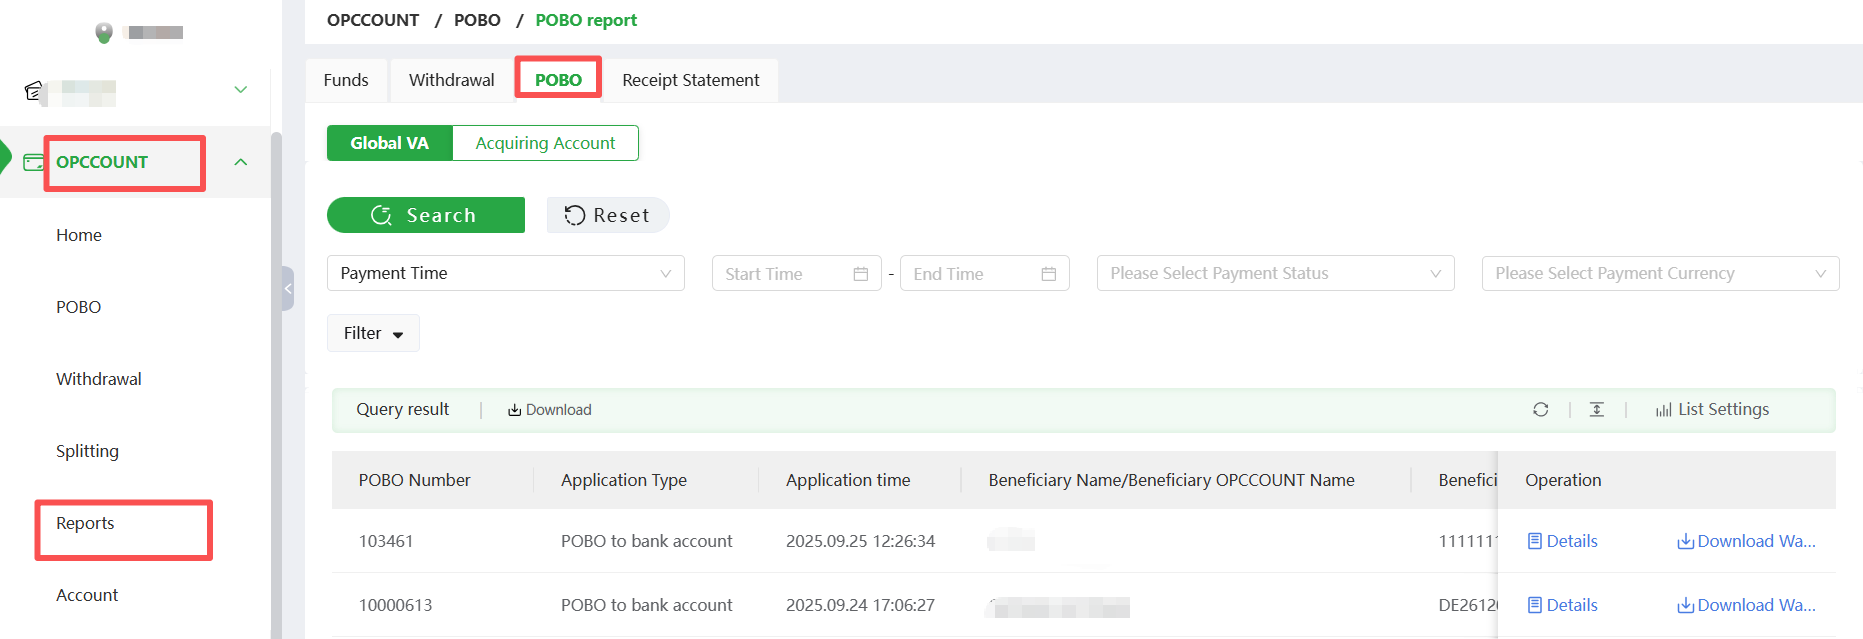
23. POBO
- View your POBO history for others
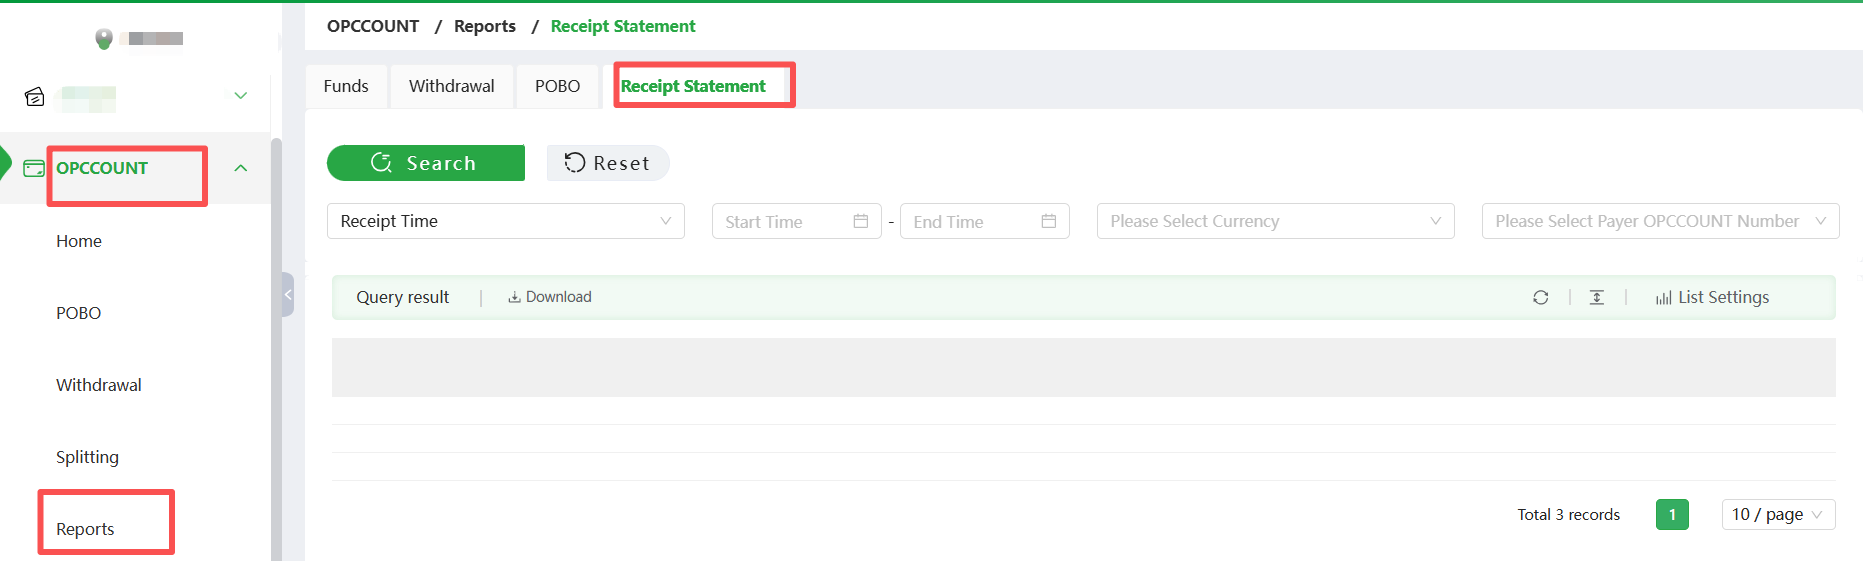
24. Receipt Statement
- View receipt records.
OPCCOUNT Account Management
25. Page Description
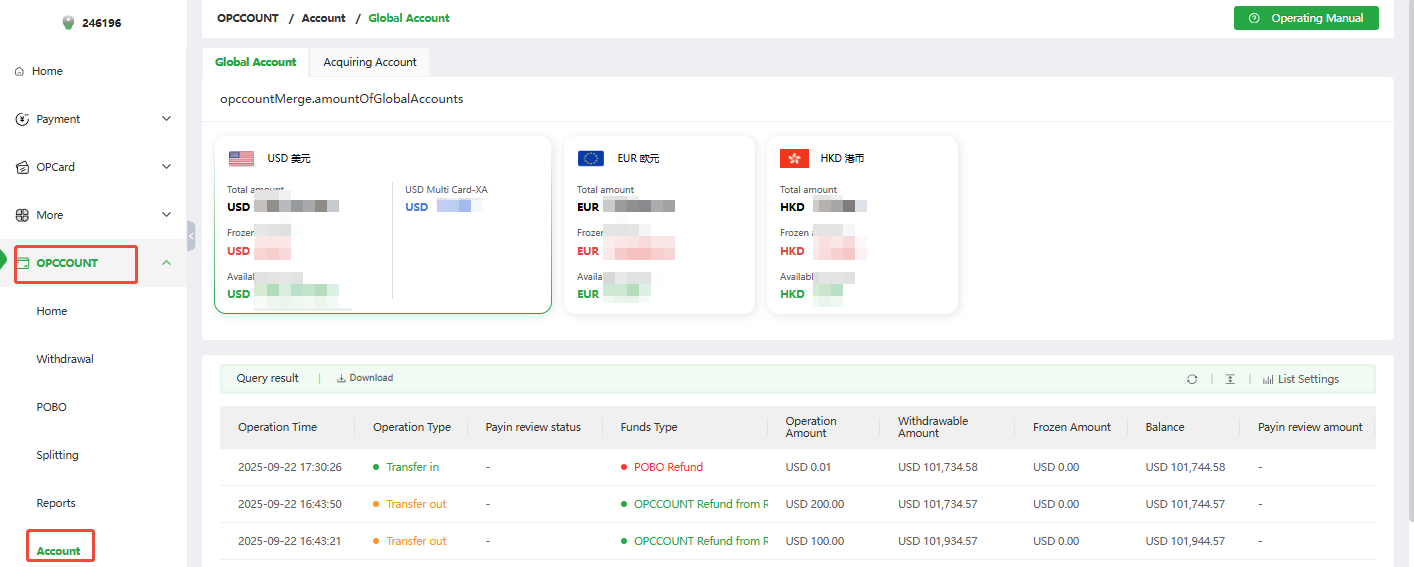
- Click【OPCCOUNT】-【Account】to view the summary of all transactions for Acquiring Account and Global Account (if applicable), and the account balance.