ODPM OP Card Oceanpayment User Guide 2606
1. Account Settings
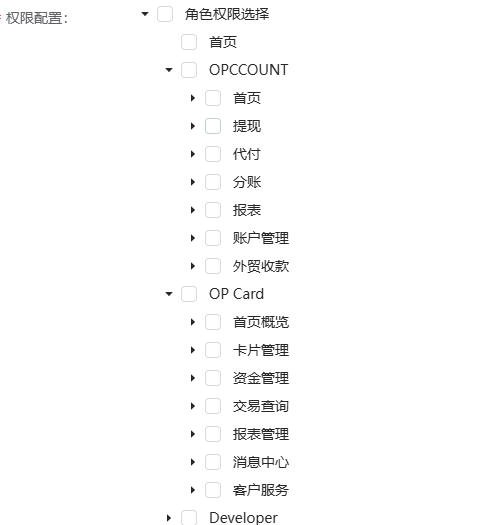
After the merchant's primary account is granted access to the OP Card and Card Issuance Limit Management modules, OP Card permissions for sub-accounts can be configured under ODPM Account Settings > Role Settings.
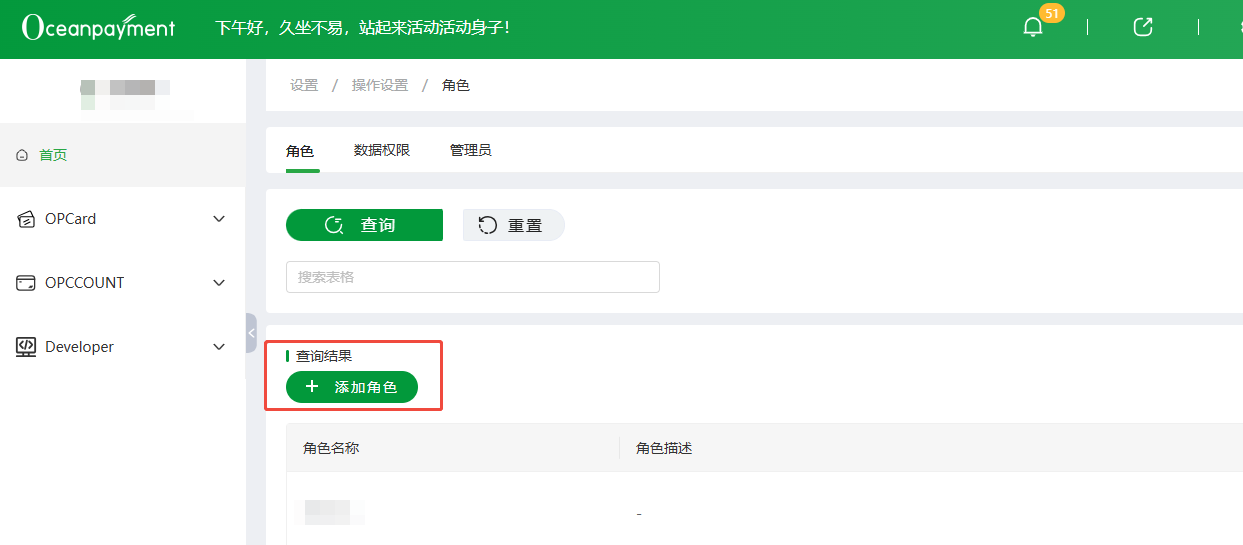
Go to Settings > Operation Settings > Roles to configure a role with access to OP Card and Card Issuance Limit Management.
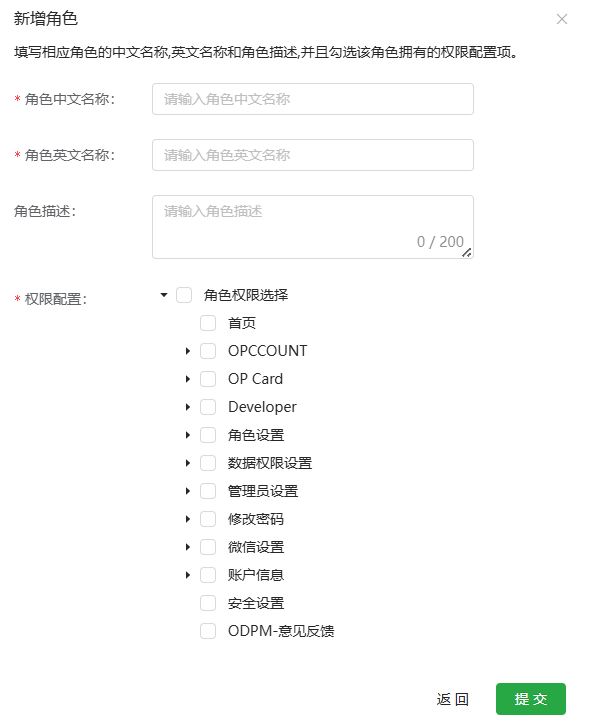
Permissions can be controlled for level-one menus, level-two menus, and individual buttons, as shown below.
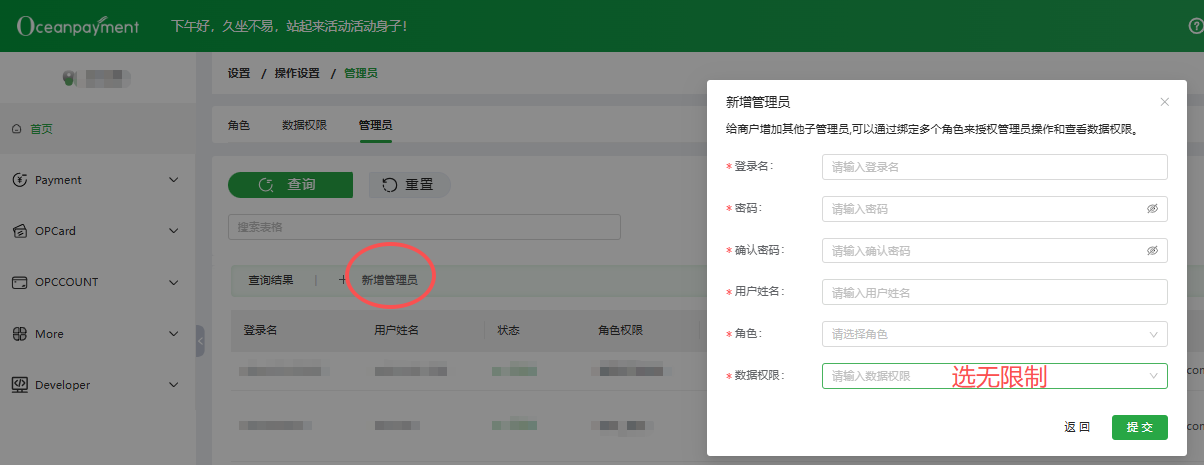
Go to Settings > Operation Settings > Administrators. Set the sub-account login name, password, user name, and role, and select Unlimited for data permissions.
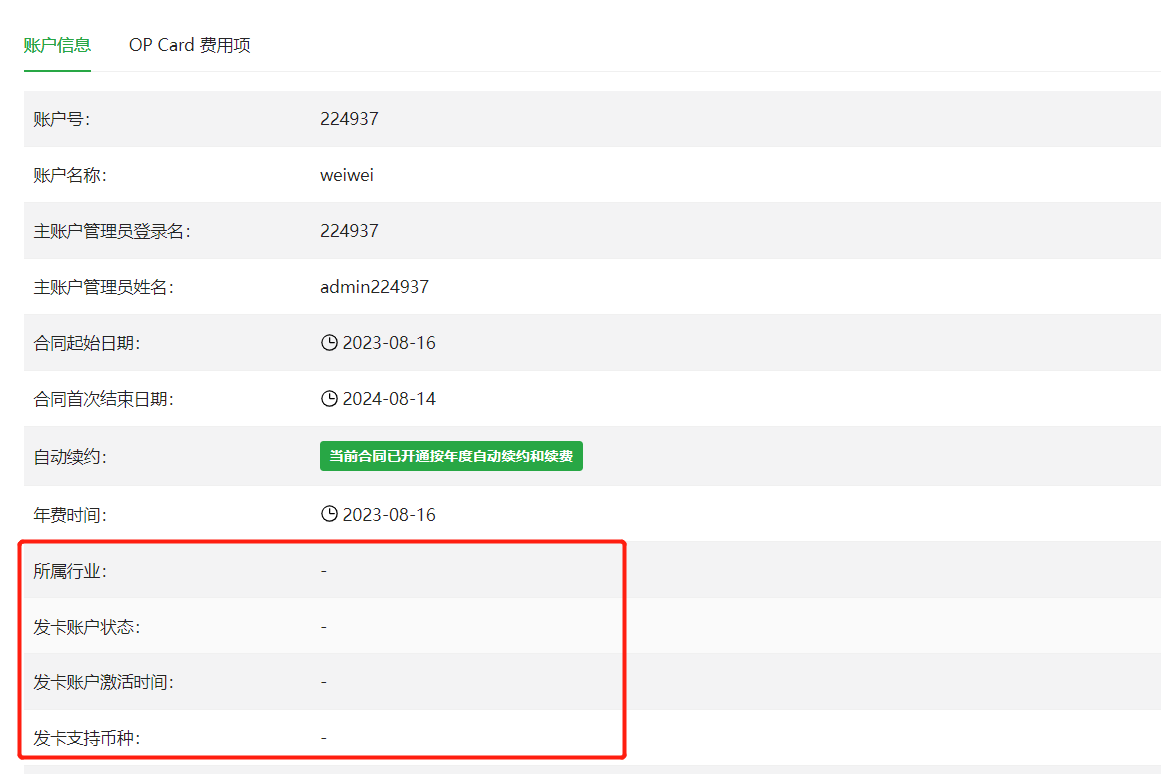
Go to Account Settings > Account Information to view card-issuance information.
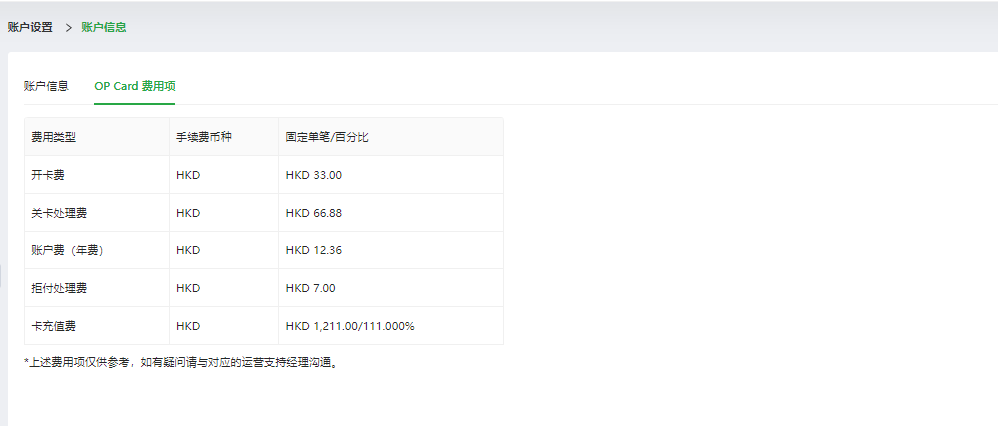
The OP Card fee items are also displayed under Account Settings > Account Information > OP Card Fee Items.
2. OP Card Dashboard Overview
| Name | Description |
|---|---|
| Limit Management | Opens Card Issuance Limit Management, where you can increase the balance of a currency account. |
| Available Balance | The real-time available balance. The page does not refresh automatically. Re-enter the Dashboard Overview module or refresh the page to retrieve the latest balance. |
The Dashboard Overview module shows card-issuance limits and real-time available balances for different currency accounts. You can filter by date to view charts for all card spending and monthly statements. It also provides quick access to Card Issuance Limit Management and four frequently used modules.
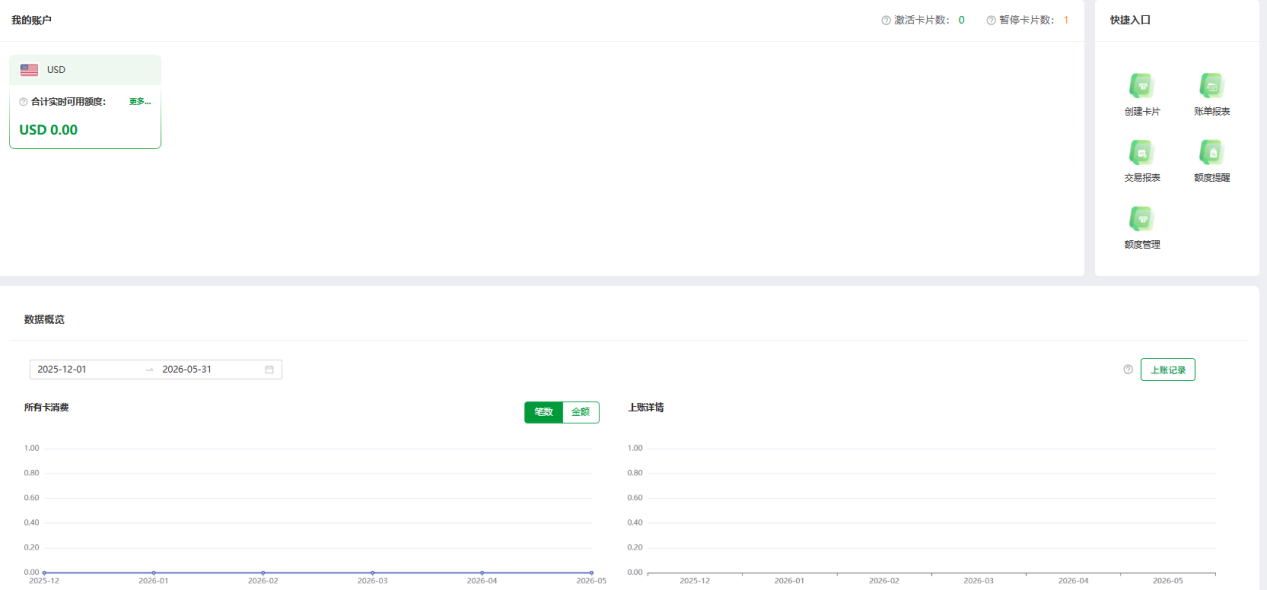
Go to OP Card > Dashboard Overview.
My Accounts displays the limits for different currency accounts. From left to right, Common Functions provides shortcuts to Card Management > Create Cards, Report Management > Monthly Statements, Report Management > Transaction Reports, and Fund Management > Limit Configuration. The overview also shows card data, total card spending, real-time available balances, and monthly statement statistics.
Click Limit Management under My Accounts to open the following page, where you can create a card-issuance limit.
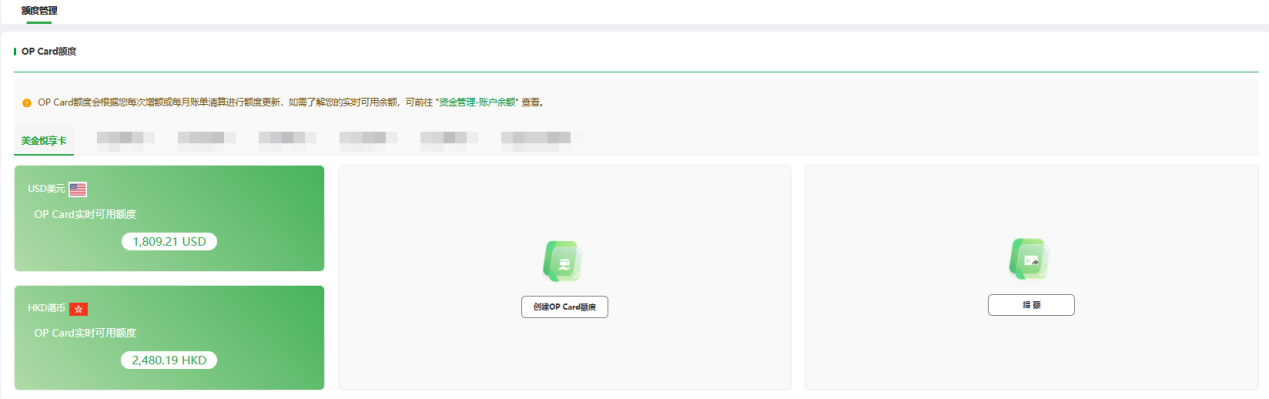
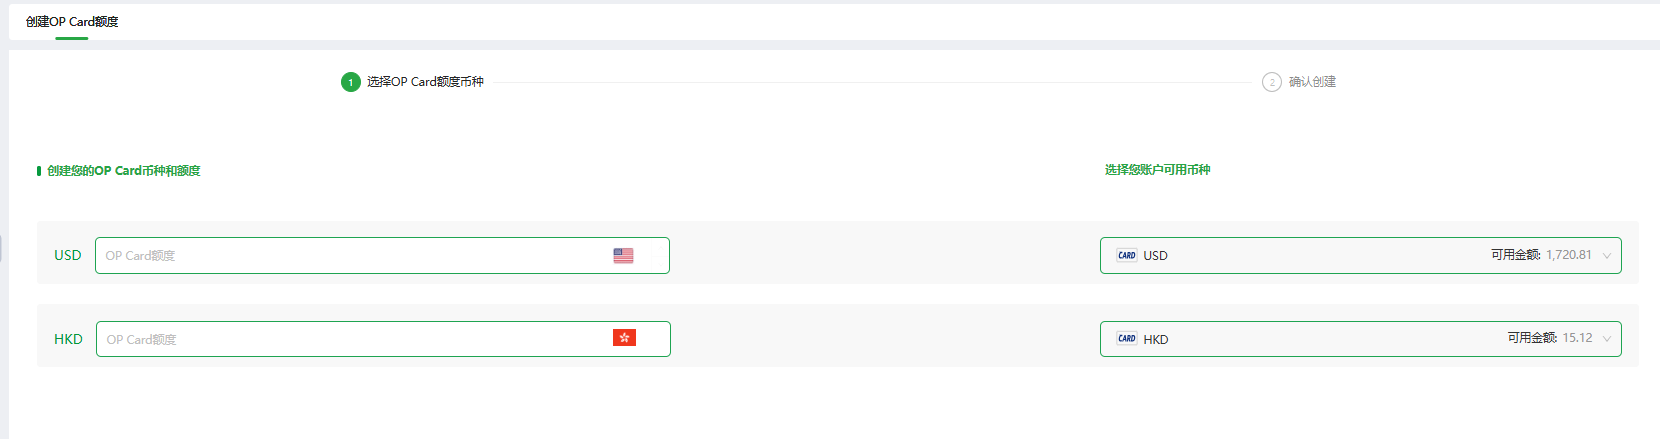
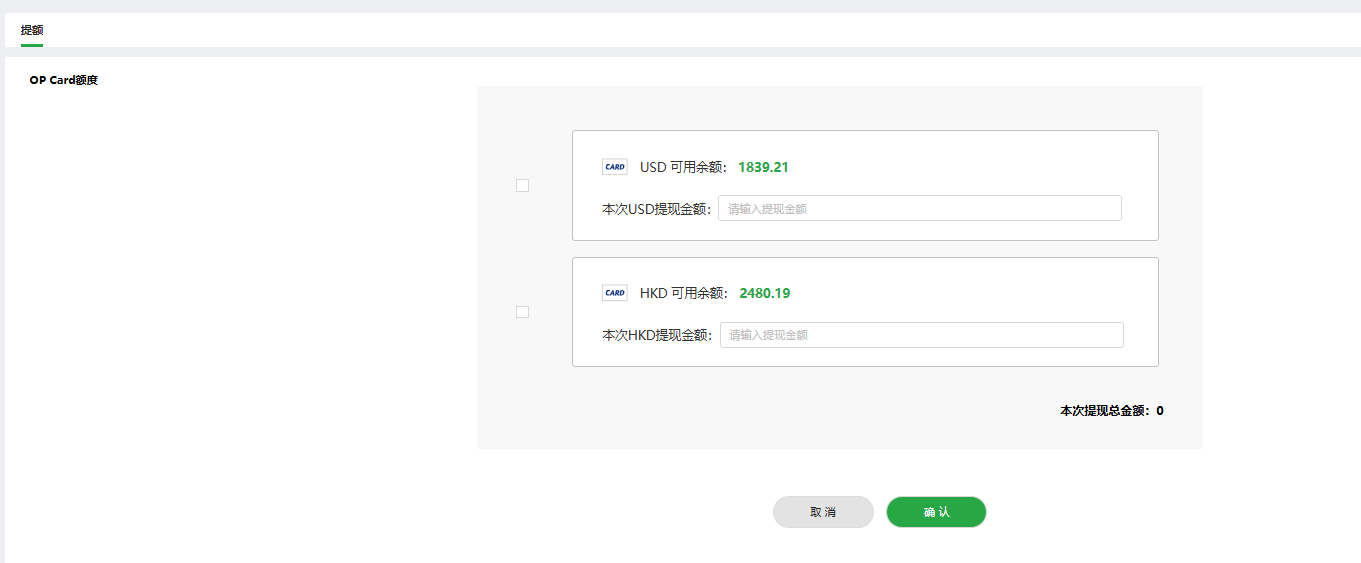
Select Increase Limit to transfer the OP Card balance to the OPCCOUNT account.
Click Create Cards under Common Functions to go directly to Card Management > Create Cards. The default card validity period is three years, and the cardholder can adjust the validity period when creating the card.
Click Transaction Reports to go directly to Report Management > Transaction Reports.
Click Statement Reports to go directly to Report Management > Monthly Statements.
Click Balance Alerts to go directly to Fund Management > Balance Alerts.
If you do not have permission to access one of these modules, the system displays: No permission. Please contact an administrator to configure your permissions.
Data Overview:
Select a start date and end date to view charts showing all card-spending and account-crediting statistics.
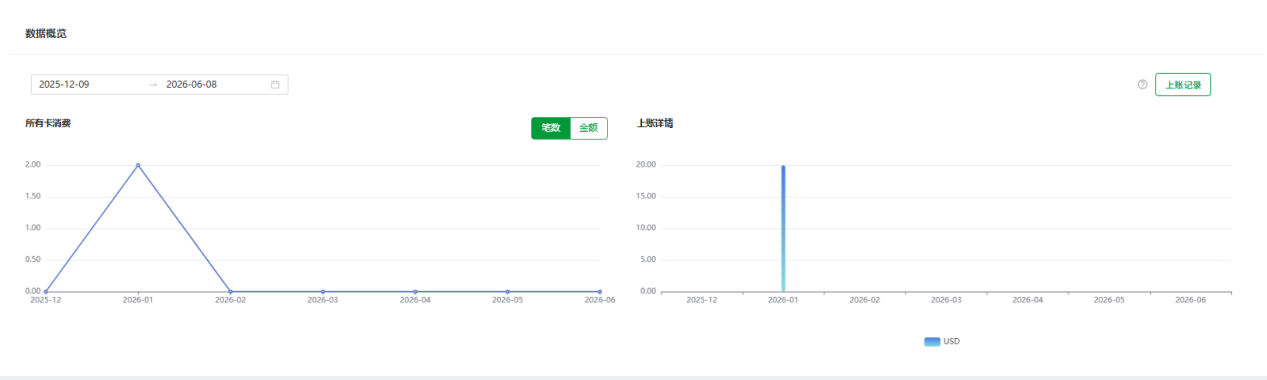
The available-balance section shows the available balance of each currency account and the combined total. To retrieve the latest data, re-enter the Dashboard Overview module or refresh the page.
3. Card Management
| Name | Description |
|---|---|
| Card Batch Number | A corresponding batch number is generated each time one or more cards are created. Use this number to search for the cards created in that request. |
Card Management contains four menus: Card Search, Cardholder Management, Create Cards, and Change History.
3.1 Card Search
Card Search is used to create, search for, and manage cards, including their status, information, and transaction limits.
Go to OP Card > Card Management > Card Search. You can filter cards using different criteria. By default, all cards created under the current account are displayed. Click Advanced Filters to show more filtering options.
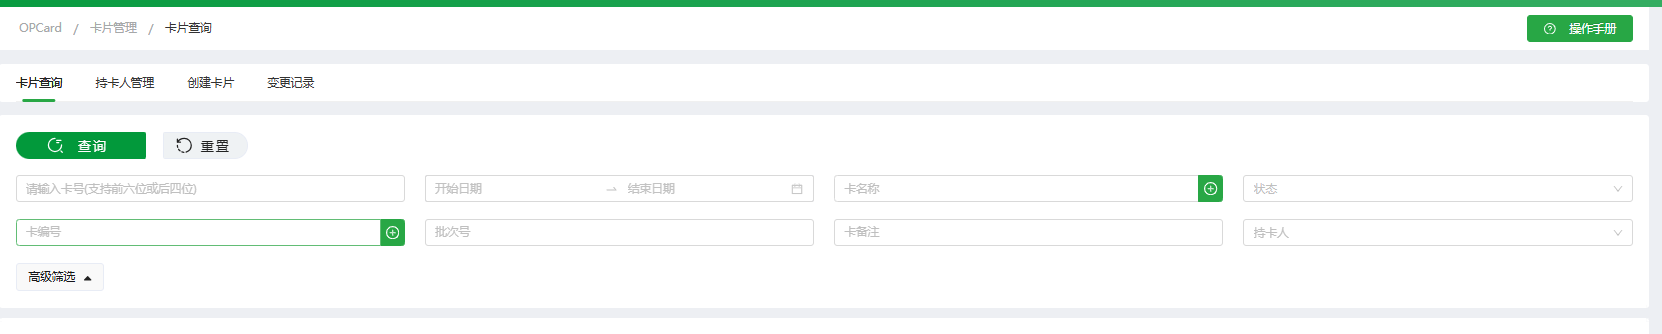
Click Search to display all matching results.

Use List Settings on the right side of the list to customize the displayed fields. We recommend selecting Card Usage Progress so that you can monitor consumption of the card's total limit in real time and replenish the OP Card balance in advance. Card usage progress equals the amount used divided by the card's total limit.
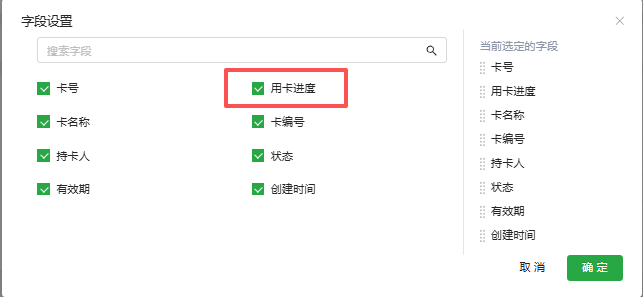

In the results list, click Export to export information for previously created cards to a spreadsheet. Click Bulk Card Closure to close multiple cards. Closed cards cannot be reactivated, so use this function with care.

Click a card number in the list to open the card details page.
You can edit the card name and description. Click the eye icon on the right to view the full card number and CVC.
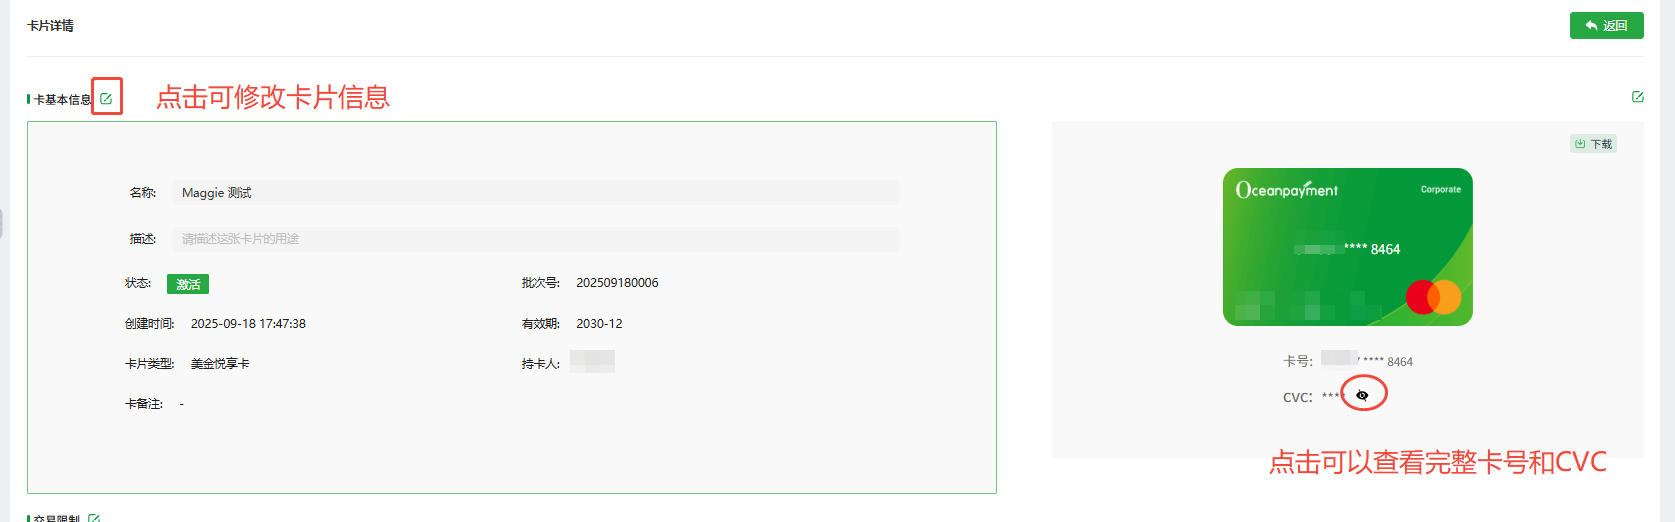
Transaction limit settings:
You can set the maximum number of transactions per day, permitted transaction countries or regions (based on the acquiring bank's country), transaction amount limits, and the total card limit. The total card limit is the amount available throughout the card's validity period and is generally recommended.
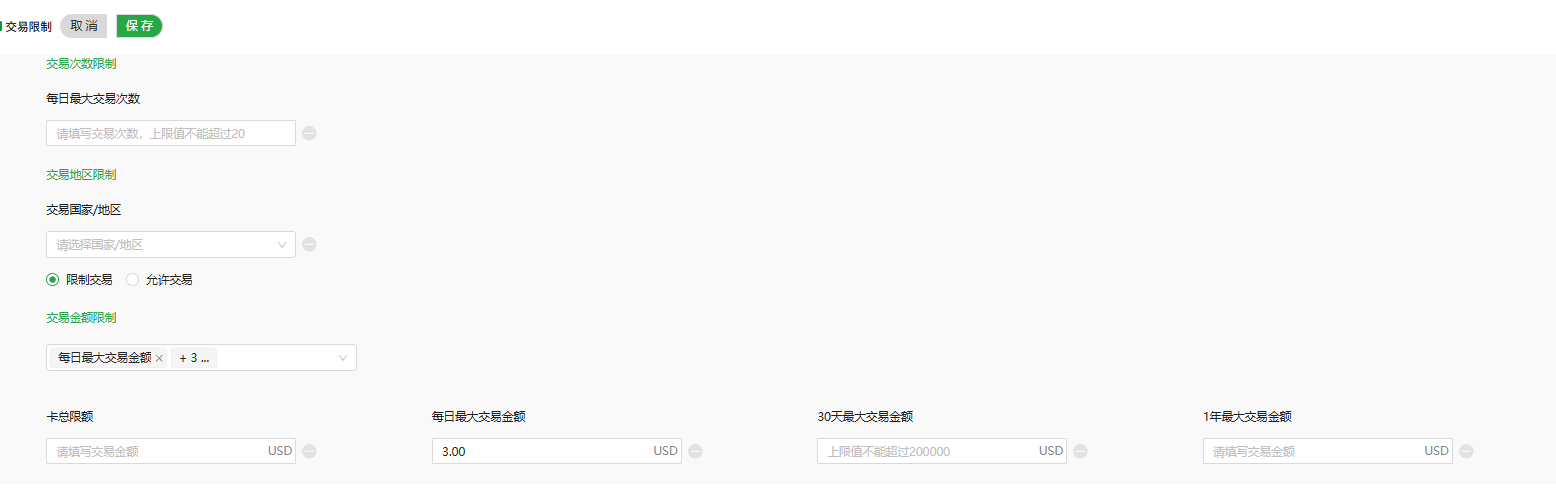
Transaction records: Shows the records generated by this card and supports statement downloads.

Cards can be suspended or closed. A closed card cannot be reactivated. Hover over More to view the available actions. For an Active card, the actions are Suspend Card and Close Card. For a Suspended card, the actions are Activate Card and Close Card. For a Closed card, these actions are disabled. Click Download Transaction Details to download the card's transaction details.

3.2 Cardholder Management
A cardholder must be created before a card can be issued. Enter an accurate email address and mobile number for the cardholder because subsequent transaction verification may require an email or SMS verification code.
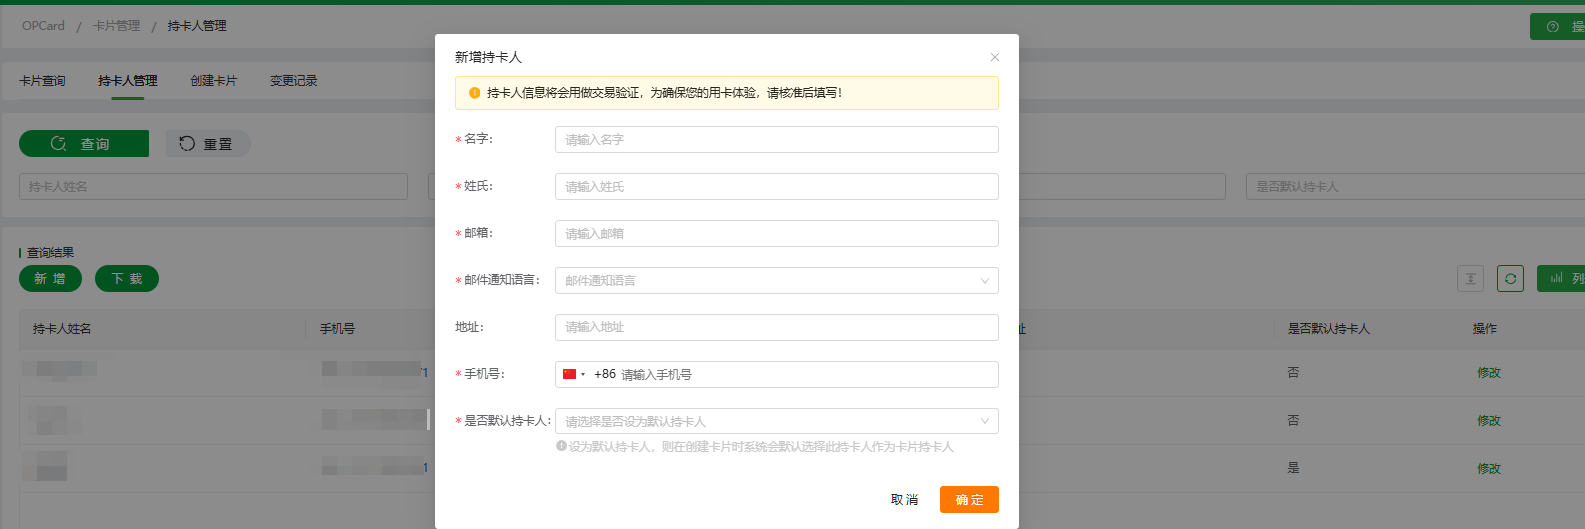
Cardholder information can be edited.

3.3 Create Cards
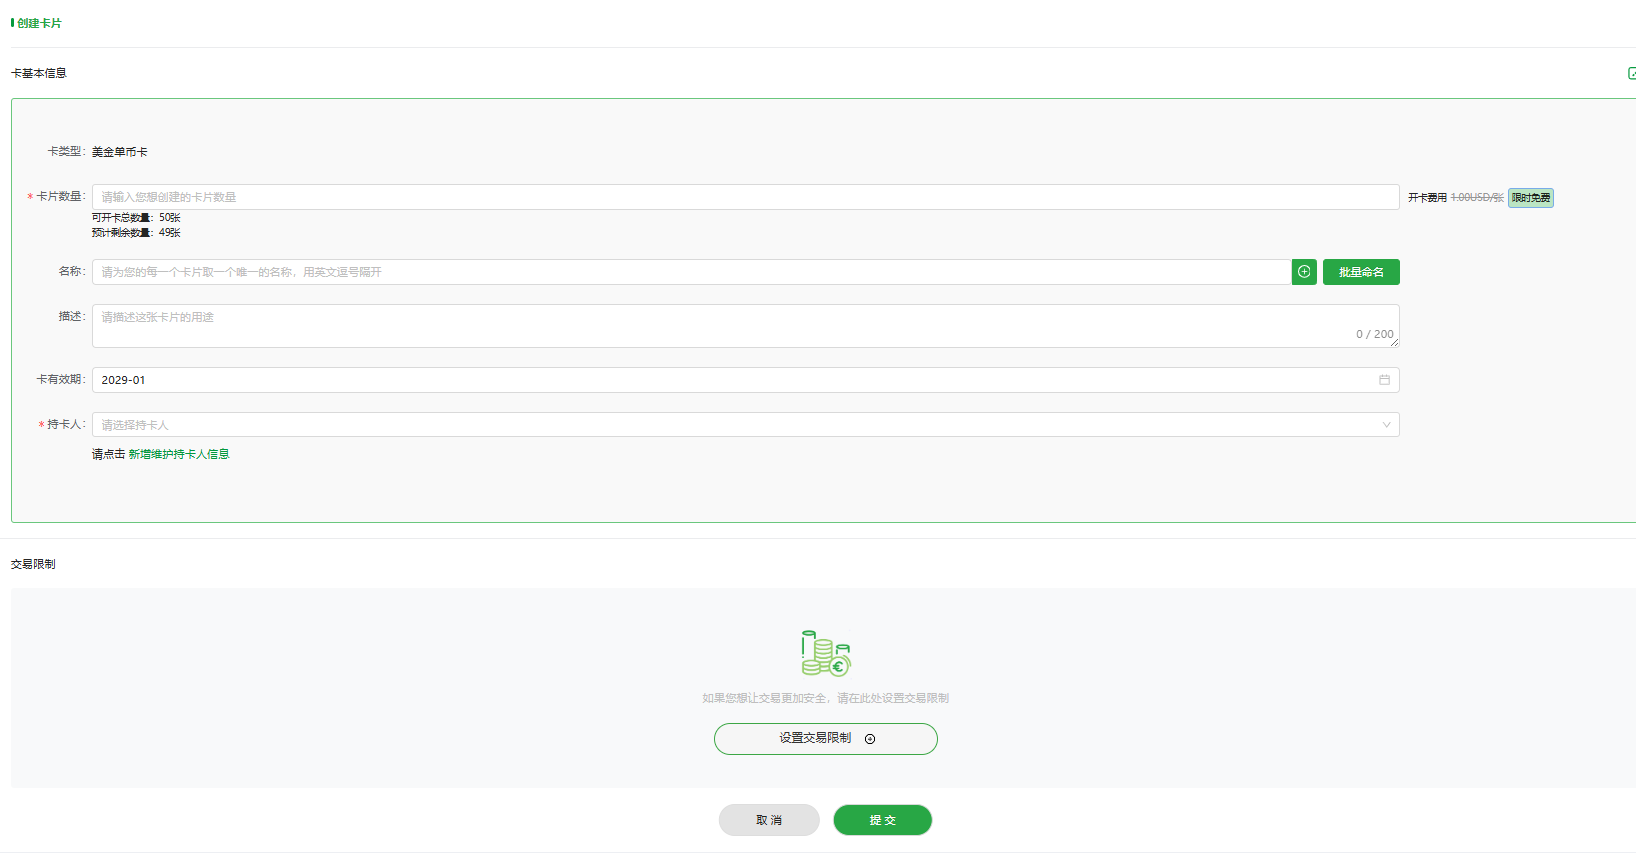
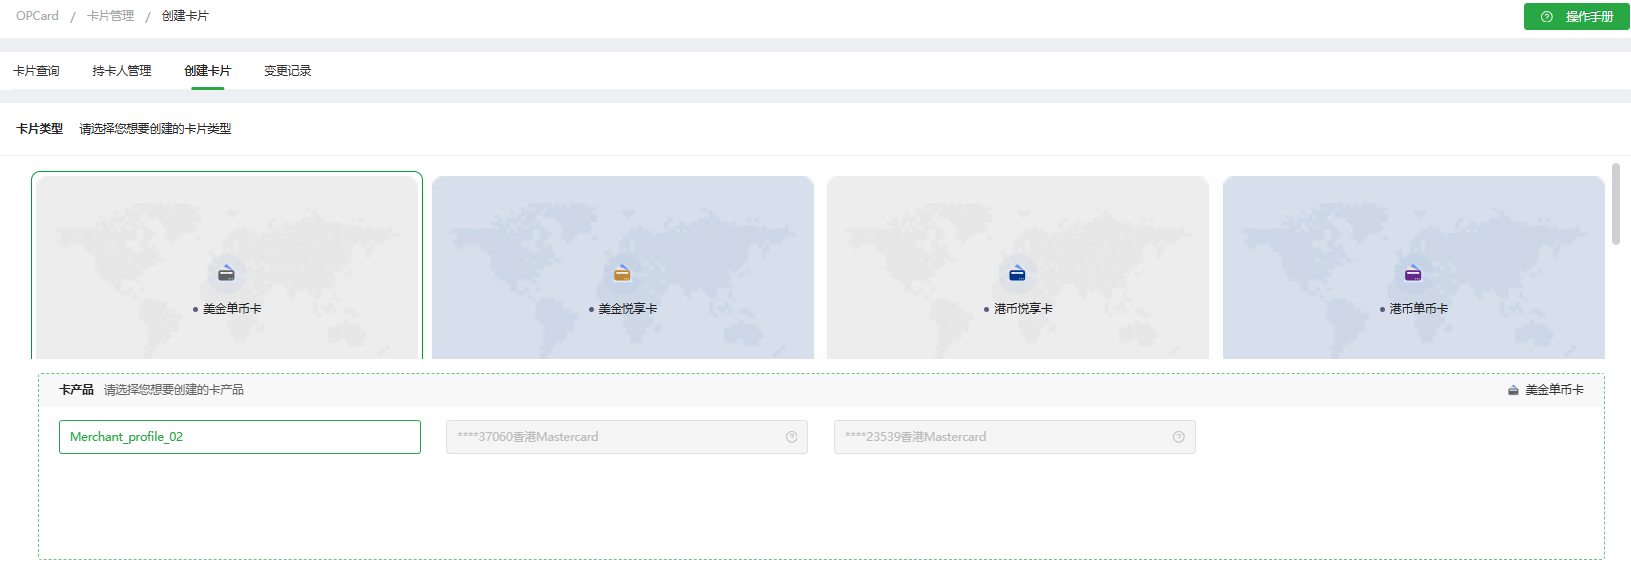
Click Create Cards and select a card currency. USD, HKD, and EUR are currently supported. Then select a card product (card BIN). One card product is enabled by default. Contact your account manager if you need another card product.
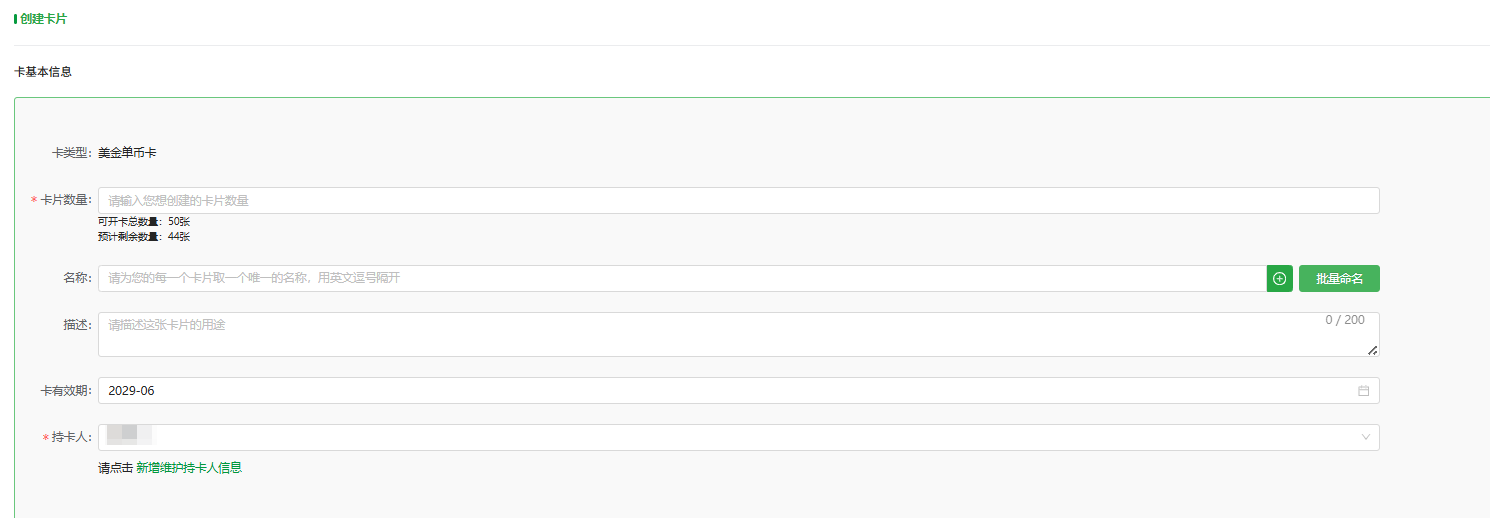
Complete the basic card information:
- Number of cards: Multiple cards can be created in one request.
- Card name: Name the card according to its purpose so that it can be identified quickly in later searches. Batch card creation is supported.
- Card description: Add supplementary information about the card's purpose.
- Card validity period: The default validity period is three years. It can be adjusted during card creation but cannot be changed after the card has been created.
- Cardholder: Each card must be linked to one cardholder. If no cardholder has been created, add the cardholder first.
Transaction limits: Configure the limits as described above.

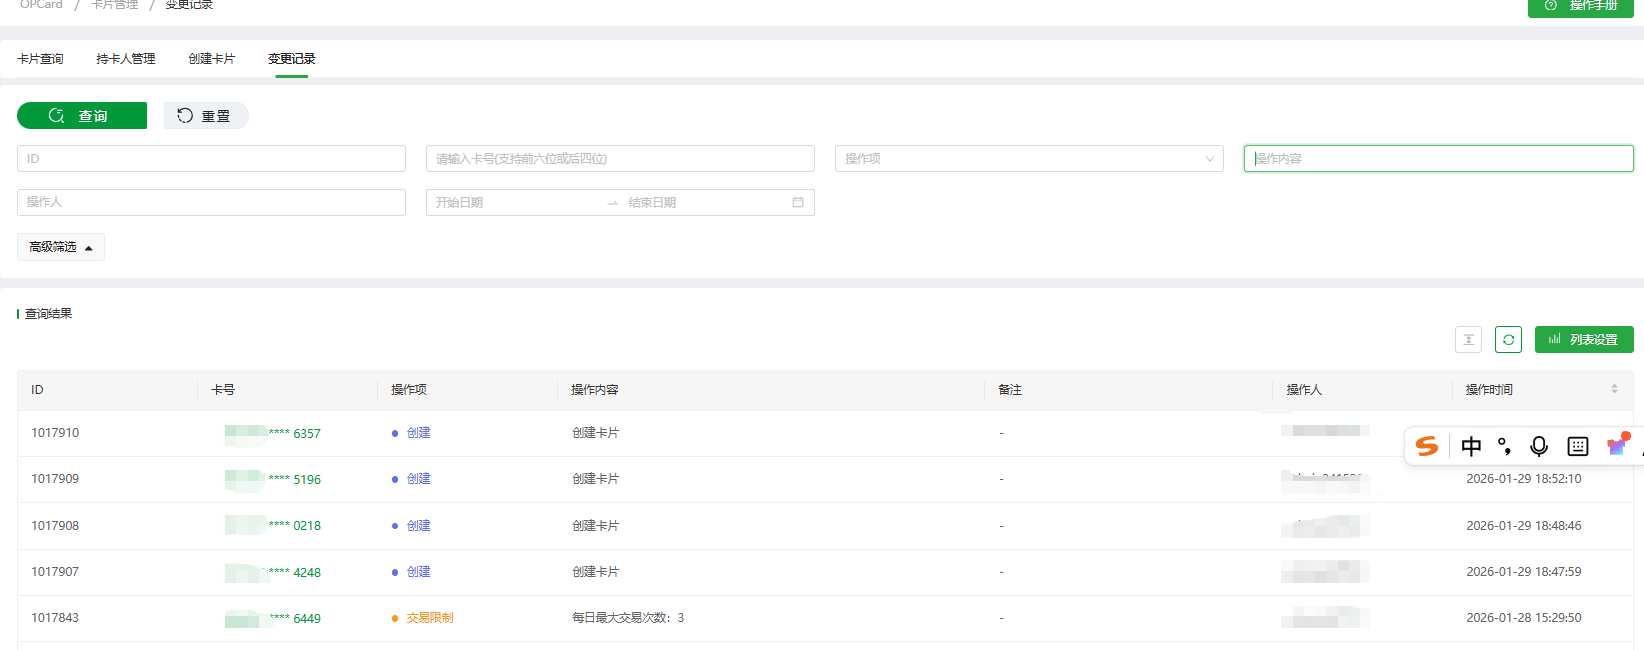
Click Change History to view card creation, status changes, transaction-limit changes, and other card operations.
3.4 Change History
Change History records card-management operations, including card creation, card-status changes, and transaction-limit edits.
Go to OP Card > Card Management > Change History and filter the records using different criteria.
By default, all card change records under the current account are displayed.
4. Fund Management
In this module, you can check real-time account balances and real-time incoming and outgoing account transactions, and manage balance alerts.
| Name | Description |
|---|---|
| Balance Alert | Triggers an email alert when the real-time available balance falls below the configured low-balance threshold. |
| Available Balance | The real-time available balance. The page does not refresh automatically. Re-enter the Dashboard Overview module or refresh the page to retrieve the latest balance. |
4.1 Account Balance
Go to Fund Management > Account Balance to retrieve real-time balance data. You can also filter the data by currency.
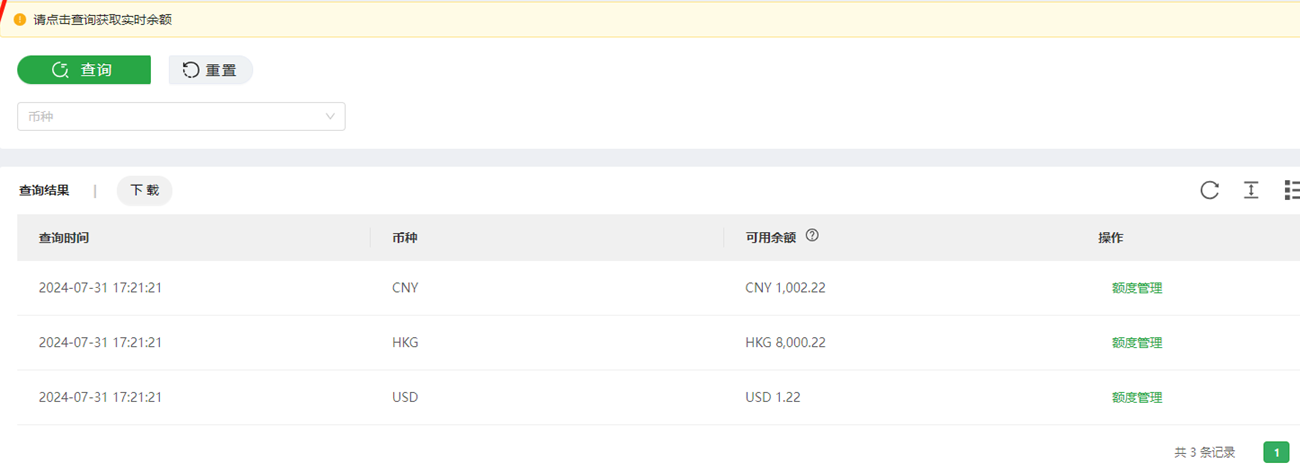
Click Limit Management under My Accounts to open the following page, where you can create a card-issuance limit.
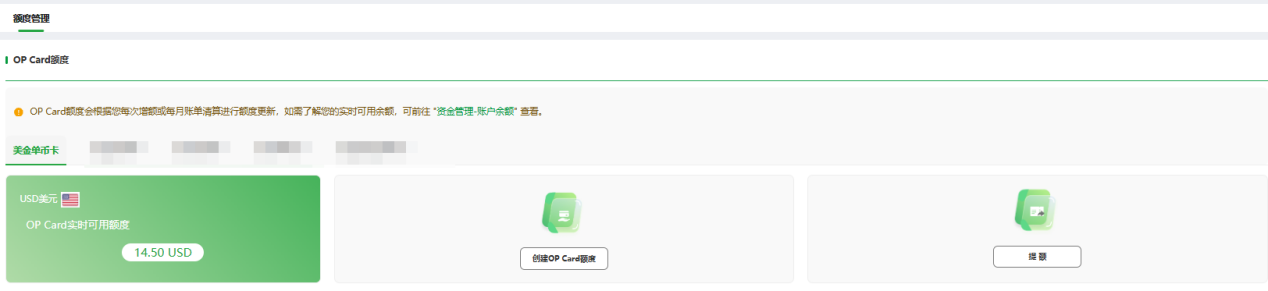
If Card Issuance Limit Management permission has not been configured, the system displays: No permission. Please contact an administrator to configure your permissions.
Click Download to download all records returned by the current search.
4.2 Account Transactions
Go to Fund Management > Account Transactions to retrieve incoming and outgoing account transactions. You can filter the records by transaction type and the first six and last four digits of the card number.

The search results are displayed as follows.

Click Download to download all records returned by the current search.
4.3 Balance Alerts
You can configure balance alerts in this section.
Go to Fund Management > Balance Alerts and click Add to open the balance-alert settings page.
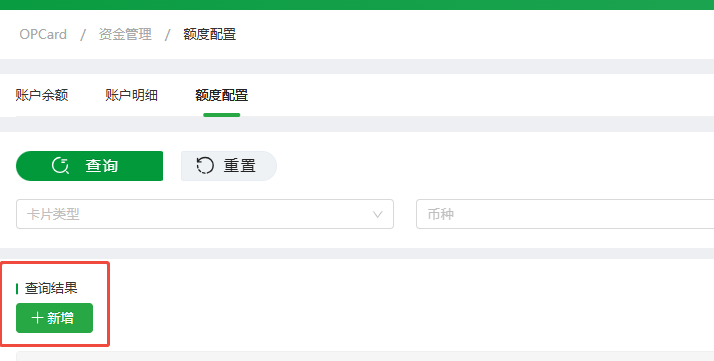
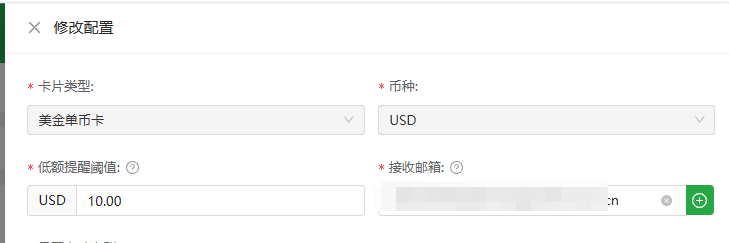
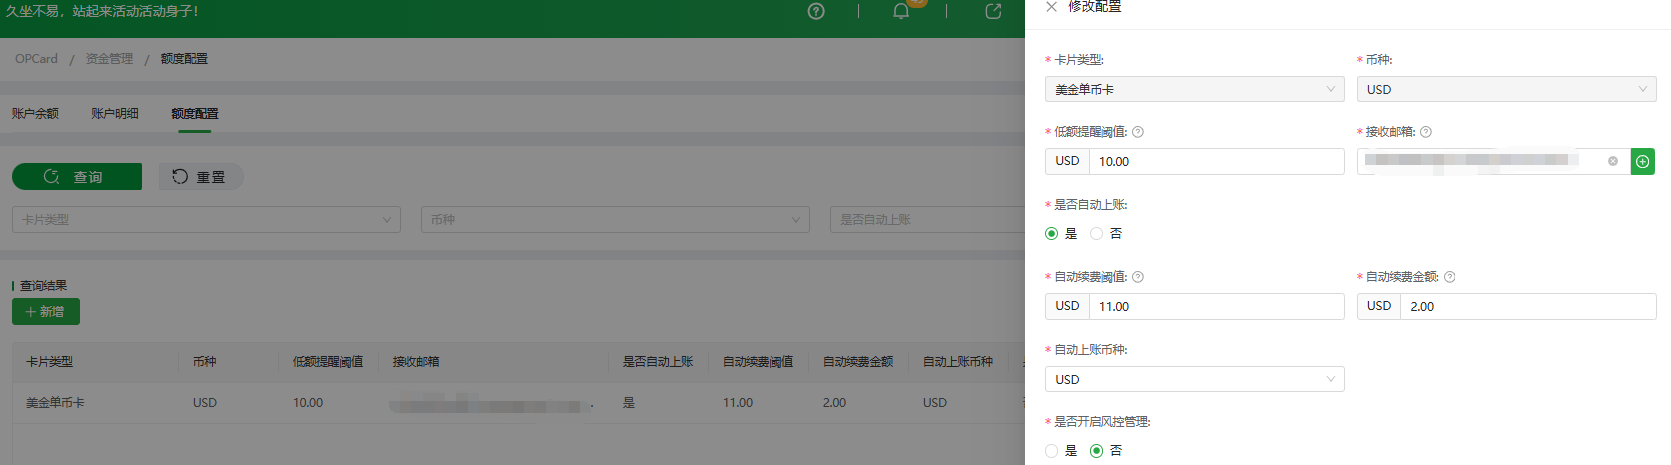
You can set different balance-alert thresholds for different accounts. Up to three low-balance notification email addresses can be configured. After adding the email addresses, save the changes. When the corresponding currency balance falls below the configured threshold, a balance-alert email is triggered.
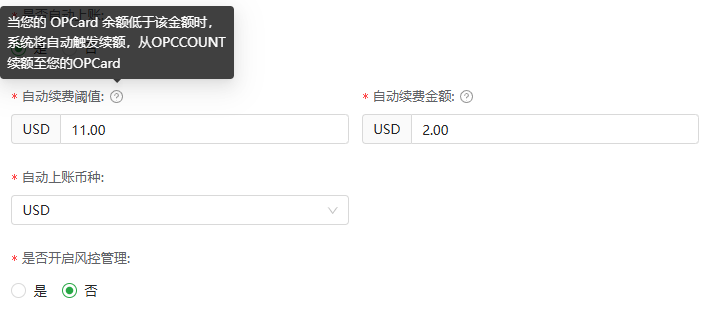
Automatic account crediting: The default setting is No. Select Yes to enable automatic account crediting, then set the automatic top-up threshold and amount. When the OP Card account balance falls below the threshold, funds are automatically credited from the OPCCOUNT balance. The credited amount is the configured automatic top-up amount.

To configure multiple records, copy an existing record. To cancel a setting, delete the corresponding record.
5. Transaction Search
5.1 Transaction Details
Go to Transaction Search > Transaction Details. By default, transaction details from the most recent seven days are displayed. You can search for a specific card's transactions by card name, card batch number, or card number.
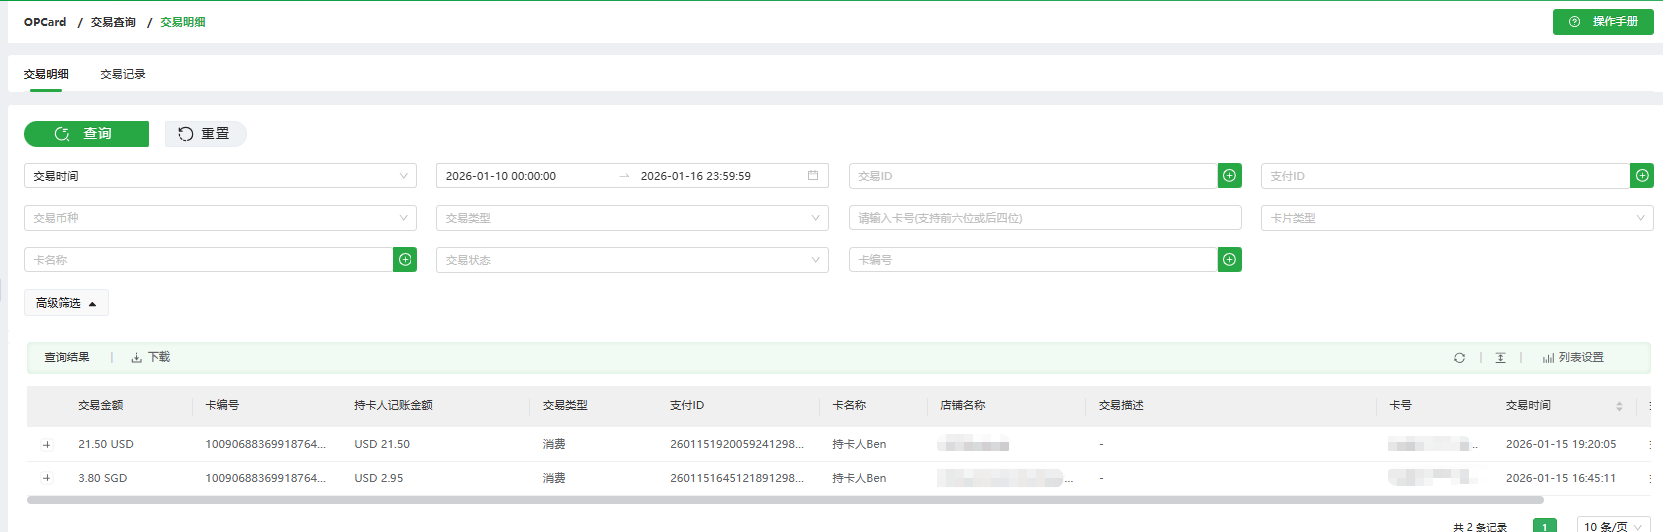
- Click Download to download all transaction records returned by the current search.
5.2 Real-Time Transactions
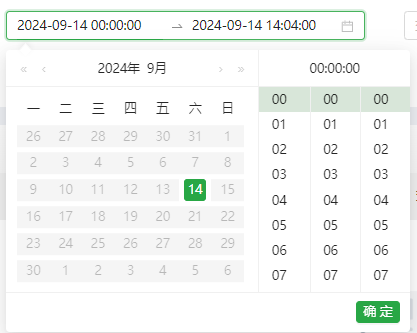
Go to Transaction Search > Transaction Records. You can filter the real-time transactions for the current day using different criteria. The default time range is from 00:00:00 on the current day to the latest available time.
Click Advanced Filters on the left to show more filtering options.

The time filter only supports real-time transaction records for the current day.
The search results are displayed as follows.

Click Details to open a page containing the detailed fields for the transaction.
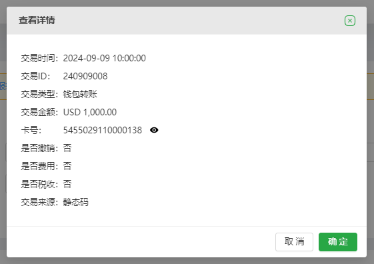
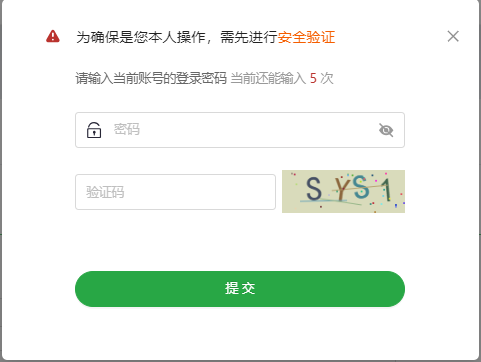
On the details page, the card number is initially masked, for example, 540560******1234. Click the eye icon next to the card number and complete the required verification to display the full card number.
- Click Download to download all transaction records returned by the current search.
5.3 Card Transactions
Go to Transaction Search > Card Transactions. All transaction records are displayed by default. You can search for a specific card's transaction details by card name, card batch number, or card number.
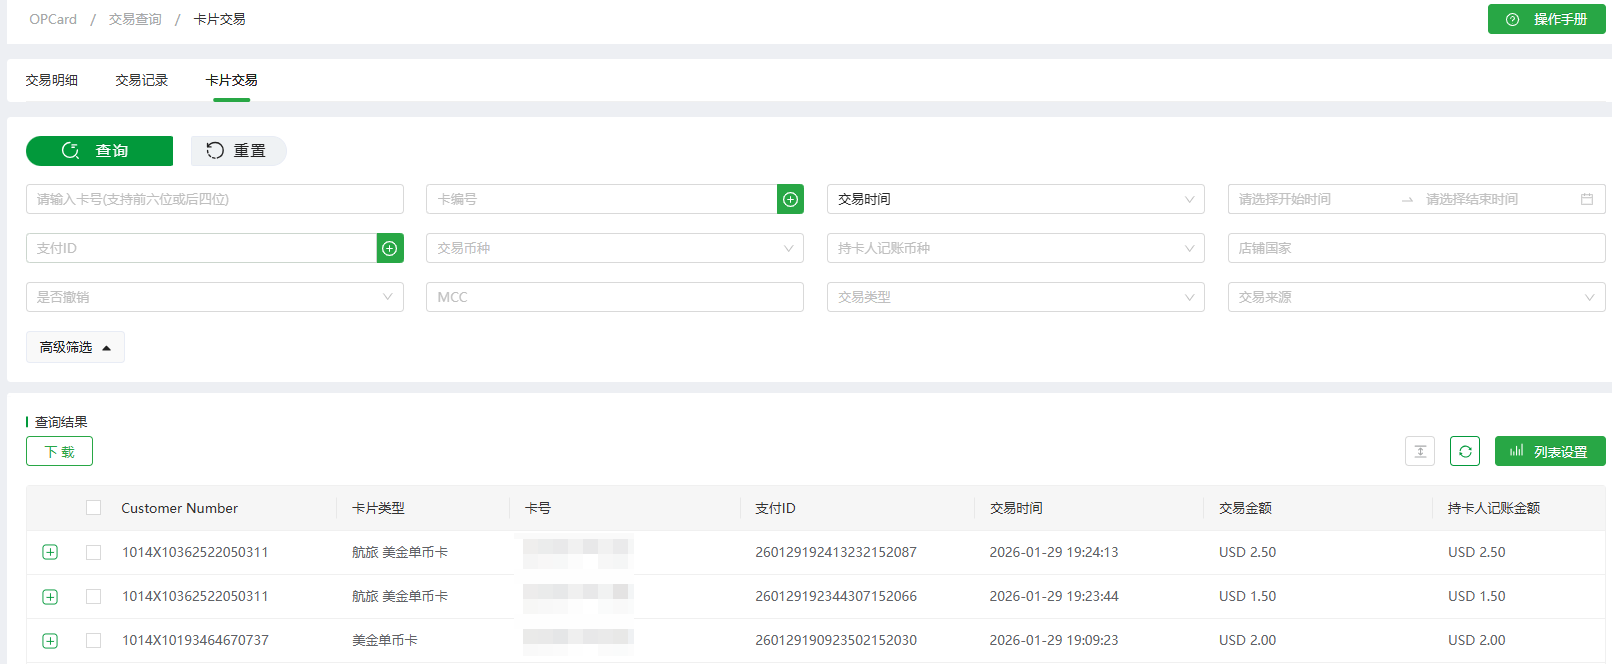
- Click Download to download all transaction records returned by the current search.

In the exported spreadsheet, the transaction status Authorization Pending means that the transaction amount has been frozen and is awaiting clearing. The amount has already been deducted from the OP Card account.
6. Report Management
In this module, you can view monthly statements, transaction reports, rebate statements, and fund reports.
6.1 Monthly Statements
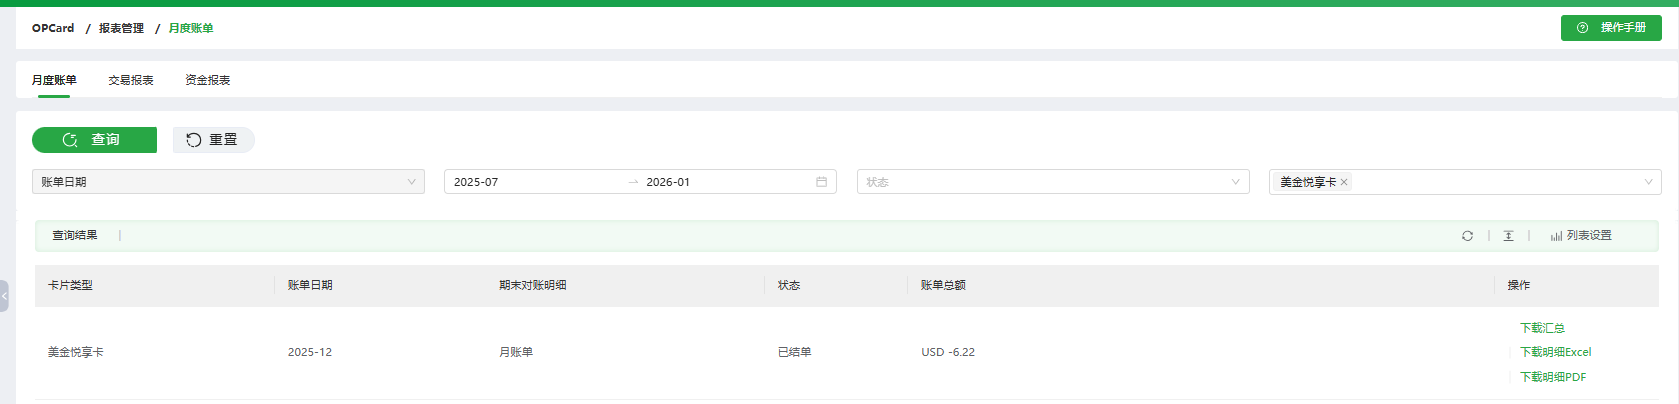
Go to Report Management > Monthly Statements to view monthly statements for each card type. The statement for the previous month is generated automatically on the first day of each month.
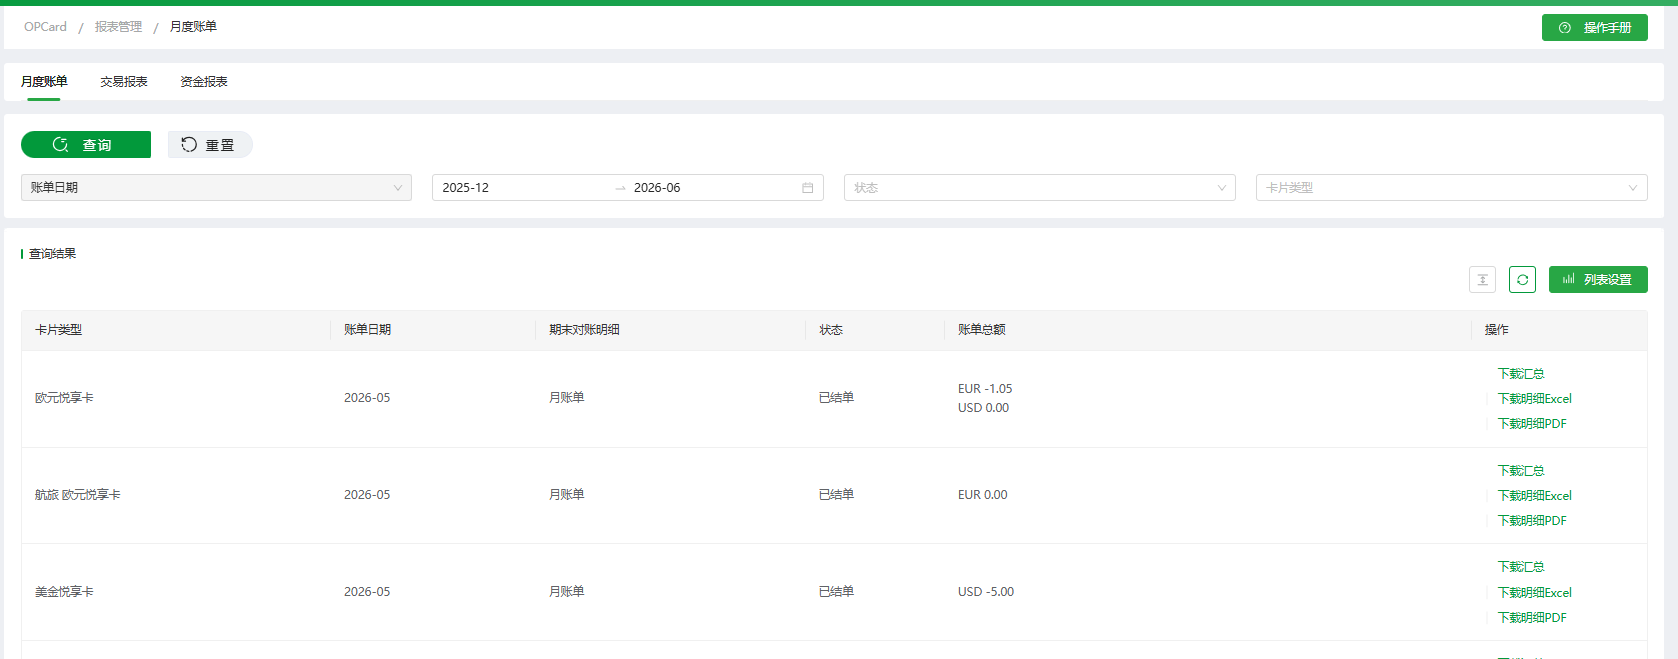
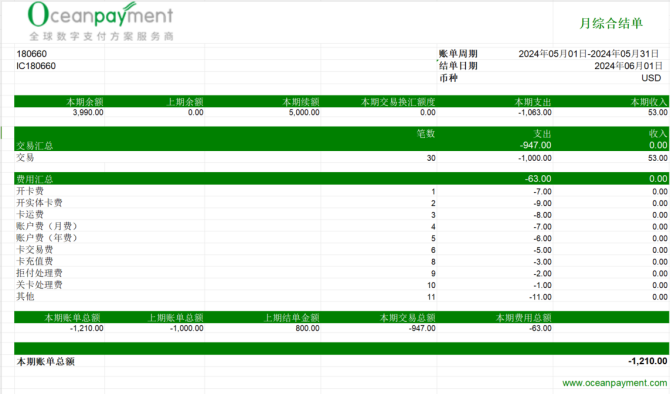
Click Download Summary to download a report showing the opening balance, closing balance, and fund movements for each month.
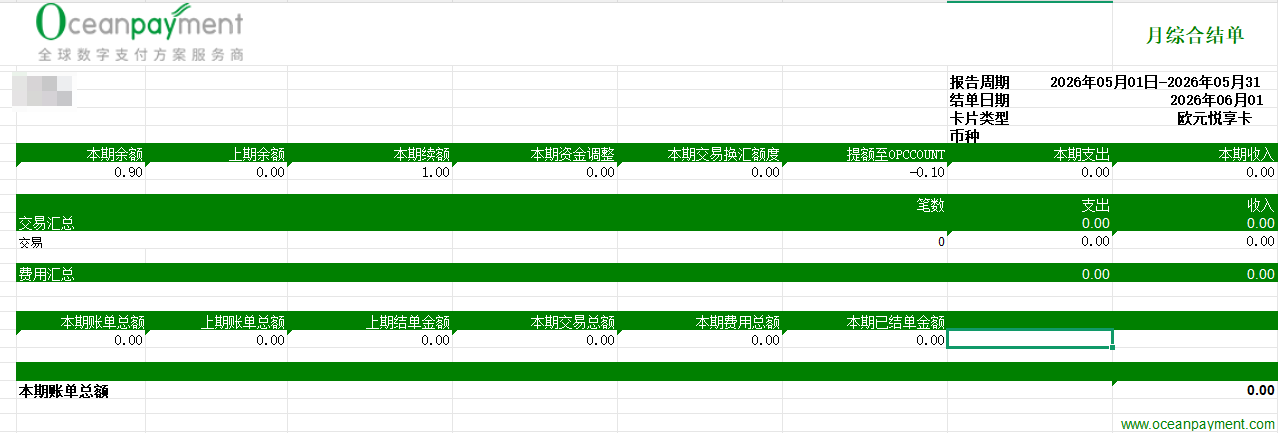
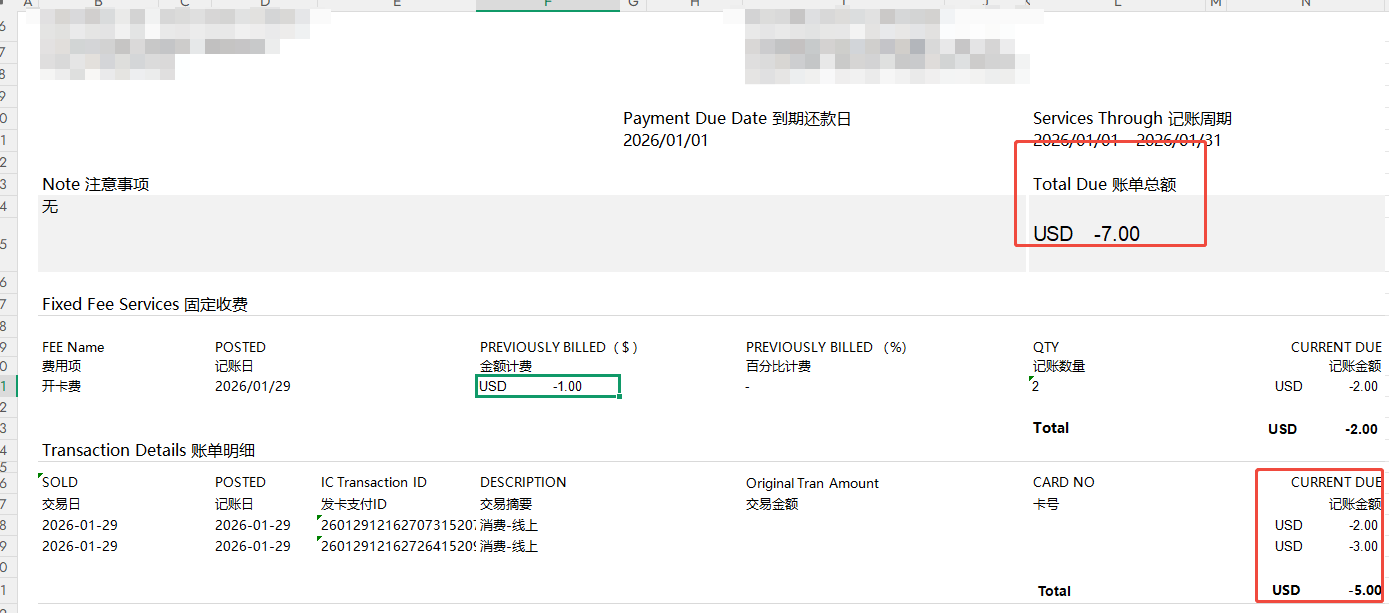
Click Download Details - Excel or Download Details - PDF to download the fund-movement details for the month. These include fixed charges, such as card issuance fees and account-opening rewards, and account transaction details.
6.2 Transaction Reports
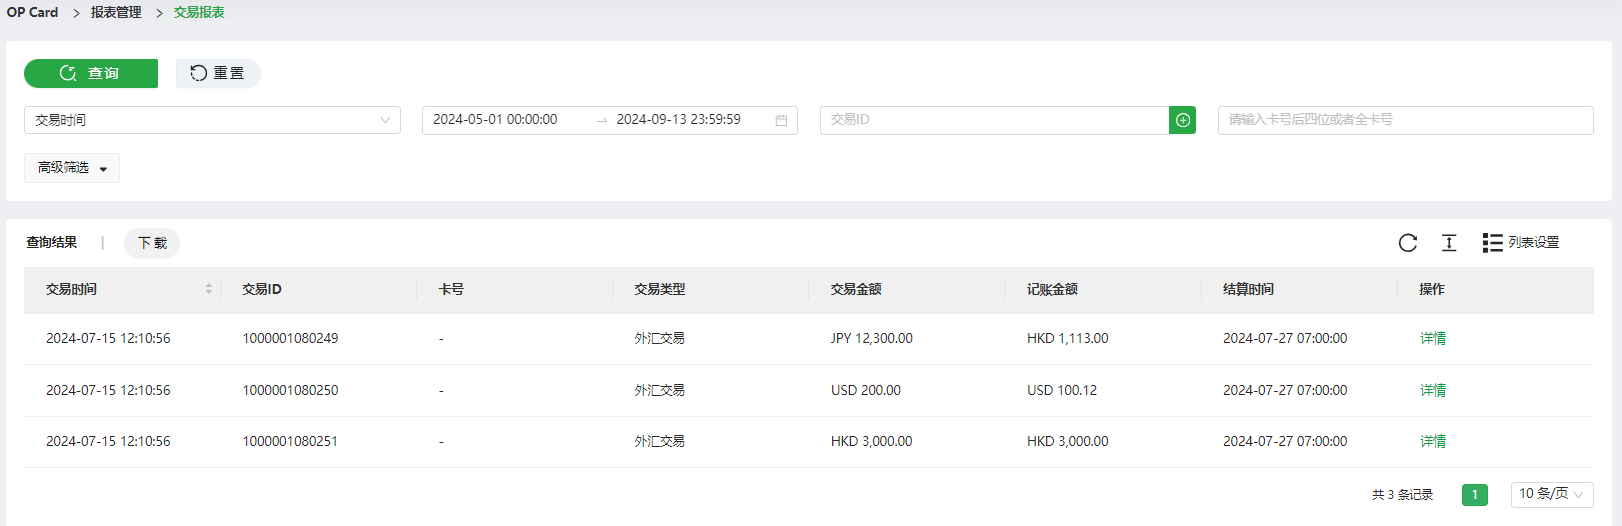
Go to Report Management > Transaction Reports. You can filter all non-real-time transaction records using different criteria. The default transaction-time range covers the most recent seven days, for example, from 2024-05-18 00:00:00 to 2024-05-24 23:59:59.
Click Advanced Filters on the left to show more filtering options.

The search results are displayed as follows.
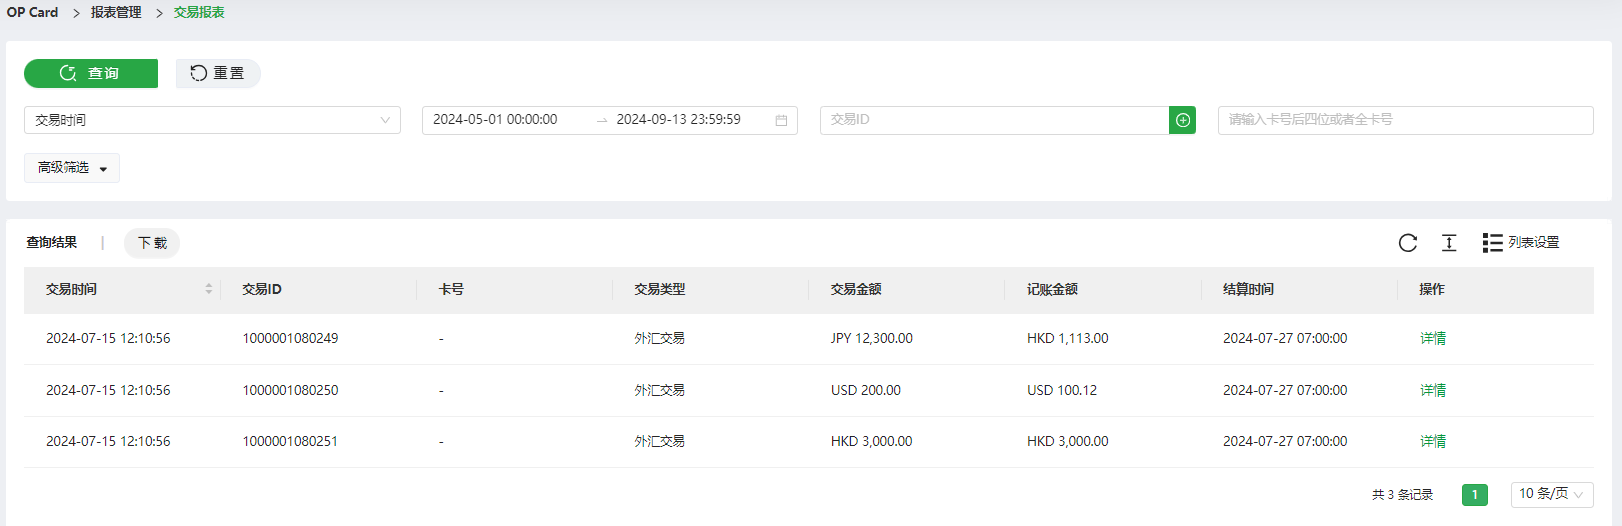
Click Details to open a page containing the detailed fields for the transaction.
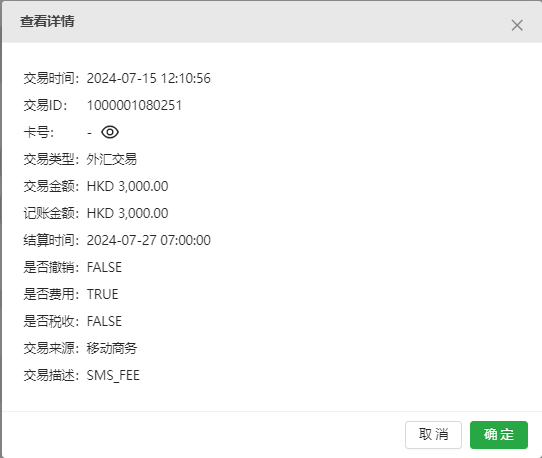
On the details page, the card number is initially masked, for example, 540560******1234. Click the eye icon next to the card number and complete the required verification to display the full card number.
Click Download to download all records returned by the current search.
6.3 Rebate Statements
Go to Report Management > Rebate Statements to view all monthly statements that meet the rebate requirements.
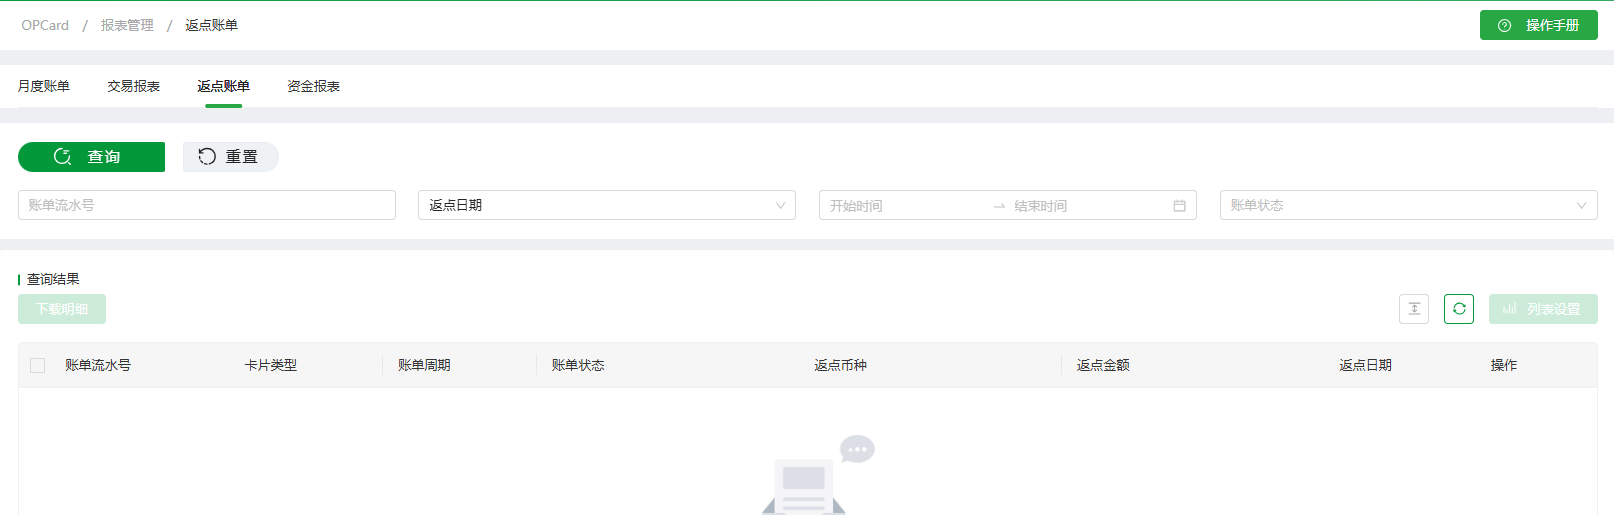
Click Download to download all orders that meet the rebate requirements for the current month.
6.4 Fund Reports
Go to Report Management > Fund Reports and filter by settlement time and status. The default range covers the most recent year of account transactions, for example, from May 2023 to May 2024. If a closed monthly statement for January 2024 falls within the selected range, it is displayed as follows.
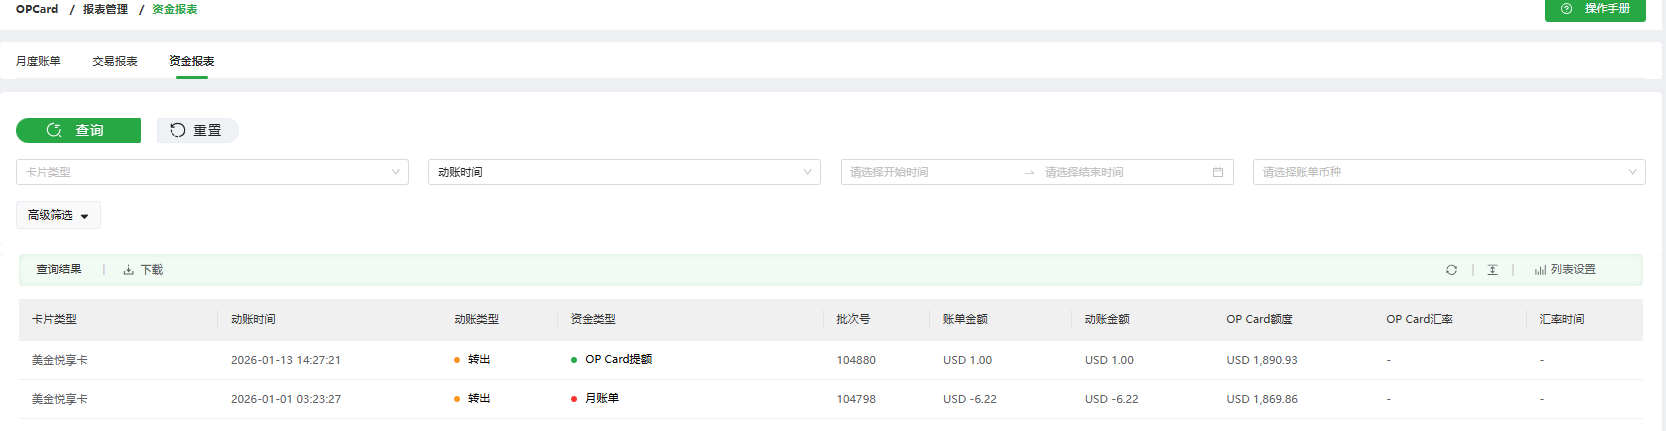
Click Excel in the Actions column to download the monthly statement as an Excel file. If multiple settlement currencies are present, each currency is shown on a separate worksheet. The previous month's statement is generally generated on the first day of the following month.
7. Message Center
In this module, you can view statement and transaction notifications and configure notification email addresses.
| Name | Description |
|---|---|
| Statement Notification | Notification that a statement has been generated. |
| Transaction Notification | Notification triggered for each transaction, including real-time transactions. |
7.1 Message Notifications
Unread badge:

The Message Center displays an unread-count badge.
Message Center unread count = transaction-notification unread count + statement-notification unread count. The maximum displayed value is 99+.
Only unread notifications from the most recent 30 days are displayed in the Message Center. Unread messages older than 30 days are automatically marked as read and are no longer displayed.
Go to Message Center > System Notifications. Filter transaction notifications by notification time and transaction type, or filter statement notifications by notification time. The default time range is the most recent month, for example, from 2024-08-20 to 2024-09-19.
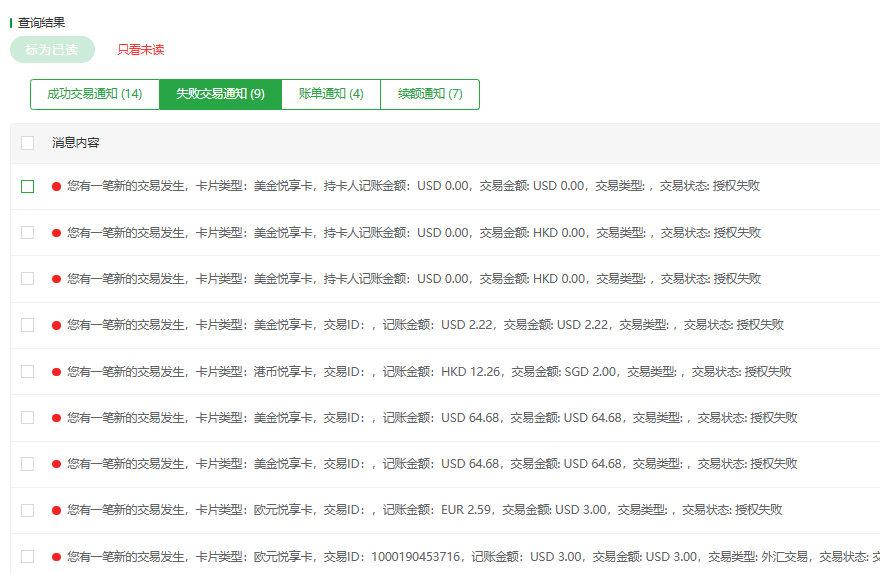
Click Mark as Read to change an unread notification (red indicator) to read (green indicator).
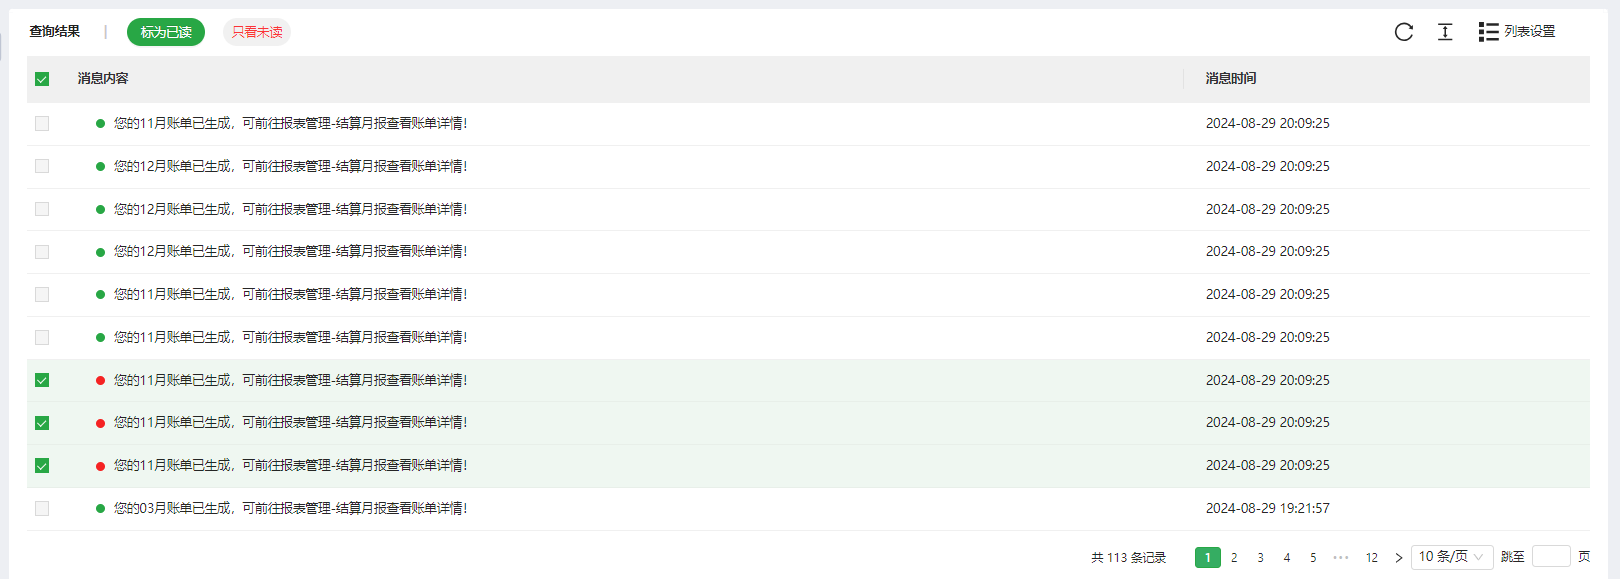
Click Unread Only to display only unread items in the list.
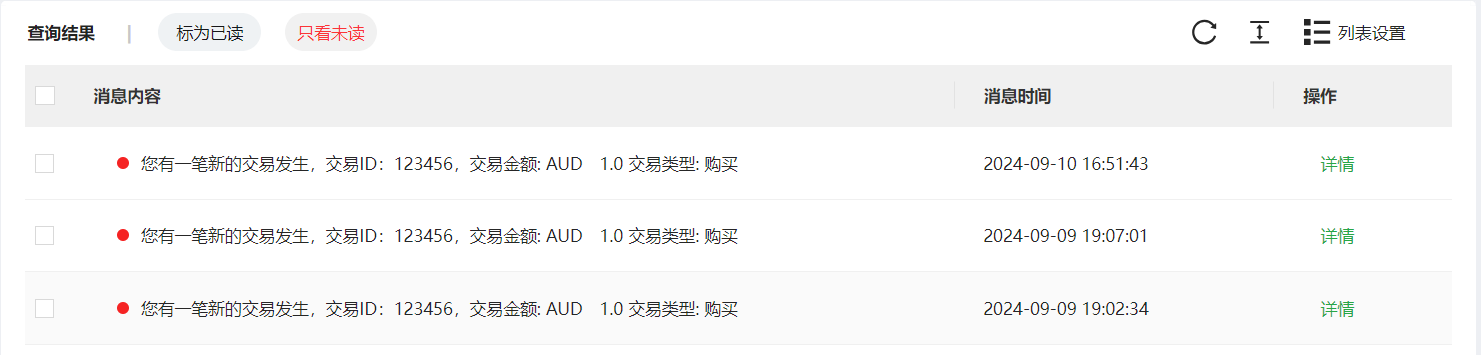
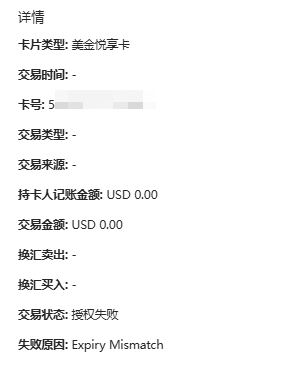
Click Details to open a page containing the transaction details.
7.2 Notification Settings
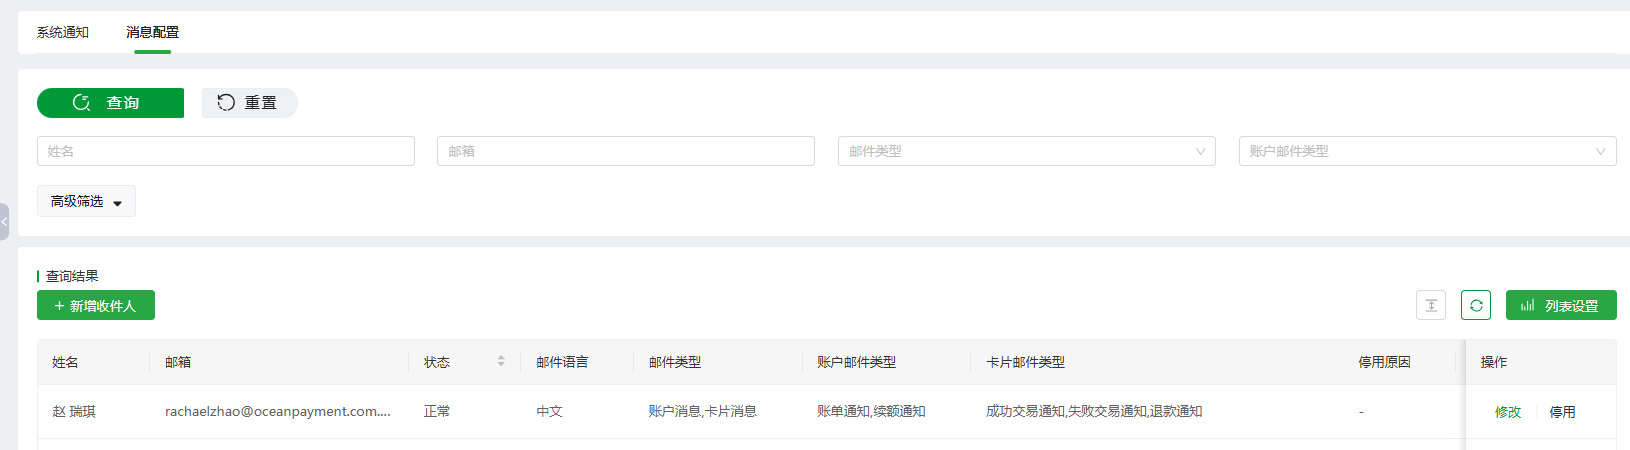
Search for the notification email addresses configured for each message category. Partial email-address matching is supported.
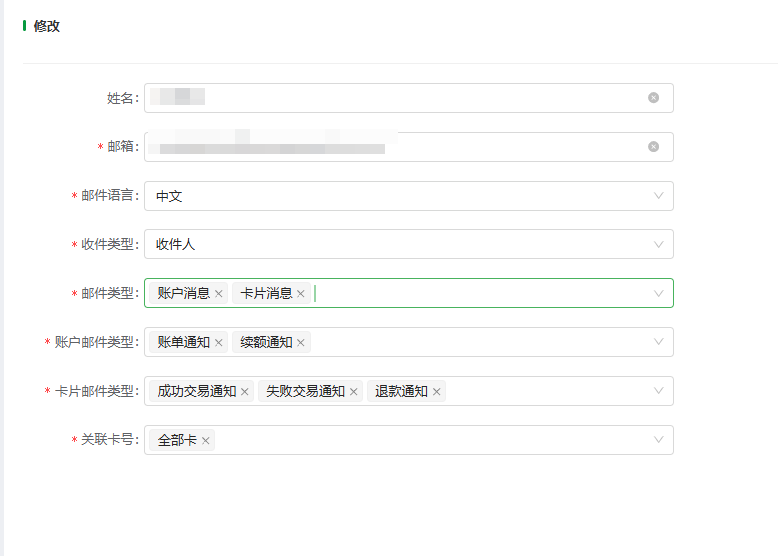
Add or edit recipients and select the card- and account-related events that trigger email notifications. For newly activated merchants, the registered email address is added by default and all notification types are enabled.
8. Customer Service
In the Customer Service module, merchants can submit chargeback requests and other dispute requests to the OP back-office system for review.
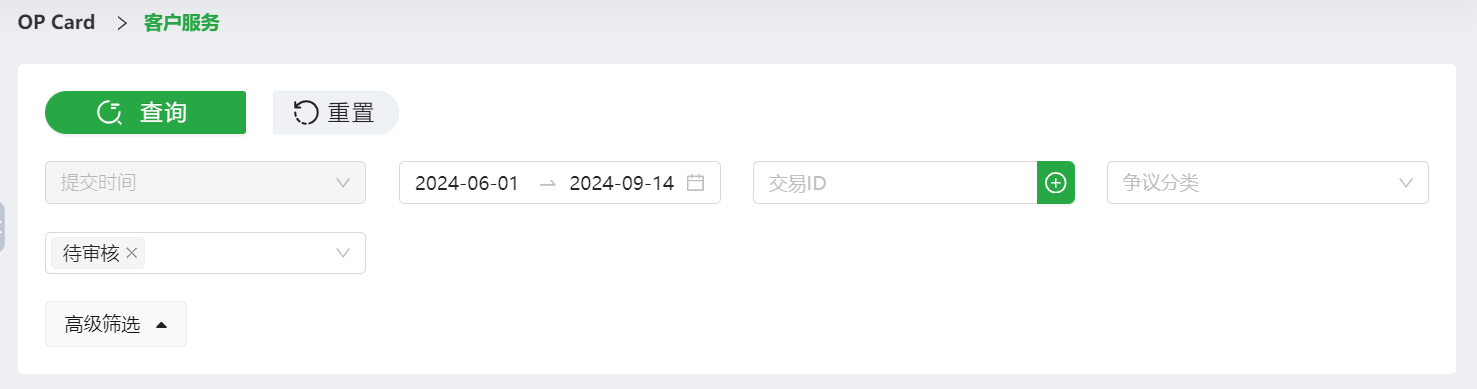
Go to Customer Service. You can filter all successful, failed, and pending requests by submission time, dispute category, transaction ID, and processing status. The default period is the most recent seven days, for example, from 2024-05-18 to 2024-05-24. More filters are shown below.
The search results are displayed as follows.
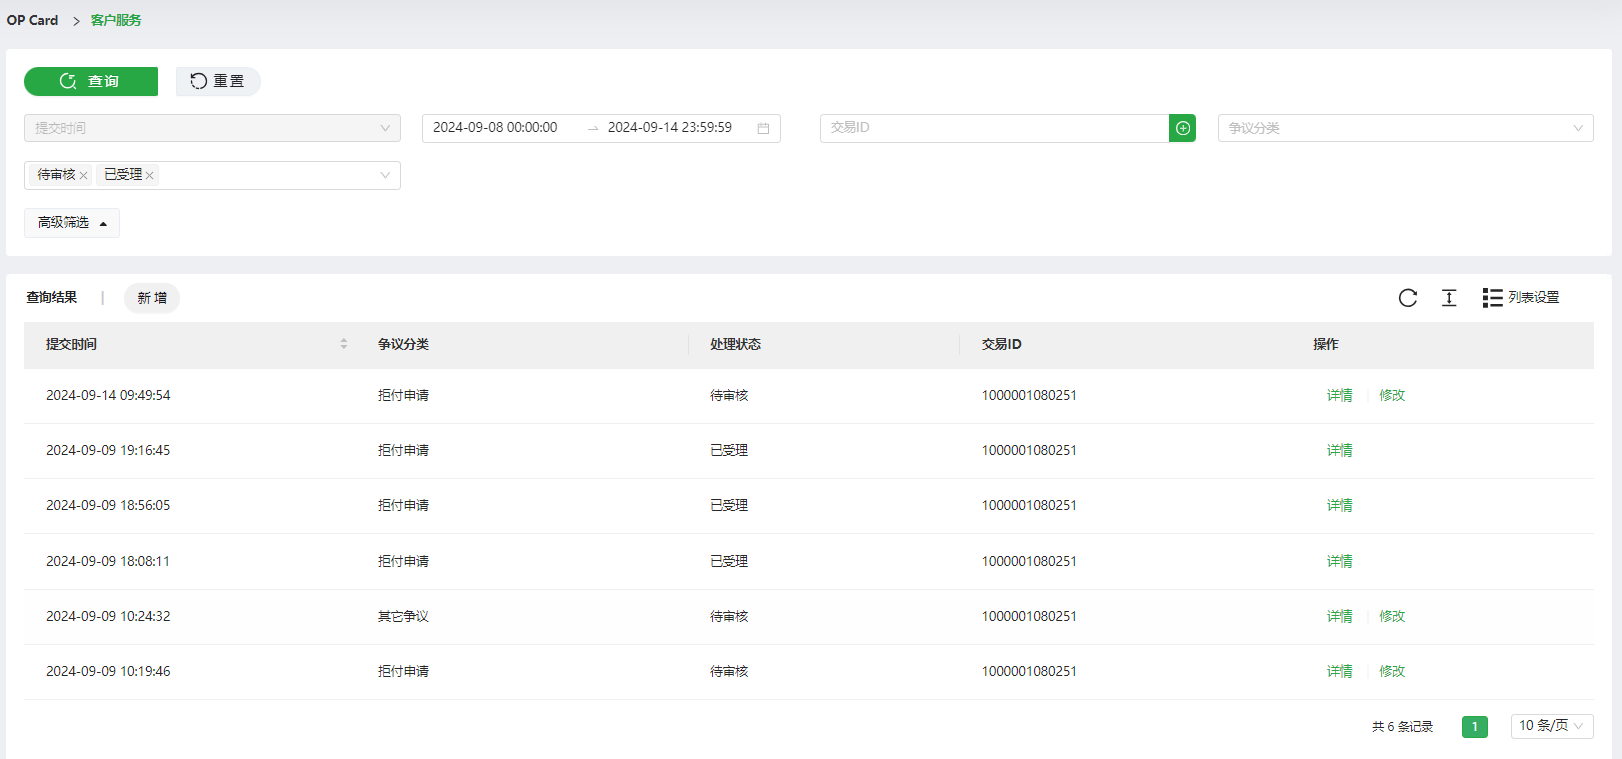
- Click Add to open a page where you can submit a chargeback request or another dispute request.
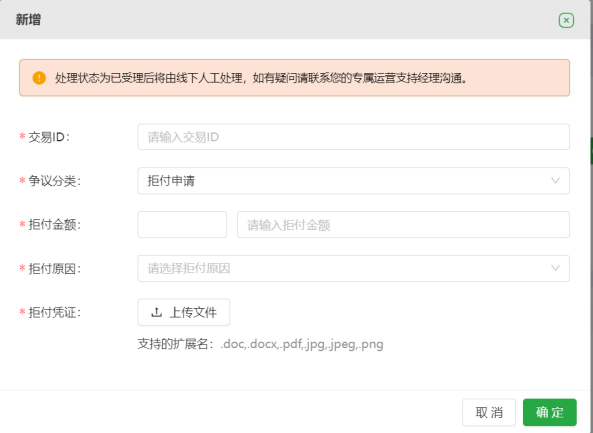
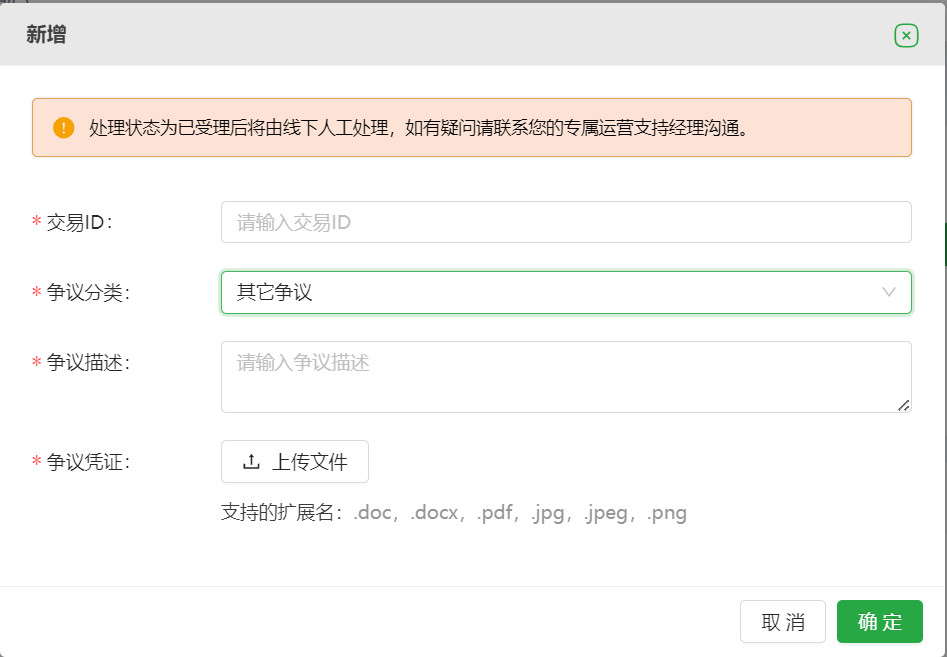
- Click Details to view the submitted chargeback or other dispute request.
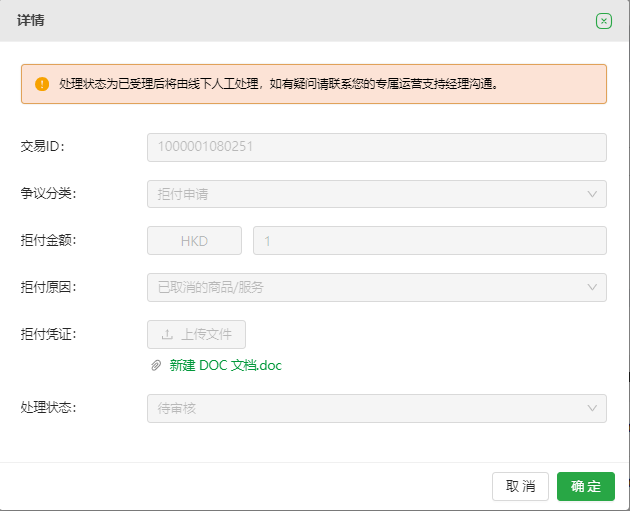
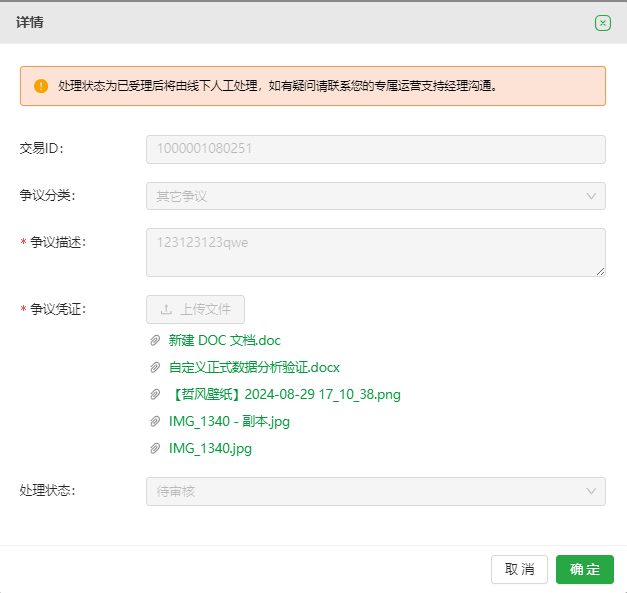
- When the processing status is Pending Review, click Edit to modify the submitted dispute request.